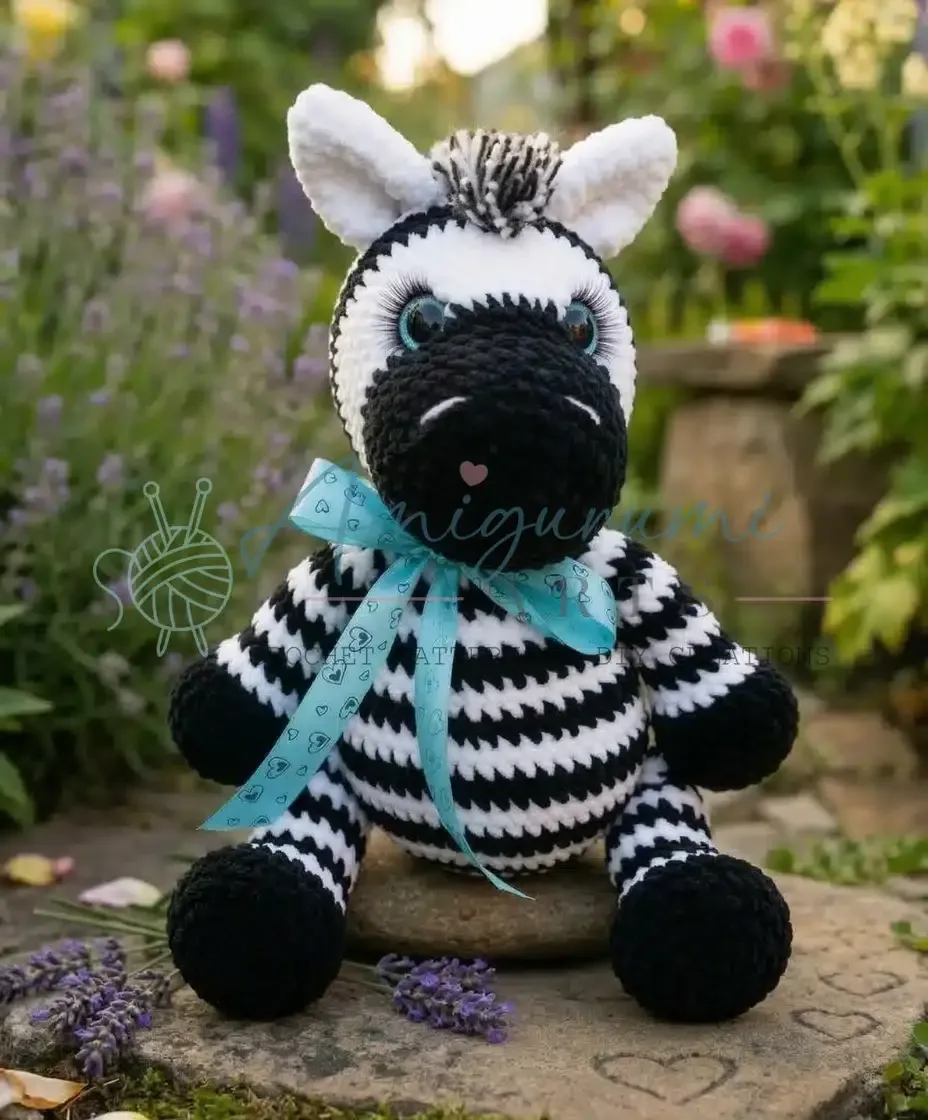
This one's for a quiet stretch of time when you want to make something that'll end up loved rather than looked at. A zebra amigurumi has that slightly goofy charm that works for a nursery shelf, a baby shower gift, or just because you've always wanted to crochet a striped animal and finally have the yarn for it.
02
Try it another way
Once you've made this zebra in black and white, there's plenty of room to play. Swap the stripe placement by starting the legs with white instead of black for a reverse-color effect, or try a gray and white combination if you want something closer to a donkey than a zebra. The 16mm safety eyes called for in the materials give a classic amigurumi expression, but going slightly smaller keeps the face gentler, which suits a nursery gift. Since the rear legs, front legs, ears, and head are all made separately before joining, you can mix and match: felt ears instead of crocheted ones, or a slightly longer mane added along the head's color-change round for extra texture. If you want a smaller toy, working the same stitch pattern in a lighter worsted-weight yarn with a 4.0mm hook will shrink the finished piece while keeping every round count the same. And if you're making more than one, varying where the black-to-white transition falls on each leg gives every zebra in the herd its own slightly different stripe pattern, just like the real thing.
The rounds, in full
Progress tracker
0 of 0 rounds
Tap a round as you finish it. This device remembers where you stopped.
Written out, round by round
Intermediate4-6 hours4.0 mmWorsted
Bring to the porch
Everything this one takes, in the order you will reach for it.
Plush Yarn (Chenille)
01YarnArt Dolce (or similar plush yarn) in White (approx. 1 skein)
02YarnArt Dolce (or similar plush yarn) in Black (approx. 1 skein)
Worsted Weight Yarn (for mane and tail)
03White yarn (any brand)
04Black yarn (any brand)
Crochet Hook
054.0mm or 5.0mm (use the size that gives you a nice, tight fabric with your chosen plush yarn)
Safety Eyes
0616mm diameter
Polyfill Stuffing
07Generous amount
Tapestry Needle
08For sewing parts together and weaving in ends
09Scissors
Thin Plastic or Cardboard Circles
10For reinforcing the hooves (optional, but recommended for stability)
Rear Legs (Make 2)
We’ll begin with black yarn for the hooves.
Round 16 sc in a MR (6)
Round 26 inc (12)
Round 3(1 sc, inc)*6 (18)
Round 4(2 sc, inc)*6 (24)
Round 5(3 sc, inc)*6 (30)
Round 630 sc in back loops only (30)
Rounds 7–830 sc (30)
Round 9(3 sc, dec)*6 (24)Now, if you’re using them, insert your plastic or cardboard circle into the bottom of the hoof for stability, and begin to stuff the hoof firmly.Change to white yarn.
Round 1024 sc in back loops only (24)Change to black yarn.
Round 11(2 sc, dec)*6 (18)Change to white yarn.
Round 1218 sc (18)Change to black yarn.
Round 13(4 sc, dec)*3 (15)Continue to alternate colors every two rounds (black, then white, then black, and so on).Begin stuffing the leg, ensuring it’s firm but not overstuffed.
Rounds 14–2115 sc (8 rounds) (15)
Round 22(3 sc, dec)*3 (12)
Round 2312 sc (12)Fold the leg flat and crochet through both sides with 6 sc to close the opening. Leave a long tail for sewing.
Your rear legs are looking wonderfully sturdy already!
Front Legs (Make 2)
Start with black yarn for the hooves.
Round 16 sc in a MR (6)
Round 26 inc (12)
Round 3(1 sc, inc)*6 (18)
Round 4(2 sc, inc)*6 (24)
Round 524 sc in back loops only (24)
Rounds 6–724 sc (24)
Round 8(2 sc, dec)*6 (18)Now, if you’re using them, insert your plastic or cardboard circle into the bottom of the hoof for stability, and begin to stuff the hoof firmly.Change to white yarn.
Round 918 sc in back loops only (18)Continue to alternate colors every two rounds (black, then white, then black, and so on).
Round 10(1 sc, dec)*6 (12)
Rounds 11–2112 sc (11 rounds) (12)Begin stuffing the leg, ensuring it’s firm but not overstuffed.
Round 22(4 sc, dec)*2 (10)
Round 2310 sc (10)Fold the leg flat and crochet through both sides with 5 sc to close the opening. Leave a long tail for sewing.
These front legs are just as neat and ready!
Ears (Make 2)
We’ll use black yarn for the ears.
Round 16 sc in a MR (6)
Round 2(2 sc, inc)*2 (8)
Round 3(3 sc, inc)*2 (10)
Round 4(4 sc, inc)*2 (12)
Round 5(5 sc, inc)*2 (14)
Round 6(6 sc, inc)*2 (16)
Round 716 sc (16)
Round 88 sc. Fold the ear flat and crochet through both sides with 4 sc to close the opening. Leave a long tail for sewing.
Two sweet little ears, ready to listen!
Head
Let’s start with black yarn for the muzzle.
Round 16 sc in a MR (6)
Round 26 inc (12)
Round 3(1 sc, inc)*6 (18)
Round 4(2 sc, inc)*6 (24)
Round 5(3 sc, inc)*6 (30)
Round 6(4 sc, inc)*6 (36)
Rounds 7–1036 sc (36)
Round 1115 sc, 6 inc, 15 sc (42)
Now is a good time to place your safety eyes! Insert them between Rnd 11 and 12, roughly centered over the increases you just made. They should be about 6-7 stitches apart. Secure the backs firmly.
Change to white yarn.
Rounds 12–1442 sc (3 rounds) (42)
Round 15(6 sc, inc)*6 (48)
Round 1648 sc (48)Change to black yarn.
Round 17(6 sc, dec)*6 (42)
Round 1842 sc (42)Change to white yarn.
Round 19(5 sc, dec)*6 (36)
Round 2036 sc (36)Change to black yarn.
Round 21(4 sc, dec)*6 (30)
Round 2230 sc (30)Begin stuffing the head firmly, shaping it nicely.Change to white yarn.
Round 23(3 sc, dec)*6 (24)
Round 24(2 sc, dec)*6 (18)Change to black yarn.
Round 25(1 sc, dec)*6 (12)
Round 266 dec (6)Finish stuffing the head until it’s lovely and firm. Cut the yarn, leaving a long tail. Thread the tail onto your tapestry needle and weave it through the front loop of each remaining stitch. Pull tight to close the opening. Weave in the yarn end.
Your zebra’s head is looking so expressive!
Body
Let’s begin the body with black yarn.
Round 16 sc in a MR (6)
Round 26 inc (12)
Round 312 inc (24)Change to white yarn.Continue to alternate colors every two rounds (black, then white, then black, and so on).
Round 4(1 sc, inc)*12 (36)
Round 5(5 sc, inc)*6 (42)
Round 6(6 sc, inc)*6 (48)
Rounds 7–848 sc (48)
Round 948 sc (48)
Rounds 10–1248 sc (48)
Round 13(6 sc, dec)*6 (42)
Round 1442 sc (42)
Round 15(5 sc, dec)*6 (36)
Rounds 16–1736 sc (36)Start stuffing the body firmly, shaping it as you go.
Round 18(4 sc, dec)*6 (30)
Rounds 19–2030 sc (30)
Round 21(3 sc, dec)*6 (24)
Rounds 22–2324 sc (24)
Round 2424 sc (24)
Round 25(2 sc, dec)*6 (18)
Round 2618 sc (18)Finish stuffing the body until it’s firm and holds its shape beautifully. Cut the yarn, leaving a very long tail for sewing the head to the body.
Your zebra’s body is plump and ready for assembly!
Putting it together
Step 1
Now for the magical part, where all our pieces come together to form our charming zebra!
Step 2
Attach the Head: Using the long yarn tail from the body, carefully center the head on top of the body. Stitch it securely all the way around, making sure it sits straight and firm. Take your time to make small, neat stitches that disappear into the plush yarn.
Step 3
Attach the Ears: Position the ears on top of the head, slightly to the sides and a few rounds back from the color change where the black meets white. Use the tails from the ears to sew them firmly in place.
Step 4
Attach the Rear Legs: Pin the two rear legs to the bottom/sides of the body, making sure they are evenly spaced and your zebra will stand nicely. Use the long tails to sew them on securely.
Step 5
Attach the Front Legs: Pin the two front legs to the lower front of the body, again ensuring they are evenly spaced. Stitch them firmly in place.
Step 6
Embroider Facial Details: With black worsted weight yarn and your tapestry needle, embroider two small lines for the nostrils on the black muzzle. You can also add some small eyebrow arches above the eyes for a touch of expression.
Step 7
Create the Mane: Cut several 30cm (approx. 12-inch) strips of both white and black worsted weight yarn. Decide on the pattern for your mane – you could alternate colors or create sections. Using your hook, insert it into a stitch along the top of the head, from the forehead back towards the neck. Loop 2-3 strips of yarn through the stitch, pull through a loop, and then pull the yarn ends through that loop to create a small knot. Repeat this process, placing these yarn tufts close together, creating a beautiful, full mane down the back of the head and neck. Trim the mane to your desired length and style.
Step 8
Create the Tail: Cut several 30cm (approx. 12-inch) strips of both white and black worsted weight yarn (the more strips, the thicker your tail will be). Find a central stitch at the very back of your zebra’s body. Using your hook, thread all the yarn strips through this stitch. Now, braid these strips together firmly to create a lovely striped tail. You can secure the end of the braid with a small knot or a tiny piece of yarn.
Marlene's notes
💡Note 01
Use whichever hook size, 4.0mm or 5.0mm, gives you the tightest fabric your plush yarn allows, since a loose gauge is the main way stuffing shows through on amigurumi this size.
💡Note 02
Stuff as you go rather than leaving it all for the end, packing a generous amount firmly enough that the piece holds its shape once the head and legs are attached to the body.
💡Note 03
When changing colors, make the last yarn over of the previous stitch with the new color so the transition between black and white stays smooth and clean.
💡Note 04
This pattern is written in US crochet terminology.
Before you sit down
Check you've got both skeins of YarnArt Dolce (or your chosen plush substitute) in white and black, plus the separate white and black yarn for smaller details — running short mid-piece on a tonal yarn is hard to match later.
Have a stitch marker ready and keep it moving, since most of this pattern works in continuous spirals without any slip-stitch joins to mark your round for you.
Work a small swatch with your 4.0mm or 5.0mm hook first and check the fabric is tight enough that stuffing won't peek through between stitches.
Read through Rnd 1 of the Rear Legs before you pick up your hook, since starting with black yarn for the hooves sets the pattern for how the leg color changes will work throughout.
How the hours go
Rear legs and front legs
about 2 hours because each leg runs 23 rounds and there are four of them total, plus a color change to track in each
Head
about 1.5 hours because the head is the longest single piece at 26 rounds, with the muzzle color change adding extra care early
Ears and assembly
about 1 hour because the ears are quick at 8 rounds each, but centering and stitching the head to the body takes patience to get it sitting straight
Looking after it
Hand wash the finished zebra in cool water with a gentle detergent, since the plush texture of yarn like YarnArt Dolce can mat or pill if machine washed or scrubbed too hard.
Reshape the stuffed body and legs while damp and let the toy air dry flat, away from direct heat, so the stripes and stuffing keep their firm, even shape once stored on a shelf.
Can I use a different plush yarn instead of YarnArt Dolce?
Yes, any similar plush yarn in white and black will work, as the pattern is written around stitch and round counts rather than a specific brand. Just check your chosen yarn gives you a tight fabric with the 4.0mm or 5.0mm hook so stuffing doesn't show through.
How long does this zebra amigurumi actually take to make?
Between the rear legs, front legs, ears, head, body, and assembly, plan on roughly 4 to 6 hours total, though that depends on your stitching speed and how many sittings you break it into. The head alone runs 26 rounds, so it's worth setting aside a solid chunk of time for that piece.
What size safety eyes does this pattern use?
The materials call for 16mm diameter safety eyes, which give the zebra a clear, friendly expression. If you'd prefer a softer look for a very young child, a slightly smaller size would still work with the same head shaping.
Do I need to join each round with a slip stitch?
No, most of this pattern works in continuous spirals, so a stitch marker placed in the first stitch of each round and moved up as you go is essential for keeping track of where you are. Without it, it's easy to lose your place, especially during the longer 26-round head.
How do I keep the head sitting straight when I attach it to the body?
Use the long yarn tail left from the body to center the head carefully before you start stitching, checking it from a few angles as you go. Take your time with small, neat stitches around the whole join so the head sits firm and doesn't lean to one side once stuffed.
🧵
Sunday evening, from the glider —
The porch letter
A pattern and a note from the glider, most weeks.
🧵
Every round ticked off.
That was the last round. Would you like the letter when the next one goes up?