Intermediate 1-2 hours Lightweight Cotton yarn

Worked on the glider, counted out loud —

Little sprout earphone charm crochet pattern

A tiny two-leaf sprout charm for headphones, great for beginners with some shaping experience. About 1-2 hours.

Jump to the rounds

What this one is

This little sprout is made for you if you've got a quiet stretch of time and a soft spot for things that look like they grew rather than got sewn. It's the kind of small make you tuck into a pocket to give later, or clip onto your own headphones so they're easier to spot in a bag. Anyone who likes tiny, finished-looking projects will enjoy this one.

Your hands spend most of the time shaping two matching leaves, working short rows with increases that round out the center, then a slim chained stem that gets reinforced with slip stitches so it holds its bend. Between the two leaves and the stem, you're looking at about an hour of actual stitching, plus a few quiet minutes of assembly and weaving in ends.

Try it another way

The easiest change is color: work both leaves in the same green for a realistic look, or use two different greens so the sprout reads as slightly variegated, the way real new growth often does. If you want a playful rather than botanical feel, swap the green for pastels or a bright palette entirely — the shaping stays identical either way. For scale, the pattern already gives you the lever you need: a thicker yarn and a larger hook will grow the sprout into a bigger charm or even a small bag decoration, while finer yarn and a shorter starting chain shrink it down into a tiny, delicate charm. You can also play with proportion by making one leaf slightly larger than the other, which gives a more asymmetrical, naturalistic sprout. Since the stem is just a reinforced chain, you control its length freely — make it longer if you want to wrap it around a thicker headphone band, or shorter for a cord or a zipper pull. If you're making several at once as gifts, batching all the leaves first and then all the stems keeps the row-counting straightforward and lets you settle into a rhythm.

There's something satisfying about a project this small actually behaving like a plant. The leaf shaping does real work here: those paired increases in row two push the stitch count from nine up to eleven, and you can feel the fabric curve outward as you work them, which is exactly what gives the leaf its rounded, pointed outline instead of a flat rectangle. Turning after every row keeps a clean front and back surface, so the texture reads the same whichever way the charm sits once it's attached. The stem is its own small pleasure — a plain chain made sturdy with a row of slip stitches, so it goes from floppy to pliable and actually wraps around a cord instead of just dangling. For something you can finish in an evening, it packs in a nice range of techniques.
The rounds, in full

Written out, round by round

Intermediate1-2 hours2.25 mmLightweight Cotton

Bring to the porch

Everything this one takes, in the order you will reach for it.

  • Small amount of lightweight cotton yarn in green or desired color, approximately 15 yards (14 meters)
  • 2.25 mm crochet hook (US B-1)
  • Yarn needle
  • Small scissors
  • Stitch marker for keeping track of small sections if needed

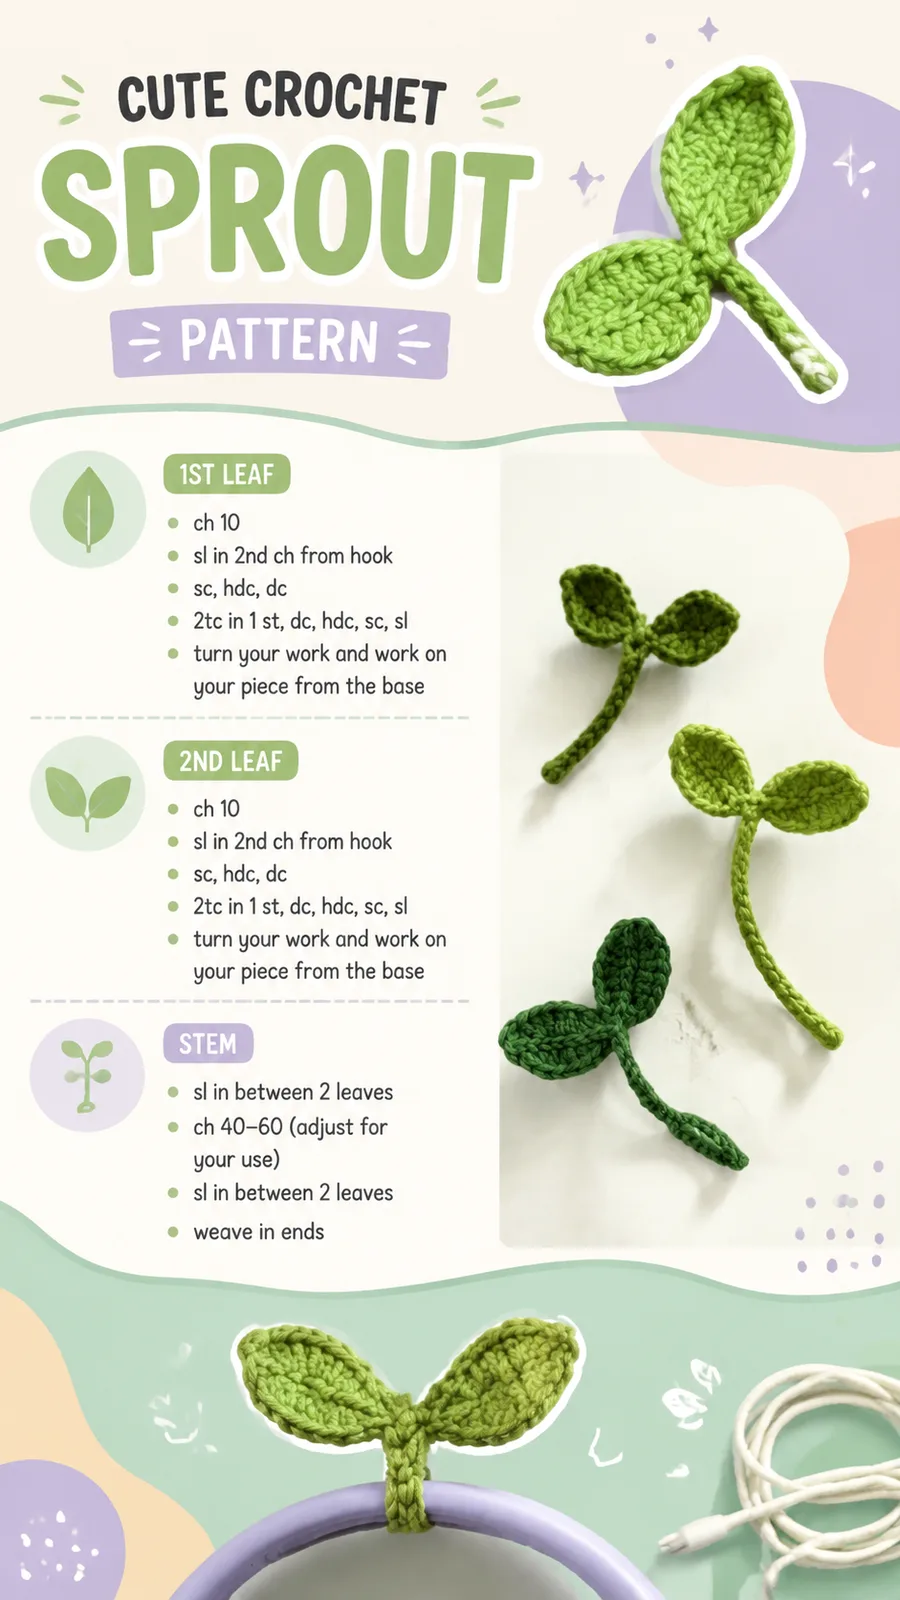
Leaf Pattern (Make 2)

Leaf shaping: Turning after each row creates a flat leaf motif with a natural front and back surface. The leaves are worked in turned rows rather than continuous rounds, using a mix of single crochet, half double crochet, and double crochet to build the textured, gently shaped surface.

  1. Row 1Ch 10. Sl st in 2nd ch from hook. Sc in next ch, hdc in next ch, dc in next 2 ch, hdc in next ch, sc in next ch, sl st in last ch. Turn. (9 sts)Leaf increase: Work multiple stitches into the same stitch to create a wider curved section. The center increases below work two stitches into the same two stitches, which gives the leaf its wider middle section before the next row's stitch pattern tapers it back toward a point.
  2. Row 2Sl st in first st, sc in next st, hdc in next st, 2 dc in next st, 2 dc in next st, hdc in next st, sc in next st, sl st in last st. Turn. (11 sts)
  3. Row 3Sl st in first st, sc in next st, hdc in next st, dc in next 3 sts, hdc in next st, sc in next st, sl st in last st. (11 sts)FO and weave in the yarn ends. Make a second leaf using the same instructions.

Stem Pattern

  1. Foundation ChainCh 45 for a standard headphone wrap length. For larger bands or longer hanging decorations, increase to ch 55 or ch 60.
  2. Row 1Sl st in each chain across. FO, leaving a long tail for assembly.

Putting it together

Step 1

Place the two leaves together at one end of the stem.

Step 2

Use the remaining yarn tail to sew the base of each leaf securely to the stem.

Step 3

Position the sprout where desired on the headphone band or cord.

Step 4

Wrap the stem around the item and secure the ends with small stitches.

Step 5

Weave in all remaining yarn tails neatly.

Step 6

Light blocking can help the leaves maintain a smooth shape. Gently flatten the leaves with your fingers and lightly steam or dampen them if needed. Avoid excessive moisture or heat because small cotton pieces can lose their shape when handled roughly.

Marlene's notes

Note 01

Use the 2.25 mm hook as given rather than sizing up, since a looser gauge will blur the stitch definition that gives the leaf its textured surface.

Note 02

A stitch marker is genuinely useful here for keeping track of which row you're on across the leaf's three short rows, especially if you're making both leaves back to back.

Note 03

Leave a long tail at the end of the stem chain as instructed, since that tail does double duty for weaving in and for attaching the finished piece.

Note 04

Gauge is approximately 8 single crochet stitches per inch (2.5 cm). The finished sprout measures approximately 3.5 inches x 2 inches (9 x 5 cm). This pattern uses US crochet terms, and skill level is easy beginner.

Note 05

Green shades create a realistic sprout appearance, but bright colors, pastel combinations, or seasonal palettes can completely change the style.

Note 06

When making tiny crochet accessories, consistent tension matters more than speed. A slightly tighter stitch will help the leaves hold their shape and look polished.

Note 07

Small accessories should always be securely attached when used near children. For baby-safe versions, avoid loose decorations and replace any detachable details with securely embroidered features.

Before you sit down

  • Check that your cotton yarn is lightweight enough to keep the leaves from looking bulky once both are stitched and joined.
  • Have your 2.25 mm (US B-1) hook ready along with a yarn needle for the long tail left on the stem.
  • Read through row 2 of the leaf before you start it, since the increases happen into the same stitch twice in a row and are easy to miss if you're moving fast.
  • Decide now whether you want both leaves in the same green or in slightly different shades, since that choice is easiest to make before you cast on.

How the hours go

First leaf (3 rows)
about 20 minutes because the increases in row 2 want a slower, careful pace
Second leaf (3 rows)
about 15 minutes because you already know the shaping by now
Stem chain and slip stitch reinforcement
about 10 minutes because it's a single pass once the chain length is set

Looking after it

  • Hand wash the finished charm gently in cool water if it needs cleaning, since cotton holds its stitch definition best without hot water or a washing machine cycle.
  • Lay it flat to dry and reshape the leaves with your fingers while damp, then store it flat or loosely in a small pouch so the stem doesn't develop a permanent crease.
FAQs

Asked on the glider

the ones that come up on the glider

Can I use a different yarn weight than the lightweight cotton listed?

You can, but keep in mind the stitch counts and hook size are tuned to a lightweight cotton for clean, non-bulky results. If you go thicker, the notes already suggest sizing the hook up too, which will give you a larger charm rather than a distorted one.

Why does row 2 of the leaf have more stitches than row 1?

Row 2 works two increases into the same stitch to widen the leaf through its center, taking it from 9 stitches up to 11. That's what creates the curved, rounded middle before row 3 narrows things back down toward the point.

Do the two leaves need to be identical?

Not at all. The pattern has you make a second leaf using the same instructions, but you can use a slightly different shade of green or even a different color altogether for a two-tone sprout look.

How long does the stem end up, and can I adjust it?

The stem length follows directly from how long you chain before working the slip stitch row across it, so you're free to lengthen or shorten it depending on what you're wrapping it around. The pattern suggests ch 45 for a standard headphone wrap, or ch 55 to ch 60 for larger bands or longer hanging decorations. Just make sure it's long enough to bend comfortably around your cord or headphone band.

Is this a good project to make several of at once?

Yes, since each part is short, it's easy to batch the leaves and stems in sets once you're comfortable with the shaping. A stitch marker helps if you're tracking which row you're on across multiple pieces at a time.

Is this charm safe to use near young children?

Treat it as a decorative accessory for careful use, not a toy. Attach it securely and avoid loose or detachable elements if it will be anywhere near a baby or small child.