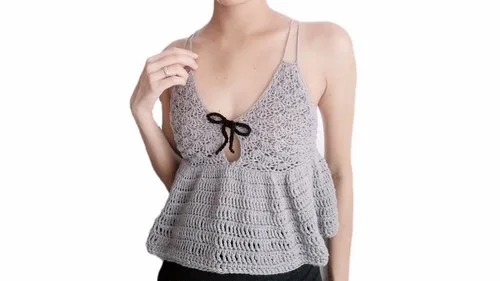
Intermediate 4-6 Hours Worsted yarn

Worked on the glider, counted out loud —

Crochet Shell Stitch Peplum Top & Dress Pattern for Summer

Learn to crochet a flirty shell stitch peplum top or dress with this detailed pattern featuring flared ruffles perfect for warm-weather wardrobes.

Jump to the rounds

Before you sit down

Chain 6 to form the starting foundation for your first row of stitches.

Work single crochet and a five-double-crochet shell into the chain to establish the pattern base.

Turn with a chain 2 and build the first full shell row using double crochet clusters into the shell's center stitch.

Continue alternating single crochet stitches with five-double-crochet shells across each new row.

Repeat this shell-and-single-crochet rhythm across rows two through four to grow the fabric's width and length.

Keep the first and last stitches of every row matching so both edges stay even and symmetrical.

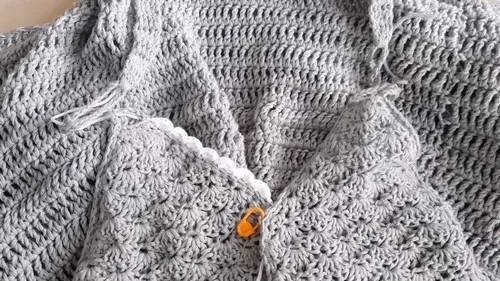
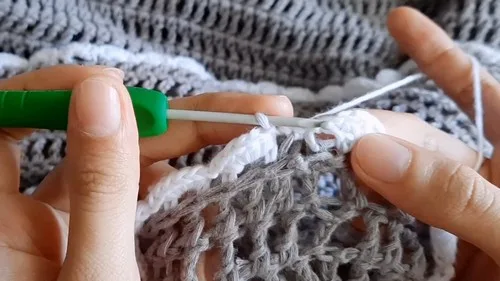
Work an edging row of single crochet across, adding a strap on each side with slip-stitched, single-crocheted chains, then finish with any embellishments before weaving in ends.

Finish off, weave in your ends, and block the shells flat to open up the scalloped texture.

What this one is

This crochet peplum top and dress pattern is all about movement and texture, built from a simple chain of 6 into a swishy, shell-stitched fabric that flares beautifully at the hem. The alternating shell and single crochet rows create a scalloped, lacy effect that feels fresh and feminine without being fussy. It's ideal for crocheters who want a wearable project that photographs beautifully and gets compliments the moment you slip it on.

The magic here lies in the shell stitch rhythm: clusters of double crochet worked into single stitches, offset row after row so the shells nest into each other like little fans. You'll want solid comfort with chain-2 turns, skipping stitches accurately, and identifying the center double crochet of each shell to keep your pattern aligned. This isn't a beginner's first project, but if you've made a few shell stitch scarves or blankets, you're ready to tackle this one over a relaxed weekend.

What emerges is a soft, textured fabric with a gorgeous scalloped edge — light enough for a top, but easily lengthened into a flowy dress silhouette. The finished piece has that airy, boho-chic drape that feels custom-made, whether you're crocheting it for your own summer closet or as a thoughtful handmade gift for a friend who loves standout, one-of-a-kind fashion pieces.
Variations

There's something so satisfying about watching a plain chain of 6 transform into these nested, fan-like shells row after row. I love how the pattern trains your eye to spot the center double crochet of each shell — once it clicks, the rhythm becomes almost meditative. The alternating single crochet and 5-double-crochet shell combo gives you that scalloped, lettuce-edge texture that looks so much more complex than it actually is to make. It's the kind of detail that makes people ask, 'wait, YOU made that?' What really sells me on this pattern is its versatility — the same repeat that builds a cropped peplum top can just as easily grow into a full dress simply by working more rows. I also appreciate that it doesn't demand fancy stitches or techniques you've never heard of; it's shell stitch, single crochet, and chains, just used thoughtfully. If you love watching texture build in real time and want a wearable that actually gets worn (not just displayed on a shelf), this project delivers every single time.

Common mistakes

  • Losing track of the center doublePlace a stitch marker directly in the middle (3rd) double crochet of every shell as you complete it, so you can find it instantly on the next row.
  • Miscounting the skipped stitchesAfter every skip, physically touch or point to each stitch you're skipping before working into the next one — this two-second habit prevents shells from drifting out of alignment.
  • Working the wrong number of doubleRemember the notes: the first and last stitches must match each other in count, so always double-check your edge stitches against the opposite side before moving to the next row.
  • Forgetting to chain 2Get in the habit of saying the turning chain count out loud as you make it — this small verbal cue prevents accidentally starting the next row too short or too tall.
  • Confusing which stitch to workLay the piece flat after each row and visually trace the shell pattern; the single crochet stitches sit as valleys between the shell 'fans,' making them easy to spot once you know what to look for.
  • Not repeating rows 2-4 enough timesMeasure your work against your body or a reference garment every few rows, and don't stop repeating until you've hit your target length exactly on a completed shell row.

The rounds, in full

Written out, round by round

Intermediate4-6 HoursWorsted

Materials

Everything this one takes, in the order you will reach for it.

  • Crochet hook (size not specified in your provided text)
  • Yarn (type and weight not specified in your provided text)
  • Stitch marker
  • Scissors

keep this to hand

Abbreviations

US crochet terms, as used in this pattern.

  1. chChain
  2. scSingle Crochet
  3. dcDouble Crochet
  4. sl stSlip Stitch
  5. st(s)Stitch(es)

Main Pattern

Starting Chain Make a slipknot, then chain 6.

  1. Row 1Single crochet into the second chain from your hook, skip one chain, work 5 double crochet into the next chain, skip one chain, one single crochet into the last chain. Chain 2 and turn your work.
  2. Row 2Work 4 double crochet into the first stitch, skip two stitches, one single crochet into the next stitch (it is the center double crochet of the shell from the previous row), skip two stitches, 4 double crochet into the last stitch. Chain 2 and turn your work.
  3. Row 3Work 2 single crochet into the first stitch, one single crochet into the next stitch, skip two stitches, 5 double crochet into the next stitch (it is the single crochet stitch of the previous row), skip two stitches, one single crochet into the next stitch, two double crochet into the last stitch. Chain 1 and turn your work.
  4. Row 4One single crochet into the first stitch, skip one stitch, 5 double crochet into the next stitch (it is the single crochet stitch of the previous row), skip two stitches, one single crochet into the next stitch (it is the center double crochet of the shell from the previous row), skip two stitches, 5 double crochet into the next stitch (the single crochet stitch of the previous row), skip one stitch, one single crochet into the last stitch. Chain 2 and turn your work.Repeating Pattern Repeat the process in rows 2 to 4 to continue the pattern. The stitches on the first and the last stitch should be the same, and in the middle stitches: alternate 5 double crochet into the single crochet stitch of the previous row and one single crochet into the center double crochet of the shell from the previous row.

Assembly

Step 1

For edging, work single crochet across, making sure to adjust for stitch height (one single crochet in the row with single crochet stitch and two single crochet in the row with a double crochet stitch).

Step 2

Create chains for straps (length as needed), then slip stitch into a corner. Work single crochet up each strap for reinforcement.

Step 3

To add mini scallops or other embellishments to the upper bust or other parts, follow the pattern for the peplum but adapt it to a smaller scale and in specific areas you want the details.

Step 4

After completing the body and details of the top, sew in any loose ends. Additional ribbons might be added for decorative purposes or to adjust fit.

Important notes

Note 01

💡 Use a hook one size larger than you'd normally choose for your yarn weight — this keeps the shell stitches open and airy rather than stiff and boxy, which is key to that flowy peplum drape.

Note 02

💡 Place a stitch marker in the center double crochet of the very first shell in each row the moment you make it, so you never lose your place while counting skips.

Note 03

💡 Choose a yarn with good stitch definition and light drape, like a cotton or cotton-blend — fuzzy or highly textured yarns will blur the delicate shell pattern.

Note 04

💡 Since the first and last stitches of each row must match in stitch count, count your edges immediately after finishing a row rather than waiting until the whole project is done.

Note 05

💡 When repeating rows 2 through 4 to grow the piece into a dress, keep a simple tally (tally marks or a row counter) since the repeat isn't always visually obvious mid-project.

Note 06

💡 Block your finished piece by lightly steaming or wet-blocking the shells flat — this opens up the scallops beautifully and gives the fabric a polished, professional drape.

More photos

FAQs

Asked on the glider

the ones that come up on the glider

Can I turn this top pattern into a full-length dress?

Yes — the notes confirm you simply repeat rows 2 through 4 to continue building the pattern until you reach your desired length. Just make sure to end on a completed row so the hem stays even and symmetrical.

What yarn weight works best for this shell stitch pattern?

A worsted weight cotton or cotton-blend yarn gives the best stitch definition and drape for the shells to really pop. Lighter DK weight yarn also works well if you want a more delicate, airy finish.

How do I know which stitch is the 'center double crochet of the shell'?

It's the middle stitch of the 5-double-crochet cluster from the previous row — placing a stitch marker there as you work each shell makes it much easier to identify on the following row. Visually, it sits at the peak of each little fan shape.

Is this pattern suitable for a beginner crocheter?

It's best suited for confident beginners or intermediate crocheters who are comfortable with turning chains, skipping stitches accurately, and following a repeating row pattern. If you've made a shell stitch scarf before, you'll pick this up quickly.

How do I keep the edges even as I work more rows?

Always double-check that your first and last stitch counts match, as noted in the pattern, since the shell decreases can cause the edges to shift the sides in or out. Counting your edge stitches after every row is the easiest way to catch mistakes early.