Intermediate 1-2 hours Worsted yarn

Worked on the glider, counted out loud —

Crochet Rose Flower: A Rolled 3D Petal Strip Pattern

A rolled crochet rose for confident beginners with basic dc skills. About 1-2 hours per bloom, worked flat then coiled.

Jump to the rounds

What this one is

You know that stretch of evening when your hands want something to do but your mind doesn't want to think too hard. This rose is for that. It's for the person who wants a bowl of handmade flowers on the table, a pin for a coat lapel, or a little something to tuck onto a gift, without committing to a whole afternoon of counting rounds.

Your hands spend most of the time making one long strip: a foundation row of double crochet, then a second row that opens up little chain-1 spaces between petals. From there, you simply roll and stitch the strip into a rose shape. Start to finish, including a green leaf if you want one, plan on about an hour or two.

Try it another way

The easiest way to change this rose is through color: work it in deep red for a classic bloom, soft pink for something gentler, or cream if you want it to read more like decor than a statement flower. Since the whole rose comes from one long strip, you can also play with scale by starting your foundation chain longer or shorter than the sample, which gives you a fuller, many-petaled rose or a smaller, tighter one. If you're making a bouquet, add the floral wire or wooden stick listed in the materials to give your rose a stem, and pair it with the optional green leaf worked from a starting chain of 10 using sc, hdc, and dc for a bit of shaping. For accessories, skip the stem entirely and use hot glue or a sewing needle to attach the rolled rose straight to a hair clip, brooch back, or headband. You could also make a handful in mixed shades from the same three colors and cluster them together in a bowl or on a wreath base for a fuller arrangement, since each rose is quick enough to repeat without it feeling like a chore.

There's something genuinely satisfying about watching a flat strip become a flower with nothing more than your own hands doing the rolling. The petal-space row is the clever part: skip a stitch, work a dc-chain1-dc shell into the next one, and repeat, so the strip naturally ruffles along one edge before you ever touch the coil. You get to watch structure emerge from a simple stitch pattern, which is a different kind of pleasure than following someone else's shaping. And because the whole rose grows from one continuous strip, there's no seaming multiple pieces together, no fussing with symmetry, just a foundation row, a petal row, and then the fun of coiling it into something that looks far more complicated than it was to make.

The rounds, in full

Written out, round by round

Intermediate1-2 hours3.0 mmWorsted

Bring to the porch

Everything this one takes, in the order you will reach for it.

DK yarn

  • 3.0 mm to 4.0 mm hook

Worsted yarn

  • 4.0 mm to 5.0 mm hook

Crochet thread

  • 1.5 mm to 2.0 mm hook
  • Cotton or acrylic yarn in your rose color
  • Green yarn for leaves, optional
  • Crochet hook suitable for your yarn
  • Yarn needle
  • Scissors
  • Stitch marker, optional
  • Hot glue or sewing needle if attaching to accessories
  • Floral wire or wooden stick if making a bouquet stem

Main Pattern

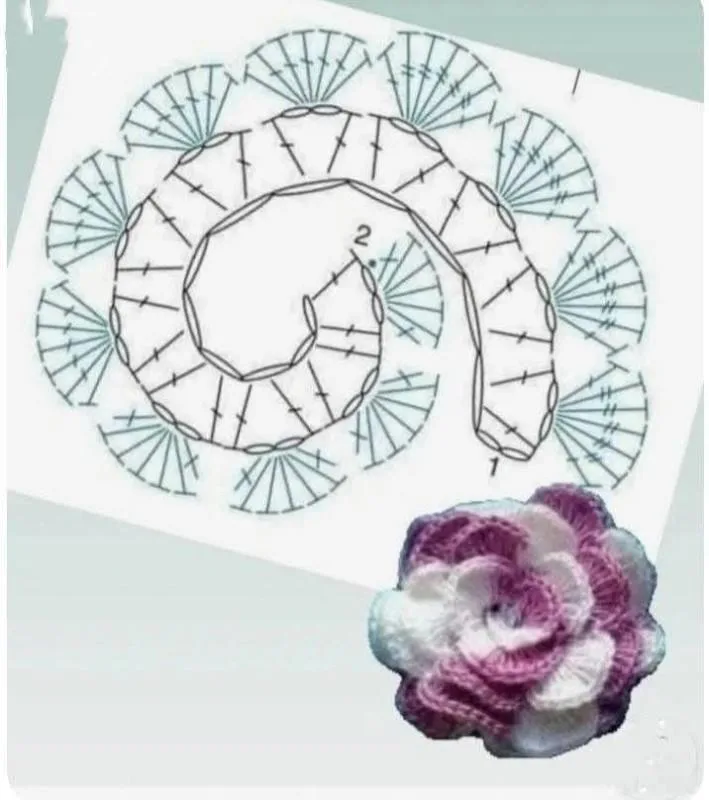
  1. Foundation ChainChain 53 .(53)

You can chain more or fewer stitches depending on the size of rose you want. A longer chain creates a fuller rose. A shorter chain creates a small bud-style rose.

  1. Row 1Create the Base Work 1 dc into the 4th chain from the hook . Then work 1 dc in each chain across .Turn your work.

At the end of this row, you should have a long strip of double crochet stitches. This row acts as the foundation that helps the flower roll neatly.

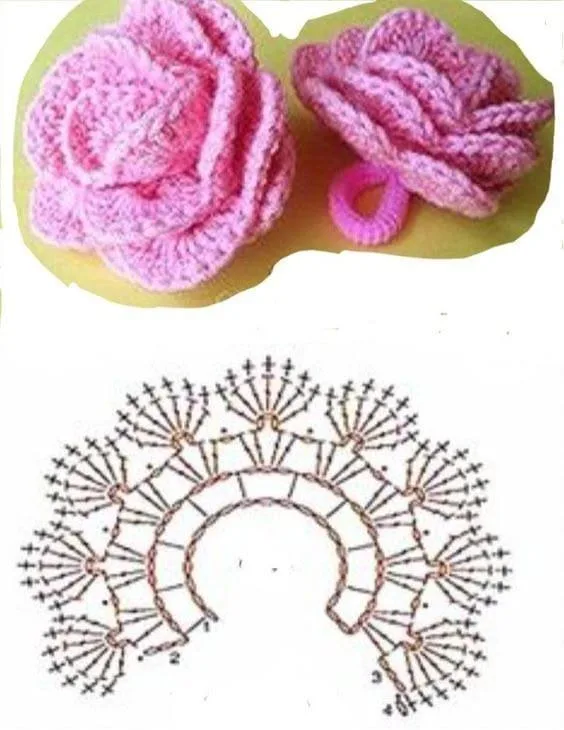
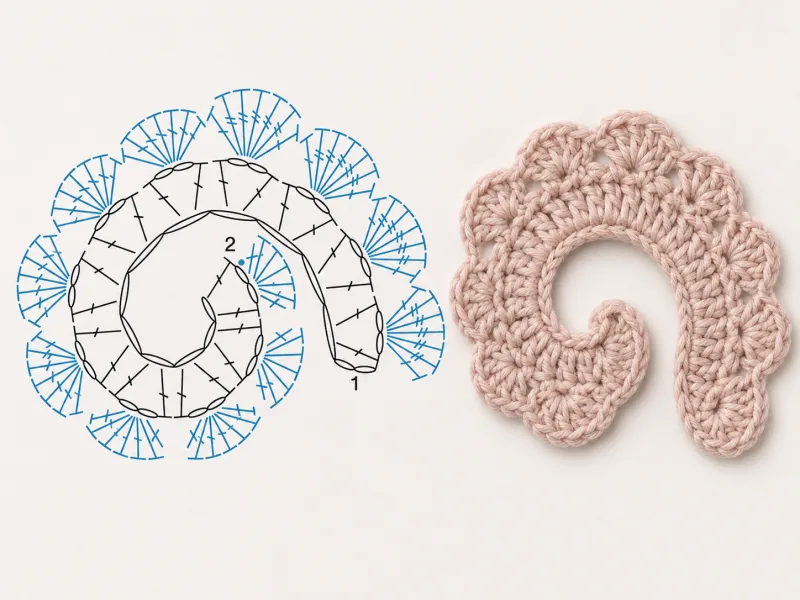
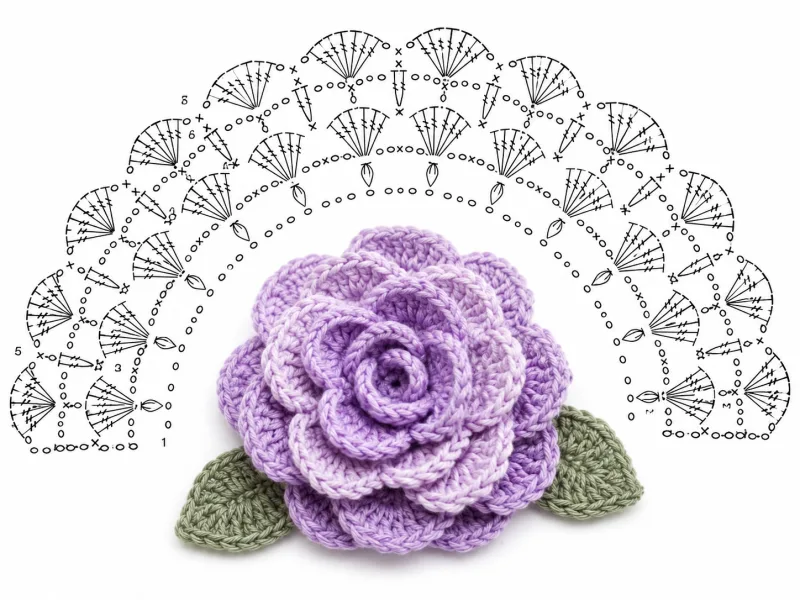
  1. Row 2Create the Petal Spaces Chain 3 . Skip 1 stitch. Work 1 dc, ch 1, 1 dc into the next stitch.Skip 1 stitch.Repeat this sequence across the row: Skip 1 st, work 1 dc, ch 1, 1 dc into next st.Turn your work.

This creates small V-shaped spaces. These spaces are where the petals will be formed.

  1. Row 3Create the Petals In the first chain space, work: 1 sc, 3 dc, 1 scThis makes a small rounded petal.In the next chain space, work: 1 sc, 5 dc, 1 sc This creates a slightly larger petal.

Continue alternating between smaller and larger petals across the strip: 1 sc, 3 dc, 1 sc 1 sc, 5 dc, 1 sc For the last few spaces, you can make the petals larger by working:

1 sc, 6 dc, 1 sc This gives the outside of the rose a fuller, open shape.

Fasten off, leaving a long tail for sewing.

Shaping the 3D Crochet Rose Now comes the magic part.

Lay the strip flat with the petals facing upward. Start rolling from one end. The beginning of the strip will become the center bud of the rose.

Roll slowly and adjust the petals as you go. Keep the base aligned while allowing the petal edge to open naturally.

Once the rose looks the way you want, turn it over and sew through the base several times with your yarn needle.

Make sure to catch all the layers. This keeps the rose from unrolling.

Secure the yarn with a knot and weave in the ends.

Optional Crochet Leaf Pattern A green leaf makes your crochet rose flower look finished and realistic.

  1. LeafLeaf Instructions Chain 10 . Starting in the second chain from the hook, work: 1 sc, 1 hdc, 1 dc, 2 tr, 1 dc, 1 hdc, 1 sc. Now work along the other side of the chain: 1 sc, 1 hdc, 1 dc, 2 tr, 1 dc, 1 hdc, 1 sc. Slip stitch to close.Fasten off and leave a tail for sewing.

You can sew one leaf underneath the rose or make two leaves for a fuller floral arrangement.

Creative Color Ideas

Classic red roses are always beautiful, but crochet gives you freedom to explore color combinations that do not exist in nature.

Romantic Rose Palette: Deep red, Soft pink, Cream, Dusty rose, Sage green.

Vintage Cottage Palette: Ivory, Mauve, Antique peach, Olive green, Warm beige.

Modern Decor Palette: White, Terracotta, Mustard, Charcoal, Forest green.

Wedding Palette: Champagne, Blush pink, Pearl white, Eucalyptus green, Soft lavender.

Bold Handmade Gift Palette: Bright coral, Hot pink, Purple, Yellow, Turquoise.

The same crochet rose pattern can look completely different just by changing the yarn color.
Marlene's notes

Note 01

Match your hook to your yarn weight rather than defaulting to the smallest size listed, since a tighter gauge will make your strip harder to roll evenly.

Note 02

A stitch marker on the first stitch of Row 2 helps you keep track of your skip-stitch rhythm across a long strip.

Note 03

Keep your tension relaxed through the petal-space row so the chain-1 spaces stay open enough to shape into visible petals once rolled.

Note 04

If you want a firmer rose, use a slightly smaller hook than recommended on the yarn label. If you want a loose, soft rose, use a slightly larger hook.

Porch photos

Before you sit down

  • Check your yarn amount before you begin, since the strip runs the length of several chains and you don't want to run short mid-row.
  • Have your yarn needle and scissors within reach for tacking the rolled strip in place once you've shaped it.
  • Work a short test length of the foundation row first if double crochet spacing is new to you, so your strip lies flat rather than curling early.
  • Read through Row 2, the petal-space row, before you start it, since the skip-stitch, dc-ch1-dc rhythm is the part that shapes your petals.

How the hours go

Foundation strip (Row 1)
about 15-20 minutes because it's a straightforward row of double crochet across your starting chain
Petal-space row (Row 2 and repeats)
about 30-45 minutes because the skip-stitch, dc-ch1-dc sequence needs a steady rhythm across the full strip
Rolling, stitching, and optional leaf
about 20-30 minutes because shaping the coil and tacking it with a yarn needle takes a bit of patience

Looking after it

  • If you've worked your rose in cotton, hand wash gently in cool water and reshape the petals while damp, then let it air dry flat so the coil holds its form.
  • acrylic yarn, a gentle machine wash on a delicate cycle is usually fine, but always air dry and store finished roses away from direct heat so the rolled shape doesn't loosen.
FAQs

Asked on the glider

the ones that come up on the glider

Why does the pattern say to work into the 4th chain from the hook instead of the usual 3rd?

This accounts for the turning chain height in the pattern's specific setup, so following the 4th chain instruction keeps your stitch count accurate. Just treat it as your pattern's starting point rather than a typo.

How long should my foundation chain be for one rose?

The pattern's sample foundation chain is 53 stitches, and its length determines how many petal spaces you'll get in Row 2. A longer starting chain gives you a fuller rose with more petals once rolled, while a shorter chain makes a smaller, bud-style rose, so it's really a matter of how full you want the finished bloom to look.

Do I have to make the leaf?

No, the green leaf is listed as optional in the materials. It's a nice finishing touch worked from its own short chain of 10, but the rose stands on its own without it.

What hook size should I actually use?

The materials list a range from 1.5mm up to 5.0mm depending on your yarn weight, so match your hook to whatever yarn you've chosen for the rose color. A worsted weight yarn generally pairs well with the 4.0mm to 5.0mm end of that range, and you can size down for a firmer rose or up for a looser, softer one.

My strip won't lie flat after Row 1. What went wrong?

This usually comes down to tension being too tight or too loose across the double crochet row. Try working a short test length first, as suggested before you start, so you can adjust your hook size or tension before committing to the full strip.

Can I turn this into a brooch or hair accessory?

Yes, once your rose is rolled and stitched in place, use hot glue or a sewing needle to attach it to a pin back, clip, or headband as listed in the materials. It's one of the simplest ways to repurpose the same rose for accessories rather than a stemmed bouquet.