Beginner 4-6 Hours Worsted yarn

Worked on the glider, counted out loud —

Crochet Pony Pal: Beginner-Friendly Amigurumi Pattern

Crochet an adorable Pony Pal amigurumi with this beginner-friendly pattern using worsted weight yarn, simple shaping, and a sweet mane and bridle detail.

Jump to the rounds

Before you sit down

Start by crocheting the small snout piece, shaping it over just a few rounds to form the muzzle.

Move on to the body, building it up round by round in a continuous spiral for a smooth, seamless shape.

Crochet the head separately, following the same spiral technique to keep the surface neat and even.

Stuff each piece firmly as you finish it so the shapes hold up well once everything is joined.

Attach the snout to the head first, positioning it carefully to get a sweet, friendly pony expression.

Join the head to the body, making sure the pony sits and faces the way you want before securing.

Add the accent color mane and bridle details using a simple color change technique for personality and charm.

Weave in all your ends and give your finished Pony Pal a final fluff and shape before displaying or gifting it.

What this one is

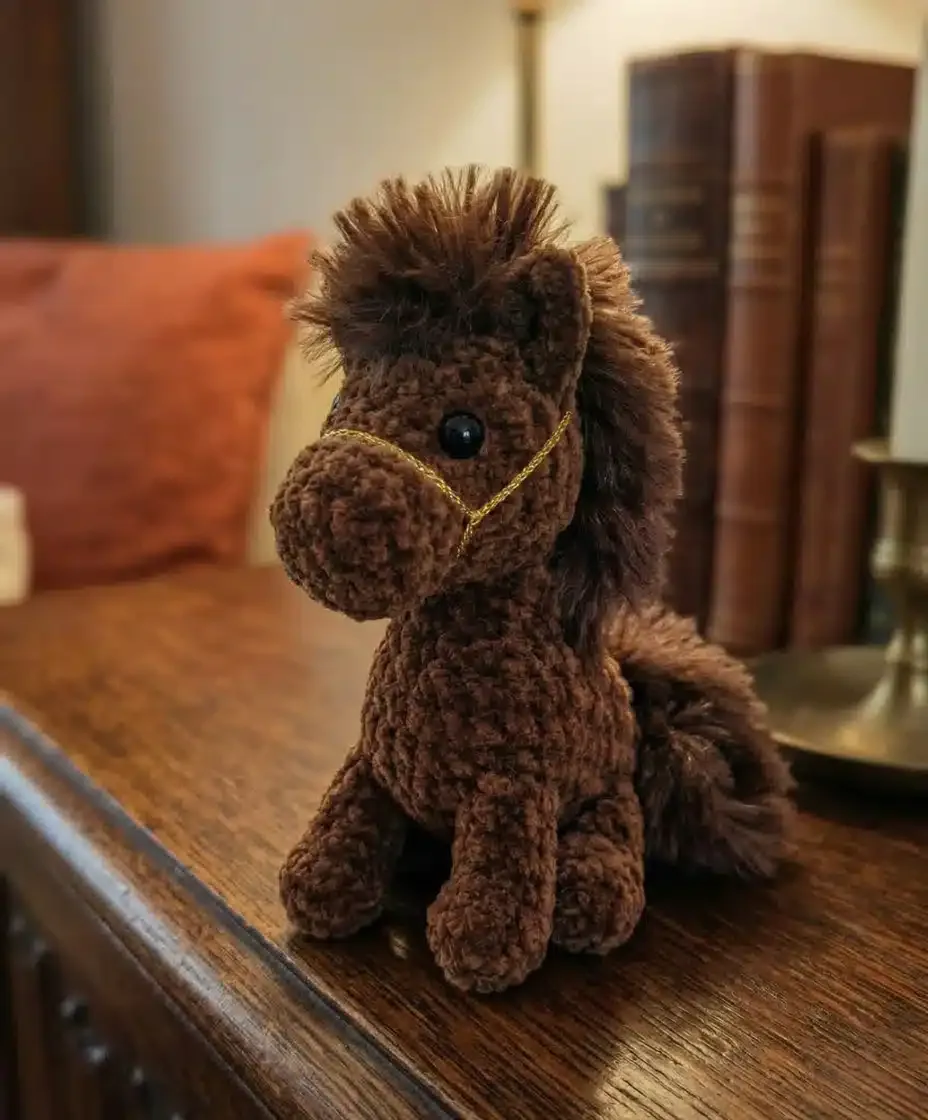
This Crochet Pony Pal is a charming little amigurumi that comes together from three simple pieces: a snout, a body, and a head, all joined into one huggable friend. What makes this pattern special is how much personality it packs into so few rounds — the accent color mane and bridle details give your pony real character without complicated techniques. It's perfect for anyone who loves the idea of amigurumi but feels intimidated by patterns with dozens of pieces, and for crocheters who want a quick, satisfying project they can finish in a weekend.

You'll be working in continuous spirals throughout, which means no joining or turning chains to worry about — just steady rounds building up each shape. The techniques here are approachable for beginners who already know single crochet and basic increases, and a stitch marker will be your best friend for tracking where each round begins. Expect to spend somewhere around 4 to 6 cozy hours total, including stuffing and assembly time, making this an ideal project to knock out over a Saturday afternoon or a couple of relaxed evenings.

The finished Pony Pal is a compact, huggable little creature with a rounded body, a friendly head, and a distinct snout that gives it real pony charm. Worked in light worsted or DK weight yarn, it has a soft, dense texture that holds its shape beautifully while still feeling squeezable in small hands. Whether you choose a classic beige or brown main color or get playful with your own pony palette, this little guy makes a delightful shelf companion, a thoughtful handmade baby gift, or a first amigurumi win to be proud of.

Variations

One of the best parts of this pattern is how easy it is to make each Pony Pal one-of-a-kind. For color, try a palmino palette with golden-tan main color and white or cream accents for the mane, or go bold with a rainbow-mane pony using scraps of leftover DK yarn in pink, purple, and teal for the accent details. A jet-black main color with a silver-gray mane creates a striking, almost mystical look, while a soft dapple-gray with white accents gives an elegant, dreamy pony. For yarn substitutions, Vanna's Choice, With Love, or Paintbox Yarns Simply DK all work beautifully in this weight and come in tons of pony-worthy shades. If you want a smaller pony for a keychain or ornament, try dropping to a 2.0mm hook with fingering weight yarn, keeping the same stitch counts — this will shrink the finished size by roughly 25-30%. For a bigger, huggable version, size up to a 4.0mm hook with worsted or aran weight yarn, which will noticeably increase the finished dimensions while keeping the same round structure. Seasonal fun is easy too: work the mane and tail details in orange and black for a fall-themed pony, or add tiny white snowflake-style embroidery stitches to the body for a winter version. You could also experiment with adding tiny felt or embroidered flowers along the mane for a floral, whimsical pony, or use two-tone main colors with a color change partway through the body round for a painted-pony effect. However you customize it, the core three-piece construction stays wonderfully simple.

There's something so satisfying about watching a pile of yarn turn into a recognizable little pony in just three pattern pieces! I love how the snout comes together in a mere 3 rounds, giving you that unmistakable muzzle shape right away — it's an instant confidence boost. Working the body and head in continuous spirals means you get into a relaxing rhythm with your stitch marker keeping you honest, no counting turning chains or joining rounds required. The accent color mane and bridle are where this pattern really shines; adding that dark brown or black detailing transforms a simple beige shape into a pony with personality. I also appreciate that gauge isn't fussy here — you just need firm, even stitches so your stuffing stays tucked away and invisible. This is the kind of project where every round feels like progress, and by the time you're weaving in your last end, you'll have a genuinely adorable, gift-worthy little friend. It's simple enough to feel achievable but detailed enough to feel like a real accomplishment.
Common mistakes

  • Losing track of the beginningPlace a stitch marker in the first stitch of every single round and move it up as you complete each one — this small habit prevents the whole piece from spiraling out of shape.
  • Stuffing too loosely, causing lumpsStuff firmly and in small pieces as you go rather than all at once at the end, and keep your stitches tight and even so the stuffing stays hidden and the shape stays smooth.
  • Rushing the snout shaping and ending upSince the snout is only 3 rounds, take your time with each increase round and check that the piece is symmetrical before moving on to attach it to the head.
  • Carrying the accent color messilyDrop the unused color loosely inside the work rather than cutting and rejoining every time, and give it a gentle tug every few stitches to keep tension even and avoid puckering.
  • Attaching the snout, mane, or bridleFollow the Putting It All Together steps in order — attach major pieces first, then add smaller accent details like the mane and bridle so you can adjust placement before anything is permanently secured.
  • Using a hook size that doesn't matchStick with the recommended 2.5mm hook for light worsted or DK weight yarn, and if your stitches look loose, size down slightly to keep the fabric dense enough to contain the stuffing.

The rounds, in full

Written out, round by round

Beginner4-6 Hours2.5 mmWorsted

Materials

Everything this one takes, in the order you will reach for it.

Yarn

  • Light Worsted / DK weight yarn (approx. 50g total)
  • Main Color (MC): Beige, Brown, or any pony color you adore
  • Accent Color (AC): Dark Brown or Black for mane and bridle details

Hook

  • 2.5mm crochet hook

Polyfill Stuffing

  • For shaping your pony

Tapestry Needle

  • For weaving in ends and assembly

Scissors

  • Your trusty crafting companion

Stitch Marker

  • To keep track of your rounds

Safety Eyes

  • 6mm (or half-beads, if you prefer to glue them)

keep this to hand

Abbreviations

US crochet terms, as used in this pattern.

  1. mrmagic ring
  2. chchain
  3. sl stslip stitch
  4. scsingle crochet
  5. hdchalf double crochet
  6. incincrease (2 sc in same stitch)
  7. decdecrease (single crochet 2 together)
  8. Puff St (made of 3 hdc)[Yarn over, insert hook into stitch, pull up a loop, yarn over, pull through 2 loops] three times in the same stitch (4 loops on hook), yarn over, pull through all 4 loops on hook.

Snout

Using MC yarn.

  1. Round 16 sc in a mr (6)
  2. Round 2(2 sc, inc) x 2 (8)
  3. Round 38 sc, sl st (8)Fasten off and cut yarn, leaving a short tail to weave in later.

Your pony's little nose is already taking shape! Set it aside for now.

Body

Using MC yarn.

  1. Round 16 sc in a mr (6)
  2. Round 25 inc, then make Leg 1: ch 4, work Puff St (made of 3 hdc) in the 2nd ch from your hook, sl st into the same 2nd ch where you made the Puff St, sl st in the next ch, sl st in the last ch, sl st into the same stitch on the Body where you started the chain. Now continue with the Body: inc, sc, then make Leg 2: ch 4, work Puff St (made of 3 hdc) in the 2nd ch from your hook, sl st into the same 2nd ch where you made the Puff St, sl st in the next ch, sl st in the last ch, sl st into the same stitch on the Body where you started the chain. (12) This round has a slight shift in the starting point, just go with the flow!
  3. Rounds 3-612 sc (12) You're doing wonderfully, building up the body!(12)
  4. Round 710 sc, then make Leg 3: ch 4, work Puff St (made of 3 hdc) in the 2nd ch from your hook, sl st into the same 2nd ch where you made the Puff St, sl st in the next ch, sl st in the last ch, sl st into the same stitch on the Body where you started the chain. Now continue with the Body: 2 sc (12)
  5. Round 8sc, then make Leg 4: ch 4, work Puff St (made of 3 hdc) in the 2nd ch from your hook, sl st into the same 2nd ch where you made the Puff St, sl st in the next ch, sl st in the last ch, sl st into the same stitch on the Body where you started the chain. Now continue with the Body: 11 sc (12) Start stuffing your Body firmly now, shaping it nicely.
  6. Round 9(dec) x 6 (6) Fasten off, leaving a long tail for closing. Close the opening by weaving the tail through the front loop of each remaining stitch and pulling tight. Weave in the end. Look at your little pony body with its adorable legs!

Head

Using MC yarn.

  1. Round 1Attach yarn to Rnd 6 of the Body (count 6 rounds up from the bottom of the body) and work 8 sc around the Body in a clockwise direction. (8)

You've seamlessly joined the head to the body – excellent work!

  1. Round 28 sc (8)
  2. Round 32 sc. Now, take your Snout piece and align it in front. Insert your hook into the next stitch on the Head, then from the wrong side of the Snout into one of its stitches, and work 4 sc, joining the Snout to the Head. Continue with 2 sc on the Head. (8)

This step can be a little fiddly, but you’re attaching the face!

  1. Round 42 sc (on Head). Now, work only into the unworked stitches of the Snout: (sc, inc, inc, sc). Continue with 2 sc (on Head). (10)

See how the snout is starting to pop out? So clever!

  1. Round 54 sc. Now, make Ear 1: ch 2, sl st in 2nd ch from hook, sl st into the same stitch on the Head where you started the chain. Continue with 3 sc. Now, make Ear 2: ch 2, sl st in 2nd ch from hook, sl st into the same stitch on the Head where you started the chain. Continue with 3 sc. (10)Start stuffing your Head firmly, shaping it gently. Make sure to shape around the snout!
  2. Round 6(dec) x 5 (5)Fasten off, leaving a long tail for closing. Close the opening by weaving the tail through the front loop of each remaining stitch and pulling tight. Weave in the end.

Your pony’s head is complete, complete with little ears!

Assembly

Step 1

Now for the magical part – bringing your pony to life!

Step 2

Eyes: Decide where you’d like your pony’s eyes to be. They look best placed between Rnd 3 and Rnd 4 of the Head, above the Snout. If using safety eyes, insert them now. If using half-beads, glue them carefully into place.

Step 3

Bridle: Using your Accent Color yarn and tapestry needle, embroider a simple bridle or halter onto your pony’s snout. A few straight stitches around the snout and up to the head, meeting between the eyes, will look lovely. You can even add a tiny stitch for the mouth!

Step 4

Mane: Cut several strands of Accent Color yarn, about 2-3 inches long. Using your crochet hook, loop these strands through the stitches along the top of the Head, from between the ears down to the neck, creating a luscious mane. You can use a larks head knot to secure each strand. Trim and style the mane as you like!

Step 5

Tail: For a sweet little tail, cut a few more strands of Accent Color yarn, slightly longer than the mane pieces. Attach them to the back of the Body, centered over the decrease area, using the same method as the mane. Trim to your desired length.

Step 6

And there you have it! Your very own charming crochet pony pal, ready for adventures.

Important notes

Note 01

💡 Keep a 2.5mm hook on hand specifically for this project — it's sized to create the firm, tight fabric that keeps stuffing from peeking through on such a small amigurumi.

Note 02

💡 Move your stitch marker up at the very start of each new round, especially through the Body and Head sections, since both are worked in 6 rounds of continuous spiral without any obvious visual break.

Note 03

💡 Stuff the Body and Head firmly but in stages — add a bit, shape it with your fingers, then add more — so you don't end up with a lopsided or overly dense final result.

Note 04

💡 Since gauge isn't critical here, focus instead on stitch consistency; uneven tension between rounds is more noticeable on a small piece like this pony than a slightly-off overall size.

Note 05

💡 Assemble the Snout onto the Head before attaching the Head to the Body, so you can adjust the snout's angle and get that classic friendly pony expression before anything is sewn permanently.

FAQs

Asked on the glider

the ones that come up on the glider

What yarn weight works best for this Pony Pal pattern?

This pattern is designed for light worsted or DK weight yarn, using about 50g total between your main and accent colors. Staying close to this weight with a 2.5mm hook will give you the firm, well-shaped fabric the pattern is designed around.

Do I need to know how to color change to make this pony?

Yes, you'll use a simple color change technique to add the accent color mane and bridle details in dark brown or black. It's a beginner-friendly skill — if you can single crochet, you can pick up a color change with a little practice.

Is this pattern written in US or UK crochet terms?

This pattern is written entirely in US crochet terminology. If you're used to UK terms, be sure to convert stitch names before you begin so your stitch counts match up correctly.

How much yarn do I actually need for one Pony Pal?

You'll need approximately 50g total, split between your Main Color and Accent Color, which is a small enough amount that leftover scraps from other projects often work perfectly. It's a great pattern for using up DK or light worsted remnants in your stash.

Can I make this pony bigger or smaller than the pattern size?

Yes, sizing up to a 4.0mm hook with worsted or aran weight yarn will give you a larger pony while keeping the same stitch counts, and sizing down to a 2.0mm hook with fingering weight yarn will shrink it. Just keep in mind that changing hook size affects the finished dimensions, not the number of stitches or rounds.