Intermediate 4-6 hours Worsted yarn

Worked on the glider, counted out loud —

Crochet a Long-Limbed Amigurumi Animal for Gifts

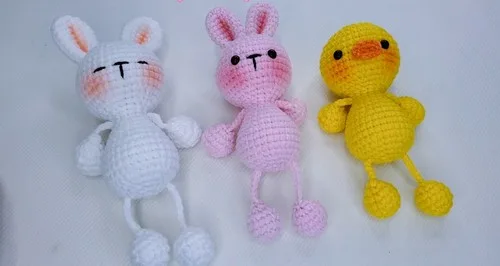
A long-limbed amigurumi animal perfect for gifts or décor, with bunny details—roughly 4 to 6 hours from ring to finish.

Jump to the rounds

What this one is

I like to think of this one as a porch-evening project — the kind you pick up when the light's going soft and you want something with a bit of whimsy. It's built for anyone who loves gifting handmade things: a nursery decoration, a soft toy that can take a hug, or a shelf companion for someone who collects small creatures. The long limbs give it real personality once it's finished, more character than a round little ball of an animal, and that makes it a favorite for both giving and keeping.

Your hands spend most of the time here on magic rings and V stitches, building the round main body first, then repeating the limb base four times for two arms and two legs. Expect somewhere in the neighborhood of four to six hours total, spread across the body's twelve rounds, the limb sets, and the stuffing-and-assembly stage where everything comes together and gets its face.
Try it another way

There's a real satisfaction in watching the main body grow from a six-stitch magic ring into a full twelve-round shape just by alternating single crochet with V stitches — it's simple math that produces a surprisingly sculptural result. The limb base repeats that same V-stitch logic on a smaller scale, then shifts into a decrease pattern (the A stitch) that tapers each arm and leg into that long, floppy silhouette the pattern is named for. Making four identical limbs is a nice rhythm exercise once you've got the first one down. And the finishing touches — an embroidered V-shaped nose, eyes placed just one stitch from it — are where the piece stops being a shape and starts being a creature with a face.

The rounds, in full

Written out, round by round

Intermediate4-6 hoursWorsted

Bring to the porch

Everything this one takes, in the order you will reach for it.

  • Worsted weight yarn
  • Crochet hook (size to suit your yarn)

Main body

  1. Round 1Make a magic ring. Crochet 6 single crochets (SC) into it. Pull to tighten and slip stitch (SL ST) into first stitch. (6 SC)CH 1. Crochet 1 V stitch in first 3 stitches (3 V stitches total). Skip next stitch and SL ST into fifth stitch.Step by step: Finishing: CH 1, cut yarn, weave in ends.
  2. Round 2Chain (CH) 1. Crochet 6 "V" stitches (2 SC in each stitch). SL ST into first stitch. (12 SC)
  3. Round 3CH 1. Alternate 1 SC, 1 V stitch for 6 repeats. SL ST into first stitch. (18 SC)Step by step: CH 1. Crochet 1 SC in each stitch around. SL ST into first stitch. (15 SC per round).Finishing: Cut yarn leaving long tail. Fold ear flat and sew opening closed. Make two ears.
  4. Round 4CH 1. Crochet 1 SC, 1 V, 1 SC, repeat around. SL ST into first stitch. (24 SC)
  5. Round 5CH 1. Alternate 3 SC, 1 V stitch for 6 repeats. SL ST into first stitch. (30 SC)
  6. Round 6CH 1. Crochet 2 SC, 1 V, 2 SC, repeat around. SL ST into first stitch. (36 SC)
  7. Rounds 7–12CH 1. Crochet 1 SC in each stitch around. SL ST into first stitch. (36 SC per round)(36)
  8. Round 13CH 1. Crochet 2 SC, 1 decrease (A), 2 SC, repeat around. SL ST into first stitch. (30 SC)
  9. Round 14CH 1. Alternate 3 SC, 1 A for 6 repeats. SL ST into first stitch. (24 SC)
  10. Round 15CH 1. Crochet 1 SC, 1 A, 1 SC, repeat around. SL ST into first stitch. (18 SC)
  11. Round 16CH 1. Alternate 1 SC, 1 A for 6 repeats. SL ST into first stitch. (12 SC)
  12. Rounds 17–18CH 1. Crochet 1 SC in each stitch around. SL ST into first stitch. (12 SC per round)(12)

Arms and Legs (Base for all Limbs)

  1. Round 1Make a magic ring. Crochet 6 SC into it. Pull to tighten and SL ST into first stitch. (6 SC)
  2. Round 2CH 1. Crochet 6 V stitches around. SL ST into first stitch. (12 SC)
  3. Round 3CH 1. Alternate 3 SC, 1 V for 3 repeats. SL ST into first stitch. (15 SC)
  4. Round 4CH 1. Crochet 1 SC in each stitch around. SL ST into first stitch. (15 SC)
  5. Round 5CH 1. Alternate 3 SC, 1 A for 3 repeats. SL ST into first stitch. (12 SC)
  6. Round 6CH 1. Crochet 6 A stitches around. SL ST into first stitch. Stuffing: Lightly stuff with fiberfill.Joining for Limbs: CH 1. Insert hook through both sides of opening and SL ST to close.Arms: CH 15 for arm string. Cut yarn, leave long tail for sewing. Make two pieces.Legs: CH 20 for leg string. Cut yarn, leave long tail for sewing. Make two pieces.

Stuffing:Begin stuffing with fiberfill.

  1. Round 19CH 1. Alternate 1 SC, 1 V for 6 repeats. SL ST into first stitch. (18 SC)
  2. Round 20CH 1. Crochet 1 SC in each stitch around. SL ST into first stitch. (18 SC)
  3. Round 21CH 1. Crochet 1 SC, 1 V, 1 SC, repeat around. SL ST into first stitch. (24 SC)
  4. Round 22CH 1. Crochet 1 SC in each stitch around. SL ST into first stitch. (24 SC)
  5. Round 23CH 1. Alternate 3 SC, 1 V for 6 repeats. SL ST into first stitch. (30 SC)
  6. Rounds 24–27CH 1. Crochet 1 SC in each stitch around. SL ST into first stitch. (30 SC per round)(30)
  7. Round 28CH 1. Alternate 3 SC, 1 A for 6 repeats. SL ST into first stitch. (24 SC)
  8. Round 29CH 1. Crochet 1 SC, 1 A, 1 SC, repeat around. SL ST into first stitch. (18 SC)
  9. Round 30CH 1. Alternate 1 SC, 1 A for 6 repeats. SL ST into first stitch. (12 SC) Stuffing: Stuff the body with fiberfill.
  10. Round 31CH 1. Crochet 6 decreases (A stitches). SL ST into first stitch.Finishing: Cut yarn leaving a long tail. Use a needle to close the hole by weaving through front loops and pulling tight. Hide the yarn tail.

Putting it together

Step 1

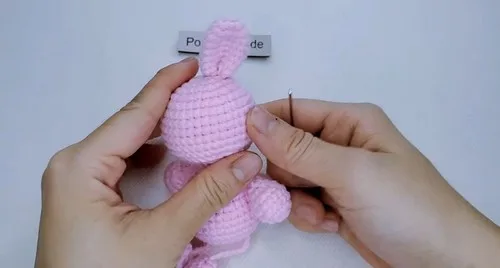
Attach Arms: Between rows 17 and 18 of main body. Secure by tying yarn tails and hiding them.

Step 2

Attach Legs: Between rows 29 and 30 of main body. Align parallel to arms and secure similarly.

Step 3

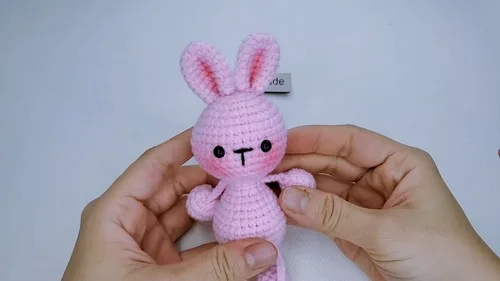
Attach Bunny Ears: Between rows 2 and 3 of the head, symmetrical with arms.

Step 4

Embroider Bunny Nose: Using black yarn (two strands), embroider between rows 9 and 10 of head to form a "V" shape.

Step 5

Attach Bunny Eyes: Use safety eyes or embroider between rows 9 and 10, one stitch away from nose.

Step 6

Attach Duck Beak: Glue between rows 9 and 11 of duck’s head.

Step 7

Attach Duck Eyes: Place safety eyes at row 9, one stitch away from beak.

Step 8

Add Blush (Optional): Use blush or pink yarn on cheeks and arms for bunny or cheeks for duck.

Marlene's notes

Note 01

Use a hook a size or two smaller than the yarn label suggests — tight amigurumi tension keeps the fiberfill from showing through the stitches, especially on the long limb sections.

Note 02

Keep a stitch marker on hand throughout, since every round ends with a slip stitch join rather than a turn, and it's easy to miscount once you're alternating SC and V stitches.

Note 03

Stuff the limbs and body firmly but evenly as you go rather than waiting until the end — those long limbs especially need consistent filling so they don't look lumpy once attached between rows 17-18 and 29-30 of the main body.

Porch photos

Before you sit down

  • Work out your yarn split ahead of time: one main color for the twelve-round body, a second for the four limb bases, and a small amount of contrast for ears if you're doing the bunny version.
  • Set a stitch marker (or a scrap of yarn) at the start of each round — the pattern joins with a slip stitch rather than turning, and it's easy to lose your place once the V stitches start alternating with single crochet.
  • Crochet a quick swatch first to check your gauge is tight enough that stuffing won't peek through between stitches.
  • Read through Round 1 of the main body before you begin, since the magic ring start and the V-stitch pattern in rounds 2 and 3 set the shaping logic you'll repeat through all twelve rounds.

How the hours go

Main body (12 rounds)
about 1.5 to 2 hours because the round count is highest here and the V-stitch increases need close counting
Arms and legs (6 rounds x4)
about 1.5 hours because you're repeating the same 6-round base four times, so it goes quicker once you find the rhythm
Stuffing, assembly, and face
about 1.5 to 2 hours because attaching four limbs, embroidering the nose and eyes, and getting everything symmetrical takes patience

Looking after it

  • Hand wash the finished animal in cool water with a mild soap, squeezing rather than wringing, since twisting can distort the long limbs and stretch the V-stitch texture.
  • Reshape the limbs and ears while damp, lay flat to air dry away from direct heat, and store somewhere dry so the fiberfill doesn't hold moisture.
FAQs

Asked on the glider

the ones that come up on the glider

Why do my long limbs look floppy instead of firm?

That's mostly a stuffing issue — the limb base's decrease rounds (the A stitch repeats) taper the tube down, so you need to pack fiberfill in as you close each round rather than trying to stuff it after the fact. A slightly smaller hook also helps keep the stitches tight enough to hold the stuffing in place.

Do I need safety eyes, or can I embroider the face instead?

Either works fine for this pattern — the eyes are meant to sit one stitch away from the embroidered V-shaped nose between rows 9 and 10 of the head, whichever method you use. If the toy is going to a young child, embroidered features are the safer choice since they can't come loose.

How do I keep the four limbs matching?

Since all four limbs share the same six-round base, the easiest trick is to crochet all four back to back before you set them aside, so your tension stays consistent across the set. It also helps to count your stitches out loud on the decrease round so each limb tapers at the same point.

Where exactly do the arms and legs attach to the body?

The arms go on between rows 17 and 18 of the main body, and the legs between rows 29 and 30, positioned parallel to each other. Lining them up with a stitch marker before you sew helps keep the finished animal standing evenly.

Can I make this without the bunny ears?

Yes, the bunny ears are an add-on detail attached between rows 2 and 3 of the head, so leaving them off just gives you a rounder-headed animal. You can always add a different ear shape later if you change your mind.

How much yarn do I actually need?

That depends on your yarn weight and how big you make the limbs, but plan for a main color quantity that covers a twelve-round body plus four limb bases, with smaller amounts for contrast details like ears or a nose. It's worth weighing your yarn before and after finishing the body so you can estimate what the limbs and finishing details will need.