Intermediate 4-6 hours Bulky yarn

Worked on the glider, counted out loud —

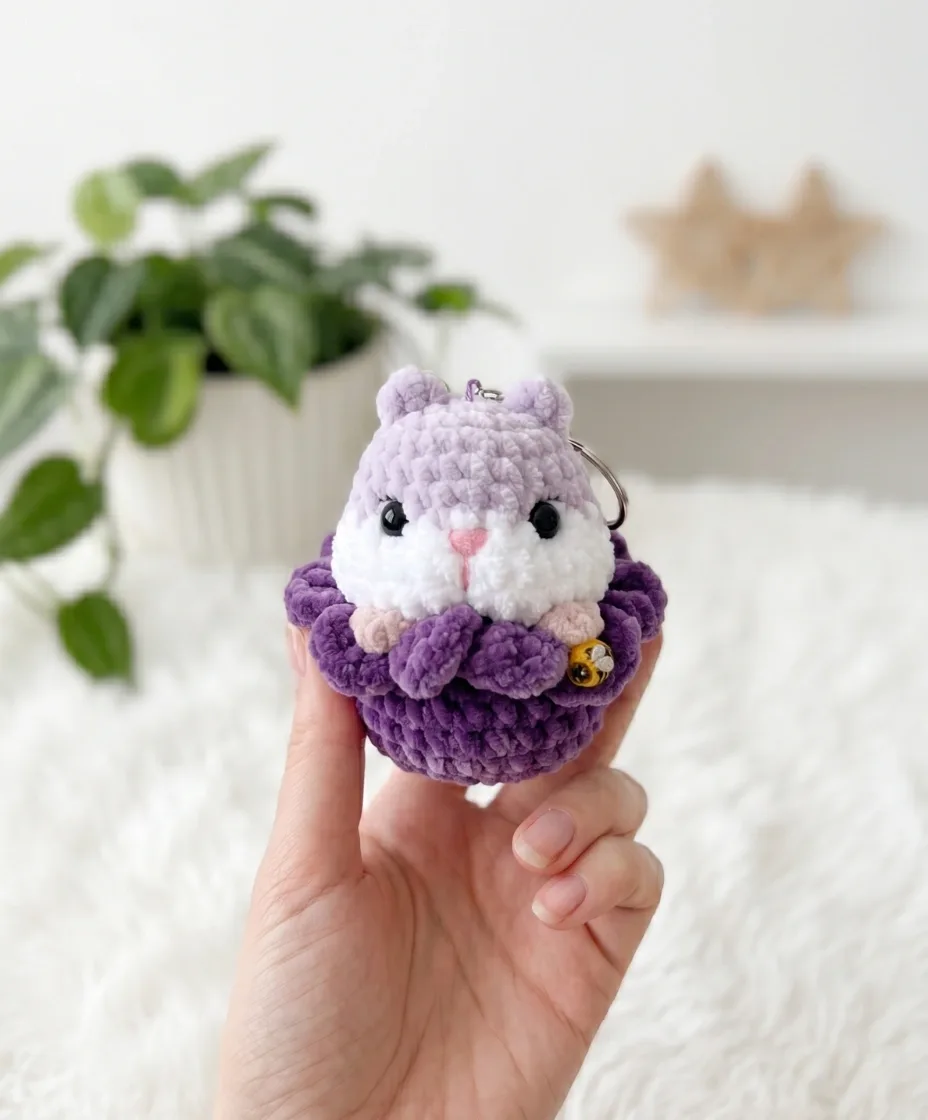
Crochet hamster flower keychain amigurumi pattern

A pocket-sized hamster and flower keychain in velvet yarn — a few quiet evenings of stitching for an easy amigurumi win.

Jump to the rounds

What this one is

This one is for whoever keeps losing their keys, or the friend who collects little charms on their bag zipper. It's a hamster tucked into a yellow flower, small enough to clip on and carry everywhere, and sweet enough that people will ask where you got it. You made it, is the answer.

Your hands will spend most of the time on the flower and the head, working tight spirals in velvet-style yarn that hides your stitches nicely. Between the two main pieces, the little ears, paws, and assembly, plan on a handful of relaxed sittings rather than one long push.

Finished size is about 10–11 cm, small enough to clip onto a bag, keys, or wrap up as a heartfelt little gift.

Try it another way

The flower and head are both built from simple magic-ring starts with standard increases, so you can easily size the whole hamster up by adding an extra even round or two once you reach the 28-stitch flower body or the 18-stitch point on the head, then adjusting your paws and ears to match. Swap the yellow for any color you like — pink or lavender petals give a completely different mood without touching the stitch counts at all. You could also make the flower on its own as a coaster-sized topper, skipping the head and using it as a simple keychain charm or bag pull. For gifting, try working the ears and paws in a contrasting bright color instead of matching cream and beige, which makes the piece feel more like a toy for a child than a subtle accessory. If chenille isn't available to you locally, any smooth bulky-weight yarn will work, though you'll lose some of that soft, fuzzy finish that hides imperfect stitches so well. And if the keychain ring feels like the wrong finish, the same hamster and flower combo makes a sweet little ornament or bag charm with a simple loop of yarn instead.
The rounds, in full

Written out, round by round

Intermediate4-6 hours3.5 mmBulky

Bring to the porch

Everything this one takes, in the order you will reach for it.

Yarn

  • Bulky velvet-style yarn (such as Himalaya Velvet or similar chenille/velvet weight) in cream/milk, white, beige, and yellow

Yarn

  • Thin yarn in pink (for the nose) and black (for the eyebrows)

Hook size

  • Appropriate for your velvet yarn — typically E-4 (3.5 mm) or F-5 (3.75 mm); check your yarn label

Safety eyes

  • 10 mm, 1 pair
  • Keychain ring/holder: 1 piece

Stuffing

  • Fiberfill/polyfill
  • Stitch markers
  • Yarn needle / tapestry needle
  • Scissors

1. Flower (in Yellow)

  1. Round 17 sc in MR. (7)
  2. Round 2inc in each st around. (14)
  3. Round 3sc, inc repeat 7 times. (21)
  4. Round 42 sc, inc repeat 7 times. (28)
  5. Rounds 5–8sc in each st around. (28) (Work 4 rounds even.)
  6. Round 92 sc, dec repeat 7 times. (21)Petal Round — worked in FLO only:
  7. Round 10(sl st + ch 2 + 3 dc + ch 2 + sl st) all in same st, then sl st in next st — repeat 10 times total. (10 petals formed)Cut yarn, fasten off securely, and weave the tail to the inside of the flower.(10)

2. Head (in Cream/Milk Yarn, then White)

Switch to cream/milk yarn.

  1. Round 16 sc in MR. (6)
  2. Round 2inc in each st around. (12)
  3. Round 3sc, inc repeat 6 times. (18)
  4. Round 4sc in each st around. (18)
  5. Round 52 sc, inc repeat 6 times. (24)
  6. Round 6sc in each st around. (24)Switch to white yarn.
  7. Round 76 sc, inc 3 times, 6 sc, inc 3 times, 6 sc. (30)
  8. Round 8sc in each st around. (30)
  9. Round 913 sc, dec repeat 2 times. (28)
  10. Round 102 sc, dec repeat 7 times. (21)Cut yarn, fasten off, and weave the tail to the inside.Insert 10 mm safety eyes after Round 6, positioning them above the increase stitches of Round 7. There should be 8 stitches between the two eye posts. Secure the backings firmly before the opening closes.Stuff the head firmly but not to bursting, pressing in a small amount of fiberfill at a time and checking the shape from the front — it should be round and hold its shape without the fabric pulling at the stitches.

3. Ears (in Cream/Milk Yarn) and Paws (in Beige Yarn)

Ears and Paws are made the same way — use cream/milk yarn for the Ears and beige yarn for the Paws. Make 2 Ears and 2 Paws.

Leave a 10 cm yarn tail at the start.

Foundation chain: ch 3.

Work 1 hdc into the first chain made (the chain furthest from your hook).

Cut yarn, leaving a 10 cm tail.

You now have a small, compact piece with long tails on both ends for sewing.

When sewing the Ears and Paws onto the Head, thread both yarn tails from each piece onto your needle and take them through the head to the opposite side, then tie them off inside — this anchors each piece from two points and keeps it from rotating.

Putting it together

Step 1

Attach the Head to the Flower: Using the yarn tail from the head, sew the head to the flower by stitching through the sts of the head and through the back loops of Rnd 9 (the last round) of the flower. Work all the way around until secure.

Step 2

Attach the Ears: Sew the two Ears onto the top of the Head using the yarn tails. Position them symmetrically on either side of the crown. Weave in all tails to the inside.

Step 3

Attach the Paws: Sew the two Paws in beige beneath the cheek area, tucked between the Head and the Flower. Weave in all tails to the inside.

Step 4

Embroider the Nose: Using pink thin yarn and a yarn needle, embroider a small nose centered below the eyes on the white muzzle area.

Step 5

Embroider the Eyebrows: Using black thin yarn, embroider two small eyebrow arches above the safety eyes.

Step 6

Facial Sculpting (dimples): Thread a yarn needle with a length of matching yarn and gently pull through the face to create soft indentations. Pull gently — not tight. Work the following pulls:

Step 7

From the right eye down to the right paw and back.

Step 8

From the left eye down to the left paw and back.

Step 9

From the right eye across to the left eye and back.

Step 10

Attach the keychain ring/holder to the top of the flower or head, passing it through a secure stitch.

Step 11

Weave in all remaining ends to the inside of the pieces.

Marlene's notes

Note 01

Keep your tension tight throughout both the flower and the head; velvet-style yarn is forgiving on stitch definition but not on gaps, and loose stitches will let the stuffing peek out. Gauge is not critical for this project, but tight tension matters more than usual with chenille yarn.

Note 02

The flower's petal round is the one exception to the continuous spiral used everywhere else, so slow down and follow that round's instructions carefully rather than working it the same way as the rest. Treat each petal cluster — sl st + ch 2 + 3 dc + ch 2 + sl st — as one complete unit worked into a single stitch, then sl st into the next stitch to move along; placing a stitch marker at the start of the round will help you keep track of all 10 petals.

Note 03

This pattern is written in US crochet terminology.

Note 04

a cleaner finish with no visible hole, work the decreases in Rounds 9–10 of the Head as an invisible decrease: insert your hook through the front loops only of the next two stitches, then complete as a single crochet.

Note 05

Stitch counts are given at the end of each round in parentheses, e.g. (28), so you can check your work as you go.

Before you sit down

  • Check that you have all four velvet-style colors on hand — cream/milk, white, beige, and yellow — plus thin pink and black yarn for the face details, since running out mid-piece with chenille yarn means an obvious color break.
  • Place a stitch marker at the start of each round before you begin the flower or head; with no join and no turning chain, it's easy to lose your place in a continuous spiral.
  • Read through Rounds 5–8 of the flower and the corresponding even rounds of the head first, so you know where the plain rounds end and the shaping resumes.
  • Work a few test stitches with your chosen hook size to see how your particular velvet yarn behaves — chenille yarns vary a lot between brands, and tight tension matters here so fiberfill won't show through.

How the hours go

Flower
about 45-60 minutes, because it's 7 rounds worked up to 28 stitches with one special petal round to slow you down
Ears, paws, and assembly
about 45 minutes, because the pieces themselves are quick foundation-chain-and-hdc work but sewing four small parts on neatly takes patience

Looking after it

  • Hand wash the finished piece gently in cool water if it needs freshening up, since velvet-style chenille yarn can shed or flatten under a washing machine's agitation; press out water in a towel rather than wringing.
  • Let it air dry fully away from direct heat before you reshape the petals and ears with your fingers, and store it somewhere it won't get squashed, since chenille yarn holds a crushed shape more readily than smooth yarns do.
FAQs

Asked on the glider

the ones that come up on the glider

What weight of yarn does this pattern use?

It calls for bulky velvet-style yarn, the chenille-type often sold as Himalaya Velvet or similar, in cream/milk, white, beige, and yellow. Thinner pink and black yarn are used separately for the nose and eyebrow details.

Do I need to join at the end of each round?

No, every part is worked in a continuous spiral with no joining and no turning chains, except for the flower's petal round, which is worked differently. A stitch marker at the start of each round will help you keep track.

What hook size should I use with velvet yarn?

The pattern suggests an E-4 (3.5 mm) or F-5 (3.75 mm) hook as a starting point, but you should check your specific yarn label since velvet-style yarns vary. Gauge isn't critical here, but keep your tension tight so the fiberfill doesn't show through.

How many pieces do I need to make for the ears and paws?

You'll make two ears in cream/milk yarn and two paws in beige yarn, all worked the same way from a short foundation chain with a single hdc. Leave a 10 cm tail at both the start and end of each for sewing them on later.

Is this a good project for a beginner?

If you've worked amigurumi before and are comfortable with magic rings, increases, and sewing pieces together, you'll manage this fine. The petal round and the color change on the head add a small step up from a purely basic pattern, which is why it's marked intermediate.

How do I attach the head to the flower?

You use the yarn tail left from the head to sew through its stitches and through the back loops of the flower's last round, working all the way around until it's secure. This keeps the seam clean and hidden along the join line.