Intermediate 4-6 Hours Worsted yarn

Worked on the glider, counted out loud —

Crochet Crocodile Amigurumi Pattern – Easy Plush Toy Tutorial

Make an adorable crochet crocodile amigurumi with this easy plush pattern featuring safety eyes, embroidered details, and cute little claws.

Jump to the rounds

Before you sit down

Start by crocheting all four legs separately, working each in the round from a magic ring base.

Shape the head over eight rounds of increases, building it into a rounded form ready for the face.

Install the safety eyes on the head, checking spacing carefully before locking them into place.

Crochet the body over eight rounds, shaping it to match the proportions of the head and legs.

Work the tail across ten rounds, tapering gradually from a wider base down to a narrow tip.

Stuff each piece firmly with synthetic fiber filling before closing up any remaining openings.

Sew the legs, head, and tail onto the body using a tapestry needle for a secure, symmetrical assembly.

Finish by embroidering the nose and adding small stitched claws to bring the crocodile's face and feet to life.

What this one is

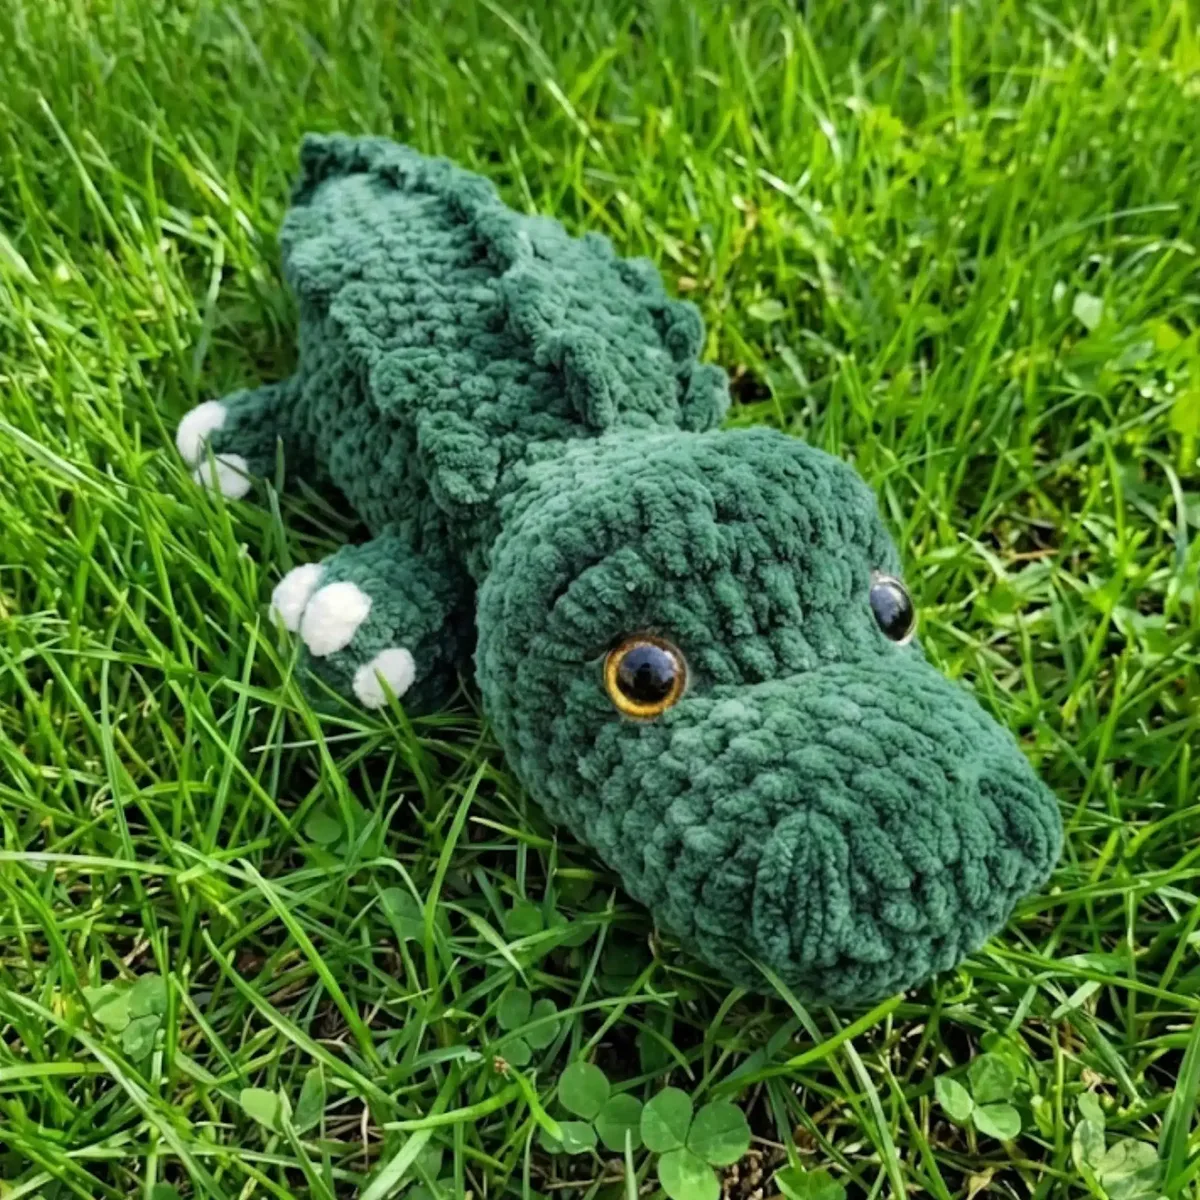
This crochet crocodile pattern turns a handful of yarn into a huggable little reptile with a rounded head, plump body, four sturdy legs, and a long tapering tail. What makes it special is how expressive it feels despite its simple construction — the embroidered nose and tiny claws give it real personality without adding complicated techniques. It's perfect for crocheters who want to make something a little more unexpected than the usual bear or bunny, and it makes a fantastic gift for reptile-obsessed kids or anyone who loves quirky handmade toys.

You'll work primarily in continuous rounds using magic rings to start each piece, shaping the head, body, and tail through a mix of increase and decrease rounds. This is a great project for confident beginners or intermediate crocheters who've made at least one or two amigurumi before, since you'll need to keep track of stitch counts across multiple pieces before assembling them together. Expect to spend somewhere between 4 and 6 hours total, spread across a cozy afternoon or a relaxed weekend of stitching.

The finished crocodile has a soft, squeezable body thanks to the plush polyester yarn and generous stuffing, with a satisfying weight that makes it lovely to hold. Its rounded proportions and gentle color palette in green and white give it a friendly, approachable look rather than anything fierce or scaly-looking. Whether it ends up on a nursery shelf, tucked into a child's arms, or wrapped up as a one-of-a-kind handmade present, this little crocodile is bound to become a favorite.

Variations

One of my favorite things about this crocodile pattern is how easily it adapts to different moods and color stories. Try working the body and head in a soft sage or olive green with a cream or pale yellow belly panel worked separately and sewn on for a more realistic reptile look, or go bold with a bright lime and white combo for a cheerful nursery toy. For a baby-safe version, skip the plastic safety eyes entirely and embroider the eyes with black yarn using satin stitch instead — this also makes it appropriate for gifting to infants under three. If you want a bigger cuddle-sized crocodile, size up to a 6mm hook and a bulky weight yarn like Bernat Blanket or Wool-Ease Thick & Quick, which will naturally increase your finished size by roughly 30-40% without changing the round counts. Conversely, working the same pattern in a lighter DK weight yarn with a 3.5mm hook creates an adorable mini version perfect for a keychain or bag charm. Consider swapping YarnArt Dolce for Bernat Baby Velvet or Comfy Cotton if you want a different plush texture while keeping that soft huggable feel. For themed variations, work alternating rounds of two greens along the back to mimic scaly texture, or add a row of small triangular fins along the spine using single crochet triangles tacked on after assembly. You could also crochet a tiny matching hat or bandana from leftover white yarn to dress up the finished toy for photos or as a special gift accent. However you customize it, the core leg, head, body, and tail construction stays reliable and forgiving.

I adore this pattern because it takes something as simple as magic rings and increase rounds and turns it into a character with so much charm. Building the four legs first feels quick and satisfying — you get that little rush of finishing pieces before diving into the bigger head and body sections. The head shaping across its eight rounds is where the crocodile really starts to come alive, especially once you install the safety eyes and see that face looking back at you. I love that the tail gets its own dedicated ten rounds to taper gracefully, giving the whole toy a balanced, believable silhouette instead of looking stubby or awkward. And the finishing touches — hand-embroidering the nose and adding tiny claws with a tapestry needle — are where you really get to slow down and give your crocodile its own personality. Every crocodile I've made has come out just a little different, and that's part of the magic. If you love amigurumi projects that combine simple repetitive stitching with a rewarding, characterful payoff, this pattern will absolutely delight you.
Common mistakes

  • Losing track of stitch counts during the increase rounds on the head and body.Place a stitch marker at the start of every round and count your stitches out loud before moving to the next round — with 8 rounds on the head and 8 on the body, drifting off by even one stitch will throw off the shaping.
  • Starting the magic ring too loosely, leaving a visible hole at the center of the legs or tail tip.Pull the magic ring's tail yarn firmly closed after your first round of stitches, and weave the tail through the base stitches a second time to fully cinch any remaining gap.
  • Installing the safety eyes before confirming spacing and placement on the head.Insert the eye posts without locking the backs on first, then hold the head up and check the spacing from multiple angles before snapping the safety backs into place permanently.
  • Under-stuffing the body and tail, leading to a floppy, saggy finished crocodile.Stuff firmly in small pinches as you go rather than all at once at the end, paying special attention to the tail's tapering rounds so it holds its shape rather than collapsing.
  • Sewing the four legs on unevenly, causing the crocodile to tip over or sit lopsided.Lay the stuffed body flat and pin all four legs in place first, checking symmetry from above before sewing any of them down permanently with your tapestry needle.
  • Embroidering the nose and claws with yarn that's too thick, making the details look bulky instead of delicate.Use a thinner strand of yarn or split your plush yarn into two thinner plies for the nose embroidery and claw details so they stay neat and proportional to the crocodile's face and feet.

The rounds, in full

Written out, round by round

Intermediate4-6 Hours5 mmWorsted

Materials

Everything this one takes, in the order you will reach for it.

  • Plush yarn in green (main color) and white (for details) – recommended: YarnArt Dolce 100% Polyester (120 m, 100 g) or Himalaya Dolphin Baby 100% Polyester (120 m, 100 g)
  • Crochet hook size 5 mm
  • Safety eyes (screw-back or bead style, 10 mm diameter)
  • Synthetic fiber filling (hollow fiber or polyester stuffing)
  • Tapestry needle for sewing and embroidery
  • Scissors
  • this …

keep this to hand

Abbreviations

US crochet terms, as used in this pattern.

  1. MRmagic ring
  2. ssslip stitch
  3. chchain
  4. scsingle crochet
  5. dcdouble crochet
  6. trtreble crochet
  7. sl stslip stitch
  8. incincrease (2 sc in 1 loop)
  9. decdecrease (2 sc together)
  10. NRnext row
  11. (…) * 6repeat the steps in brackets 6 times
  12. = X scX sc must be in the row

Legs (Make 4)

Create four identical legs using green yarn. End each row with 1 ss and 1 ch.

  1. Round 1-6sc in MR.
  2. Round 2(2 sc, inc) * 2 = 8 sc
  3. Round 3-48 sc End with 1 ch, fasten off and cut the thread, leaving a tip 1.5-2 cm long.

Head

Start with green yarn. End each row with 1 ss and 1 ch or crochet in a spiral:

  1. Round 1-5ch, in the third loop from the hook inc, 1 sc, 5sc in 1 loop (in the last of chain), 1 sc, inc
  2. Round 2inc, 3 sc, 3 inc, 3 sc, inc
  3. Round 3-518 sc
  4. Round 62 sc, inc, 1 sc, inc, 1 sc, inc, 1 sc, inc, 9 sc = 22 sc
  5. Round 7-22sc
  6. Round 85 sc, inc (4 dc), 3 sc, inc (4 dc), 12 sc
  7. Round 95 sc, dec (4 dc), 3 sc, dec (4 dc), 12 sc
  8. Round 10-22sc

Installing the Eyes

Insert the safety eyes between rows 7 and 8, with 5 sc between them.

  1. Round 11(2 sc, dec) * 5, 2 sc = 17 sc Fill the head with synthetic filler.
  2. Round 12(1 sc, dec) * 5, 2 sc = 12 sc
  3. Round 1312 sc

Body

Continue crocheting in a spiral from the head:

  1. Round 14(1 sc, inc) * 6 = 18 sc
  2. Round 15(2 sc, inc) * 6 = 24 sc
  3. Round 16(3 sc, inc) * 6 = 30 sc
  4. Round 17-30sc
  5. Round 18-21sc, 4 sc (attach first leg), 1 sc, 4 sc (attach second leg), 10 sc = 30 sc
  6. Round 19-2430 sc
  7. Round 2522 sc, 4 sc (attach third leg), 4 sc (attach fourth leg) = 30 sc
  8. Round 26-30sc Fill the body with filler as you continue.

Tail

  1. Round 27(3 sc, dec) * 6 = 24 sc
  2. Round 28-3024 sc
  3. Round 31(2 sc, dec) * 6 = 18 sc
  4. Round 32-3418 sc Fill the tail with filler.
  5. Round 35(1 sc, dec) * 6 = 12 sc
  6. Round 36-3812 sc
  7. Round 39(2 sc, dec) * 3 = 9 sc
  8. Round 40-429 sc Fill the remaining tail section.
  9. Round 43(2 sc, dec) * 2, 1 sc = 7 sc
  10. Round 447 sc Carefully close the loops in the last row.

Important notes

Note 01

💡 Keep a consistent tension throughout the head and body rounds — plush polyester yarn like YarnArt Dolce can hide gaps easily, but overly loose stitches will show once the piece is stuffed.

Note 02

💡 Use a stitch marker religiously at the start of every round, especially through the 8-round head and body sections, since it's easy to lose your place in continuous rounds.

Note 03

💡 Stuff the legs firmly but leave the very top rounds a little less full so they flatten nicely when sewn onto the body.

Note 04

💡 When installing the safety eyes, work on a flat surface and double-check spacing before locking the backs, since 10mm eyes are unforgiving once secured.

Note 05

💡 Save a long yarn tail after finishing the tail's final round — you'll want extra length for sewing it securely onto the body without needing to add new yarn.

Note 06

💡 Work the nose embroidery and claw details after the eyes are installed so you can balance all the facial features together for a more symmetrical, expressive final look.

FAQs

Asked on the glider

the ones that come up on the glider

What weight yarn works best for this crochet crocodile pattern?

The pattern is designed for plush worsted-weight yarn like YarnArt Dolce or Himalaya Dolphin Baby, both 100% polyester with a soft, velvety feel. This yarn type helps hide stitch definition nicely, which suits amigurumi shaping.

Can I make this crocodile without safety eyes for a baby-safe version?

Yes, simply skip the safety eye installation step and embroider the eyes instead using black yarn in a small satin stitch circle. This makes the toy safer for infants and very young children who might tug on plastic pieces.

How much yarn do I need to complete the whole crocodile?

Since the pattern uses two 120m/100g balls as the recommended yarn (one green, one white for details), one ball of each color is generally enough for the entire project, including the legs, head, body, and tail.

What size hook should I use for this pattern?

A 5mm crochet hook is recommended to match the plush worsted-weight yarn and achieve the right tight gauge for amigurumi, which helps keep the stuffing from peeking through the stitches.

How do I keep the crocodile's four legs symmetrical when attaching them?

Pin all four legs onto the stuffed body before sewing any of them permanently, checking the placement from the front, back, and top. This lets you adjust spacing evenly before committing with your tapestry needle.