Intermediate 4-6 hours Worsted yarn

Worked on the glider, counted out loud —

Crochet cactus amigurumi in a pot pattern

An intermediate amigurumi cactus in a pot, worked in rows and spirals. About 4-6 hours, good for a focused weekend project.

Jump to the rounds

What this one is

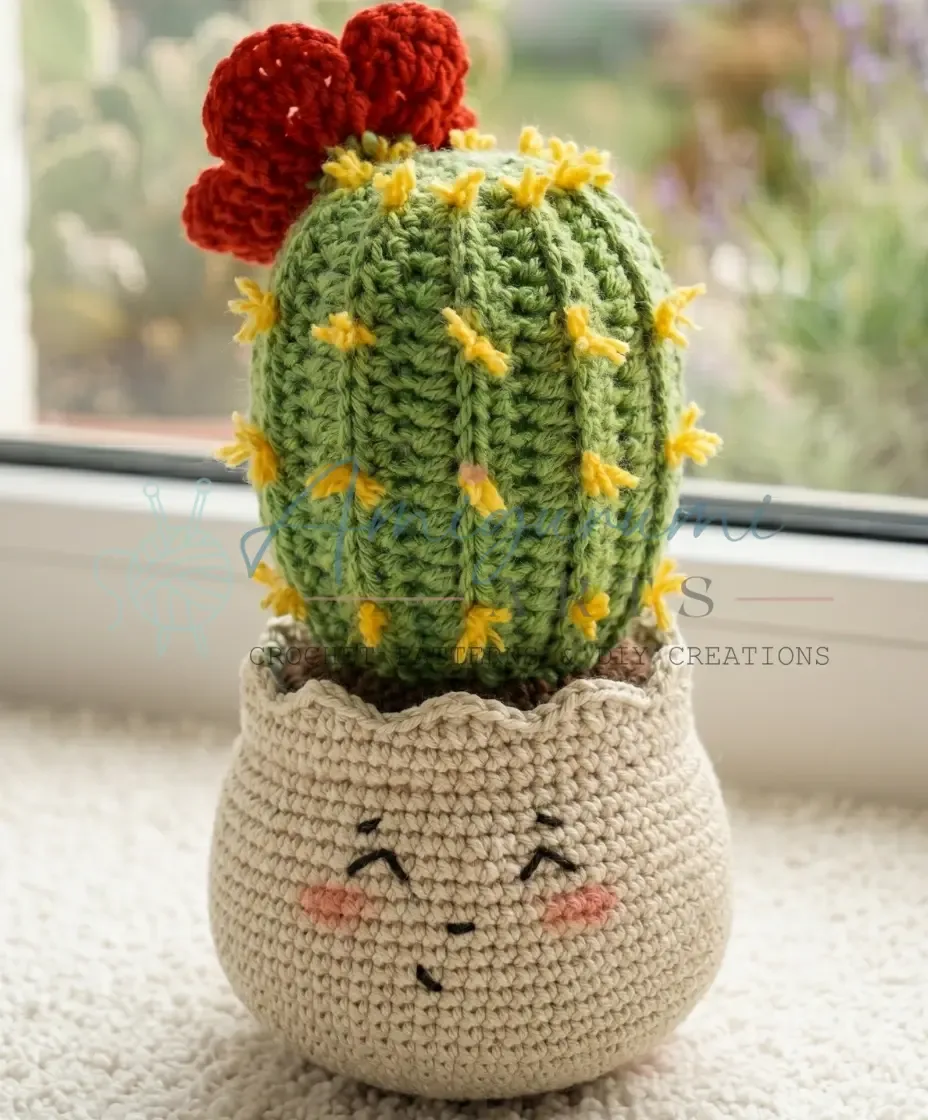
You know the kind of evening where you want something small and finished by the time you turn off the lamp, but nothing about it should feel rushed. This little potted cactus is for that evening. It's for anyone who loves a desk plant but has killed one too many real ones, or who wants a housewarming gift that never needs watering. The pot sits sturdy, the cactus stands tall, and the flower on top gives it a little personality without asking too much of you.

Your hands will move between two different rhythms here: tight back-and-forth rows in back loops only for the cactus body, then quiet continuous spiral rounds for the earth disc and the pot. There's a bit of shaping as the tube narrows and widens, a short flat flower motif worked in two colors, and some embroidery to lay in the spines. All told, you're looking at something you can comfortably finish in an afternoon, with maybe a second sitting for the stuffing and assembly.

Try it another way

Once you've made this cactus in a pot the once, there's plenty of room to play. Swap the green for a dusty sage or a cactus-print variegated yarn and the body reads completely differently without changing a single stitch count. The flower is the easiest place to experiment — work Rnd 2 in white or yellow instead of pink for a desert-bloom look, or make two flowers from your 2-3 meters of DK yarn and set them at different heights along the top edge. If you want a squatter cactus, you could stop the Cactus Body rows a few rows early, though you'll want to adjust your stuffing amount to match. The earth disc and pot both rely on that same 24-stitch Rnd 4 shaping logic, so if you're making a set of these as a gift, working several earth discs back to back in different browns (tan, chocolate, rust) gives each pot its own little personality while keeping the pot and cactus construction identical. For a no-sew shortcut, consider gluing the flower in place instead of stitching it, especially if this one is headed for a shelf rather than little hands.

There's real satisfaction in working the cactus body entirely in back loops only — it leaves a neat ridge on the right side that reads as texture even before you touch it with an embroidery needle. The shaping is the other quiet pleasure: watching 20 stitches swell to 72 and then taper back down through a run of decreases gives the tube its believable barrel shape without any fuss. The earth disc and pot, worked in plain continuous spiral, are a nice contrast — mindless, steady, good for half-watching something on in the background. And the two-round flower, spine yarn giving way to petals in a contrast color, is such a small thing to make but it's the detail that makes the whole piece feel finished rather than just stuffed and set down.
The rounds, in full

Written out, round by round

Intermediate4-6 hours3.5 mmWorsted

Bring to the porch

Everything this one takes, in the order you will reach for it.

Pot yarn

  • Worsted-weight yarn in beige (approx. 20–25 g)

Earth yarn

  • Worsted-weight yarn in brown (approx. 5–7 g)

Cactus yarn

  • Worsted-weight yarn in green (approx. 15–20 g)

Spine yarn

  • Sport/DK-weight yarn in light contrast color (approx. 2–3 m)

Flower yarn

  • DK-weight yarn in pink or desired color (approx. 2–3 m) + a small amount of spine yarn for Rnd 1 of the flower

Hook size

  • E-4 (3.5 mm) — adjust as needed for yarn weight

Safety eyes

  • 6 mm, quantity 2 (optional)

Stuffing

  • Polyester fiberfill, 35–45 g
  • Stitch marker (or a length of contrast yarn / a paper clip)
  • Tapestry needle with a large eye for seaming and weaving in ends
  • Scissors
  • Tweezers or a stuffing tool for packing fiberfill into tight spaces
  • Colored pencils or eyeshadow for adding blush to the face

Cactus Body (Green)

Foundation: ch 21 (20 ch + 1 turning ch). Leave a 30 cm tail before you begin.

All rows are worked in BLO. Turn at the end of each row.

  1. Rows 1–20ch 1 (turning ch), 20 hdc in BLO across. (20)Work more or fewer foundation chains to adjust height, or more/fewer rows to adjust width.After completing all 20 rows, cut yarn leaving a long tail. Do not weave in yet — this tail is used to seam the cactus into a tube.

Embroidering the Spines

Using the spine yarn and a tapestry needle, embroider spines across the right side of the cactus panel. You can work small raised knots for a "bumpy" cactus texture, or longer straight stitches for a classic spiny look. Space them evenly across the surface to your preference.

Earth Disc (Brown)

Work in continuous spiral rounds. Use a stitch marker to track the beginning of each round.

  1. Round 16 sc in MR. (6)
  2. Round 2inc in each st around. (12)
  3. Round 3inc, sc repeat around. (18)
  4. Round 42 sc, inc repeat around. (24)
  5. Round 5inc, 3 sc repeat around. (30)
  6. Round 62 sc, inc, 4 sc repeat 5 times, inc, 2 sc. (36)
  7. Round 7inc, 5 sc repeat around. (42)
  8. Round 82 sc, inc, 6 sc repeat 5 times, 4 sc. (48)
  9. Round 9inc, 7 sc repeat around. (54)
  10. Round 102 sc, inc, 8 sc repeat 5 times, 6 sc. (60)Fasten off. Weave in ends.

Assembling the Cactus

Roll the cactus panel into a tube with the spines facing outward on the right side. Using the long starting yarn tail, whipstitch the two short side edges together to close the tube. Then center the tube on the earth disc and sew the bottom edge of the cactus securely to the earth disc. Set aside.

Pot (Beige)

Work in continuous spiral rounds.

Note for the pot body: the sc stitches for the pot and earth disc are worked "cross-stitch style" — insert the hook from above the stitch rather than below. This creates a textured, woven look.

  1. Round 16 sc in MR. (6)
  2. Round 2inc in each st around. (12)
  3. Round 3inc, sc repeat around. (18)
  4. Round 42 sc, inc repeat around. (24)
  5. Round 5inc, 3 sc repeat around. (30)
  6. Round 62 sc, inc, 4 sc repeat 5 times, inc, 2 sc. (36)
  7. Round 7inc, 5 sc repeat around. (42)
  8. Round 82 sc, inc, 6 sc repeat 5 times, 4 sc. (48)
  9. Round 9inc, 7 sc repeat around. (54)
  10. Round 102 sc, inc, 8 sc repeat 5 times, 6 sc. (60)
  11. Round 11inc, 9 sc repeat around. (66)
  12. Round 122 sc, inc, 10 sc repeat 5 times, 8 sc. (72)
  13. Rounds 13–21sc in each st around. (72)
  14. Round 22dec, 22 sc repeat 3 times. (69)
  15. Round 2311 sc, dec, 21 sc repeat 2 times, dec, 10 sc. (66)
  16. Round 24dec, 20 sc repeat 3 times. (63)
  17. Round 2510 sc, dec, 19 sc repeat 2 times, dec, 9 sc. (60)
  18. Round 2660 sc in FLO only. (60)At this point, attach safety eyes and embroider the nose, eyebrows, and mouth using black thread. The start of your rounds is at the back of the pot — the face is centered on the opposite side.

Joining Earth Disc to Pot

Position the earth disc (with the cactus attached) inside the opening of the pot, aligning it with Rnd 25 of the pot body. Each stitch of the earth disc matches one stitch of the pot — both have 60 stitches. Using your tapestry needle and yarn, sew through each paired stitch around the circumference, leaving a gap for stuffing. Add fiberfill into the base of the pot — do not overstuff; the pot needs to sit flat without the bottom bulging. Once you are happy with the firmness, sew the remaining stitches closed.

Finishing the Pot

Continue crocheting the pot after the earth disc is sewn in.

  1. Round 27sc in each st around through both loops as normal. (60)
  2. Round 28Choose your finish: Option A — Classic Picot Crown (every 3rd stitch): 3 sc, [ch 3, sl st in 3rd ch from hook — picot made] repeat around. Option B — Decorative Crown with dc Points: Work a combination of sc and dc stitches to create taller "crown point" peaks at intervals. Plan the dc placement from the center-front of the face so that a peak falls symmetrically between the eyes.Tip: Count back from the center of the face and sketch your repeat on paper before you begin Rnd 28 — it makes centering the crown effortless.Fasten off. Weave in all ends.

Stuffing the Cactus Tube

Using tweezers or a stuffing tool, pack fiberfill firmly into the open top of the cactus tube. Once stuffed to your liking, pinch the top closed and sew it shut with a length of matching yarn. Weave in the end securely.

Flower

Using the spine yarn for Rnd 1 and the flower yarn for subsequent rounds, work the flower as a small flat motif:

  1. Round 1Spine yarn 5 sc in MR, sl st to join. (5)
  2. Round 2Flower yarn [ch 1, dc, ch 1, sl st] in each sc repeat 5 times. (5 petals) Fasten off, leaving a yarn tail for sewing.

Putting it together

Step 1

Confirm the cactus tube is centered and firmly sewn onto the earth disc.

Step 2

Confirm the earth disc is fully joined to the pot at Rnd 26, with the pot stuffed and closed.

Step 3

Stuff the cactus tube through its open top and sew the top edge closed.

Step 4

Position the flower at the top center of the cactus and sew it on using its yarn tail. Secure with a knot and weave in the end.

Step 5

If desired, brush a small amount of blush, eyeshadow, or a colored pencil mark onto each cheek area of the pot face for a rosy effect.

Step 6

Weave in all remaining ends throughout the project.

Marlene's notes

Note 01

Work the cactus body tightly enough that the fiberfill doesn't peek through the back-loop-only rows, since BLO leaves a slightly looser fabric than a full stitch.

Note 02

The earth disc and pot are worked in continuous spiral rounds with no joining or turning chains, so keep that stitch marker moving with you every round or you'll lose track of where you started.

Note 03

Pack fiberfill into the cactus tube with tweezers or a stuffing tool before you sew the top closed, especially down near the earth disc join where gaps are easy to miss.

Note 04

This pattern is written in US crochet terminology.

Note 05

Gauge is not critical for this project; consistent tension matters more. Work tightly enough that stuffing does not show through.

Before you sit down

  • Weigh out your green, brown, and beige worsted-weight yarn against the amounts listed so you're not caught short mid-round on the earth disc or pot.
  • Have your stitch marker ready before you start the earth disc and pot — both are worked in continuous spiral with no joining, so you'll want to track the beginning of each round from the first stitch.
  • Read through Rows 1-20 of the Cactus Body before you pick up your hook, since the whole piece is worked flat in back loops only and it helps to know that shape before the first turn.
  • Set aside your tapestry needle and a little extra spine yarn now, since Rnd 1 of the flower calls for it alongside the main flower yarn.

How the hours go

Cactus Body (Green)
about 1.5-2 hours because it's worked flat in BLO across 20-plus rows with several rounds of shaping increases and decreases to get the tube shape right
Earth Disc and Pot (Brown and Beige)
about 1.5 hours because the earth disc alone runs 10 rounds and the pot joins to it at Rnd 26, so there's a fair bit of spiral crochet before you reach assembly
Flower, embroidery, and assembly
about 1-1.5 hours because the two-round flower is quick but the spine embroidery and final sewing of cactus to disc, disc to pot, and flower to top all take a careful hand

Looking after it

  • Since this is worked entirely in worsted and DK-weight yarn with polyester fiberfill inside, skip the washing machine; spot clean any marks with a damp cloth and a little mild soap, then let it air dry fully before you set it back on the shelf.
  • Reshape the pot and cactus body gently with your fingers while they're still slightly damp if they've gotten squashed in storage, and store the finished piece somewhere it won't get crushed under heavier items, since the fiberfill will hold whatever shape it's left in.
FAQs

Asked on the glider

the ones that come up on the glider

Why is the cactus body worked flat instead of in rounds like the pot?

The pattern calls for back-and-forth rows in back loops only specifically to create texture and a seam, which gives the tube its ridged, cactus-like surface. You'll turn at the end of every row rather than working in a spiral.

What's the spine yarn used for in the flower?

Rnd 1 of the flower uses a small amount of the same yarn you used for embroidering the spines, with the main flower yarn taking over for the petals in Rnd 2. It's just enough to make the flower's center read as part of the same cactus family.

Do I need both 6 mm pieces listed in the materials?

Those are listed as optional, so they're there if you want to add safety eyes or a similar detail to the pot's face. The pattern works perfectly well with just embroidered or blushed features instead.

How do I know where the earth disc joins the pot?

The assembly steps specify joining the earth disc to the pot at Rnd 26, with the pot already stuffed and closed by that point. Confirm the pot is fully stuffed before you sew that join so you're not trying to add fiberfill through a nearly-closed seam.

Can I skip the blush on the pot's face?

Yes, the blush step is listed as optional, so leaving the pot's face plain works just fine if you'd rather keep things simple. A little colored pencil or eyeshadow on the cheeks just adds a soft, finished look if you want it.

What size hook should I use?

The pattern calls for an E-4 (3.5 mm) hook, adjusted as needed for your yarn weight. Since gauge isn't critical here, focus more on keeping your tension consistent and tight enough to hide the fiberfill.