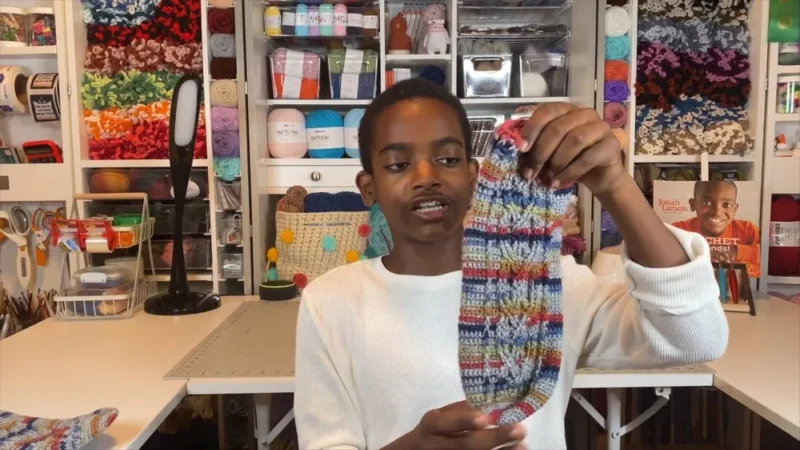
Intermediate 3-4 hours per sock Fingering/Sock yarn

Worked on the glider, counted out loud —

Crochet cable socks pattern for cozy evenings

A toe-up crochet cable sock pattern for confident beginners, worked in a few easy evening sittings.

Jump to the rounds

What this one is

These socks are for the kind of quiet evening when your feet notice the cold before the rest of you does, and you want something small to work on that doesn't need much light. They suit anyone who already knows single crochet comfortably and wants to stretch into post stitches and a bit of simple cabling without committing to a full garment. Toe-up construction means you can try the sock on as you go, which takes a good deal of the guesswork out of fit.

Your hands spend most of the project in single crochet, building ten stitches up from a magic ring and increasing round by round until the toe is wide enough to carry on as a foot. The cable section asks for more attention, with front post treble crochet crossing itself every other round, and the heel brings you back to plain single crochet decreases. Worked in sock-weight yarn on a very small hook, one sock comes together over a few steady sittings rather than one long one.
Try it another way

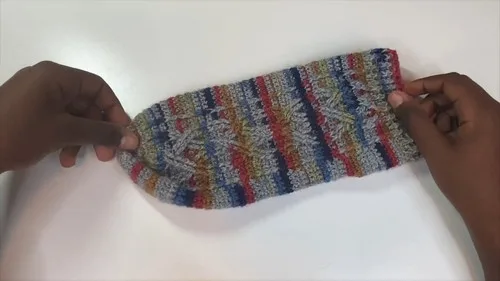
There's real satisfaction in watching a magic ring turn into a toe you can count stitch by stitch, each increase round doubling the shaping until the foot takes form in your hands. The cable section is where this pattern earns its name: front post treble crochet worked around stitches two rounds below, crossing a pair of columns against a plain background, so you get a raised rope pattern without any cable needle or drama. Once you've worked the cable rounds a few times, the rhythm of chain one, skip two, work the posts, skip two more becomes almost automatic. Then the heel decreases the stitches right back down, closing the sock from the inside, so the whole piece feels like it comes full circle, from one small ring to another.

The rounds, in full

Written out, round by round

Intermediate3-4 hours per sockFingering/Sock

Bring to the porch

Everything this one takes, in the order you will reach for it.

  • Sock yarn (Patton's Croissant yarn is used in the tutorial)
  • Very small crochet hook
  • Stitch marker

Toe Section

  1. Round 1Make a MR and ch 1. Work 10 sc into the MR. Pull the working yarn through the MR to cinch it up and secure it.
  2. Round 2sc in the next sc, mark this stitch as the first stitch of the round, sc in the next 9 sc.
  3. Round 3Increase all stitches. sc in the first sc, 2 sc in the next sc, repeat around. For Round 4: sc in each sc around.Repeat rounds 3 and 4 until you have worked 12 rounds total.
  4. Round 13Work from the wrong side of your work. sc in each sc around.

Cable Section

  1. Round 1ch 1, sc in the first sc.
  2. Round 2Skip the first 2 sc, hdc around the next 2 sc, skip the next 2 sc, sc in the next 2 sc.For Round 3:ch 1, skip the first 2 sc, fptc around the next 2 sc, skip the next 2 sc, fptc around the next 2 sc, skip the next 4 sc, sc in the next 2 sc.
  3. Round 4ch 1, sc in each sc around. Repeat rounds 3 and 4 for the desired length of the cable section.

Heel Section

  1. Round 1Skip the first 24 sc, ch 1, turn, skip the first 24 sc, sc in each sc around.
  2. Round 2sc in each sc around. For Round 3: Decrease 2 stitches. sc in the first sc, skip the next sc, sc in the next sc, repeat around.
  3. Round 4sc in each sc around. Repeat rounds 3 and 4 until you have decreased all stitches.

Brim

  1. Round 1ch 1, fpdc in the first sc, skip the next sc, bpdc in the next sc, repeat around.For Round 2: ch 1, sc in each sc around.Repeat rounds 1 and 2 for the desired length of the brim.

Putting it together

Step 1

Sew the heel together from the inside.

Step 2

Weave in any loose ends.

Marlene's notes

Note 01

The pattern calls for a very small crochet hook, smaller than most everyday hooks, so keep an eye on your tension through the toe's increase rounds where it's easiest to drift tight or loose.

Note 02

Once your stitch marker is placed in round 2, move it up every round without exception, or you'll lose track of where each round starts, especially once the cable crossings start competing for your attention.

Note 03

Keep the plain single crochet rounds, including the sc rounds in the heel, at the same tension as the rest of the sock, since the skipping and crossing in the cable rounds will already pull things in slightly.

Porch photos

Before you sit down

  • Check how much sock yarn you actually have on hand; toe-up socks use yardage steadily through the foot and heel, and you don't want to run short mid-cable.
  • Have your stitch marker ready before round 2 of the toe section, since that's exactly where you mark the first stitch of the round, and you'll be relying on it for every round after.
  • Work a small swatch in single crochet with your very small hook first, since the toe starts from only 10 stitches and any looseness in your tension shows up fast at that scale.
  • Read through round 2 and round 3 of the cable section before you begin them, so the skip-and-fptc placement makes sense in your head before your hook is already committed mid-round.

How the hours go

Toe Section
about 30-40 minutes, because it covers 13 rounds total, though most are straightforward increase or plain sc rounds
Cable Section
about 45-60 minutes, because the fptc crossings in round 3 go slower than plain single crochet and you repeat rounds 3 and 4 several times for length
Heel Section & Brim
about 30 minutes, because the decrease rounds move quickly once stitches start skipping down to nothing, with just one plain round left for the brim

Looking after it

  • Wash these socks by hand in cool water, or on a wool-safe cycle if your sock yarn's fiber content allows it, since rough agitation can flatten the definition in the fptc cable rounds.
  • Lay them flat to dry away from direct heat, gently reshaping the toe and heel while still damp, then store them flat or loosely rolled rather than folded across the cable band, so the raised posts don't get pressed down over time.
FAQs

Asked on the glider

the ones that come up on the glider

Can I use a different yarn weight instead of sock yarn?

You can, but you'll need to adjust your hook size, and the final measurements will shift since the toe's 10-stitch magic ring and 12 increase rounds are sized around sock-weight yarn. A heavier yarn gives you a noticeably bigger sock from the same stitch counts.

How do I know when to stop repeating rounds 3 and 4 in the cable section?

That's up to how long you want the cable panel before the heel starts, since the pattern has you repeat those two rounds for the desired length rather than a fixed number of times. Try the sock on as you go and stop once it covers the foot length you want.

What exactly is fptc and where does it show up?

Fptc stands for front post treble crochet, and it appears only in round 3 of the cable section, worked around two stitches at a time with skips in between. It's what gives the finished panel its raised, rope-like look.

Why does round 13 of the toe section say to work from the wrong side?

That round is the pivot point where the piece turns from toe shaping into the start of the cable section, so the right side ends up facing out once you keep going. It only happens that one time and is intentional, even though it feels odd mid-round.

I lost track of my stitch marker partway through, what now?

Go back to the last full round where you're sure of the start, count the ten toe stitches from there, and re-place your marker at the beginning of the round. The marker only tracks the round's start and doesn't change your stitch count, so there's nothing to unravel.

How do I finish the heel once the shaping is done?

Once all the stitches in the heel section have been decreased away, sew the heel together from the inside, then weave in any loose ends. It's a small seam worked only after the shaping is fully complete.