Intermediate 4-6 hours Worsted yarn

Worked on the glider, counted out loud —

Crochet bull amigurumi pattern for beginners

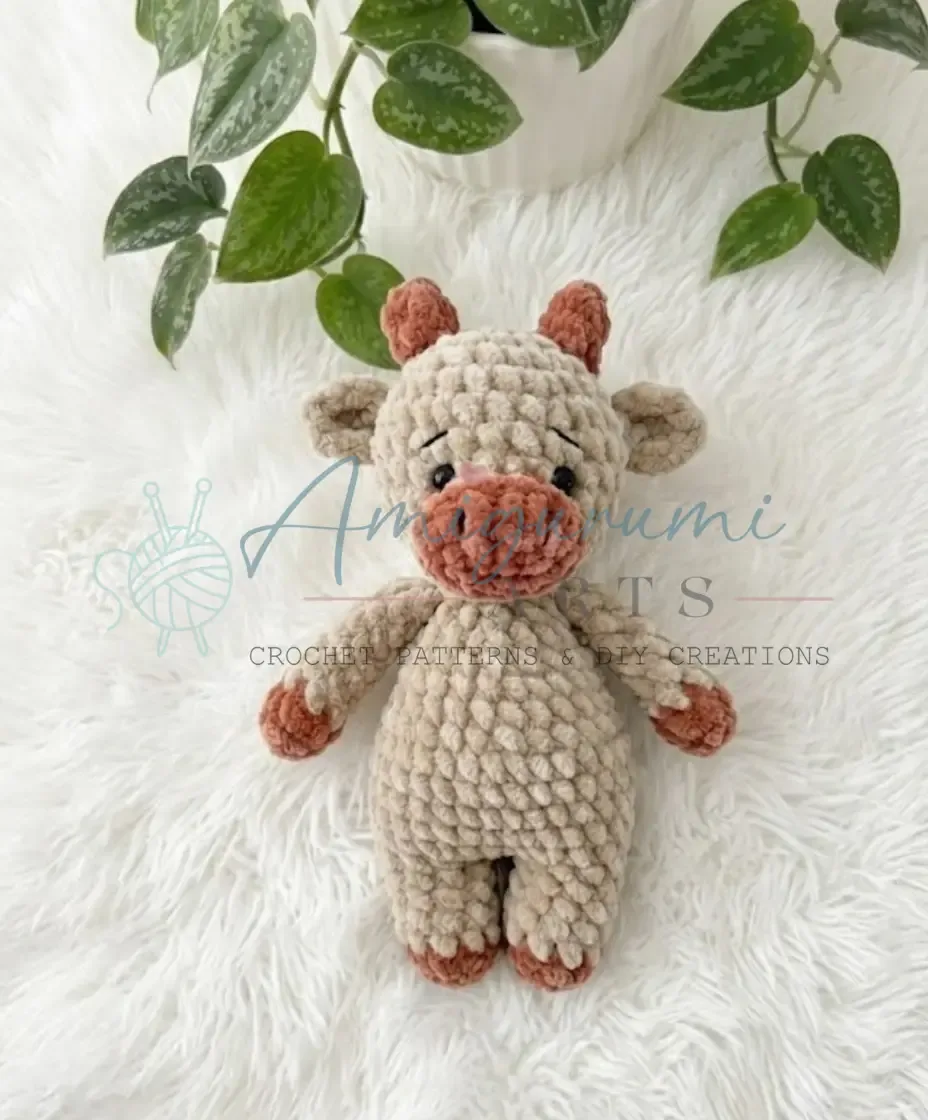
A friendly two-color bull amigurumi with horns and a snout. Great for beginners with a few hours to spare on hand.

Jump to the rounds

What this one is

You know that stretch of evening when you want your hands busy but your mind doesn't want a challenge that fights back? This little bull is for exactly that. He's sturdy, a bit stubborn-looking in the best way, with his curved horns and that round snout sitting front and center on his face. Make him for a kid who loves the farm, for a shelf that needs something with personality, or just for yourself because you like the shape of him.

Try it another way

This little bull takes well to small changes. Swap the main and contrasting colors around so he comes out dark-bodied with a light snout and horns instead, which reads as a completely different animal personality. If you want him smaller for a keychain or ornament-sized piece, drop to a lighter worsted-weight yarn with the same G-6 hook, though you'll want to watch your stitch counts stay tight since the pattern's increases are built for a plush-weight yarn. You could also skip the safety eyes glue-and-wait step and embroider the eyes instead if the toy is meant for a very young child, pairing them with the black embroidery thread already on your materials list for the eyebrows and nostrils. For a bull with more presence, work the horns a shade darker than the rest so they stand out against the head instead of blending in. And if you're making more than one, alternating which color you use for the arms each time turns a single pattern into a small herd where no two bulls quite match.
The rounds, in full

Written out, round by round

Intermediate4-6 hours4.5 mmWorsted

Bring to the porch

Everything this one takes, in the order you will reach for it.

  • Plush yarn in two colors: one main color (light) and one dark/contrasting color

Hook size

  • G-6 / 4.5 mm
  • Black embroidery thread (for eyebrows and nostrils)

Tools

  • Fiberfill stuffing
  • Yarn needle / tapestry needle
  • Scissors
  • Stitch markers
  • 8 mm safety eyes (2)

Head

  1. Round 1Ch 2, work 6 sc into the 2nd ch from hook. (6)
  2. Round 2inc in each st around. (12)
  3. Round 3sc, inc repeat 6 times. (18)
  4. Round 42 sc, inc repeat 6 times. (24)
  5. Round 53 sc, inc repeat 6 times. (30)
  6. Rounds 6–9sc in each st around. (30)
  7. Round 103 sc, dec repeat 6 times. (24)
  8. Round 112 sc, dec repeat 6 times. (18)
  9. Round 12sc, dec repeat 6 times, sl st to close. (12)Cut yarn, leaving a short tail. Stuff the head firmly with fiberfill before assembly. this …

Arms (Make 2)

Begin with dark color yarn.

  1. Round 1Ch 2, work 7 sc into the 2nd ch from hook. (7)
  2. Round 27 sc. At the end of this row, switch to main color yarn. (7)
  3. Rounds 3–77 sc. (7) — work 5 rows total
  4. Round 8dec, 5 sc. (6)Fold the arm in half and work 3 sc through both layers to close the opening. Do not stuff the arms. Cut yarn, leaving a short tail.

Snout

Work with dark color yarn.

  1. Round 1Ch 4. Starting from the 2nd ch from hook: 2 sc, 3 sc in the last ch; working back along the opposite side of the foundation chain: 1 sc, inc. (8)
  2. Round 2inc, 1 sc, 3 inc, 1 sc, 2 inc. (14)
  3. Round 314 sc, sl st to close. (14)Cut yarn, leaving a long tail for sewing the snout onto the head.

Horns (Make 2)

Work with brown yarn.

  1. Round 1Ch 2, work 5 sc into the 2nd ch from hook. (5)
  2. Round 25 sc. (5)
  3. Round 32 sc, sl st. (partial round — creates the natural curve) Cut yarn, leaving approximately 6 inches (15 cm) for sewing. Because round 3 is partial, one side of the horn is slightly larger — this is intentional. Sew the larger side facing toward the snout (front), and the shorter side toward the back.

Legs and Body

Begin with dark color yarn.

First Leg:

  1. Round 1Ch 2, work 5 sc into the 2nd ch from hook. (5)
  2. Round 2inc in each st around. At the end of this round, switch to main color yarn. (10)
  3. Rounds 3–6sc in each st around. (10) — work 4 rounds total Fasten off with a sl st. Cut yarn and weave in ends.

Second Leg:

Rnds 1–6: Work exactly as the First Leg through round 6. Do not cut yarn after round 6. Continue directly into the body.

Body (joining the legs):

  1. Round 7Work 5 sc across the Second Leg, ch 1, then continue working across the First Leg starting from the stitch where you fastened off — work 10 sc across the First Leg, inc in the ch-1 space, 10 sc across the Second Leg, inc in the ch-1 space. (24)
  2. Round 83 sc, inc repeat 6 times. (30)
  3. Rounds 9–12sc in each st around. (30) — work 4 rounds total
  4. Round 133 sc, dec repeat 6 times. (24)
  5. Rounds 14–15sc in each st around. (24) — work 2 rounds total
  6. Round 162 sc, dec repeat 6 times. (18)
  7. Round 17sc in each st around. (18)
  8. Round 18sc, dec repeat 6 times. (12)
  9. Round 192 sc, work 3 sc joining the first arm (holding the arm in place and crocheting through both the body stitch and the arm together for 3 stitches), 3 sc, work 3 sc joining the second arm in the same way, 1 sc, sl st to close. (12)Cut yarn, leaving a long tail for sewing on the head.

Ears (Make 2)

Work with main color yarn.

  1. Round 1Ch 2. Into the 2nd ch from hook: sc, hdc, 3 dc, hdc, sc, sl st. Cut yarn, leaving a long tail for sewing.

Tail

Ch 7. Starting from the 2nd ch from hook, work 6 sl st. Fasten off and cut yarn.

Putting it together

Step 1

Sew the head firmly to the top of the body using the long yarn tail left on the body and your yarn needle.

Step 2

Position the snout centered on the lower half of the face and sew it in place using the long tail.

Step 3

Sew the ears onto either side of the head, angling them slightly outward.

Step 4

Sew the horns to the top of the head, with the larger curved side facing forward toward the snout.

Step 5

Secure the safety eyes to the head using glue, positioned between rounds 6 and 7 with the snout as your centering guide.

Step 6

Using black embroidery thread, stitch two small curved eyebrows above the safety eyes and two small nostril dots on the snout.

Step 7

Sew the tail to the back of the body at the base.

Step 8

Weave in all remaining yarn ends.

Marlene's notes

Note 01

Use a G-6 / 4.5 mm hook throughout and keep your tension snug and even, since a looser gauge will let the fiberfill peek through on a small amigurumi like this one.

Note 02

Move your stitch marker up at the start of every new round on the head, body, and legs, since these parts are worked in a continuous spiral with no joining slip stitch to mark the round for you.

Note 03

Stuff the head and body firmly as you close each section rather than trying to add fiberfill through a small opening afterward, since a solid fill helps the safety eyes sit properly between rounds 6 and 7.

Before you sit down

  • Read through Round 1 of the head so you're comfortable starting with 6 sc into the second chain from the hook before you commit yarn to it.
  • Set out your stitch markers now, since the head and body are worked in a continuous spiral and you'll want the marker in place from the very first round to track where each one begins.
  • Have your 8 mm safety eyes and fiberfill within reach before you finish the head, since the eyes get placed between rounds 6 and 7, well before you're done stuffing.

How the hours go

Head
about 45 minutes to an hour, because it runs 9 rounds with several increase rounds to keep even before you close it up
Legs and body
about 1 to 1.5 hours, because at 12 rounds it's the longest single piece in the pattern and needs steady stuffing as you go
Small parts and assembly
about 1.5 to 2 hours, because the arms, snout, horns, ears, and tail each need their own short work session plus sewing and eye placement at the end

Looking after it

  • Since this is worked in plush yarn, hand wash gently in cool water if needed and avoid wringing, then reshape the head, horns, and snout by hand while damp so they dry holding their round shape.
  • Let him air dry fully flat or upright on a towel away from direct heat, and store him somewhere he won't get squashed, since plush yarn can flatten under weight over time.
FAQs

Asked on the glider

the ones that come up on the glider

Do I need to join at the end of each round on the head and body?

No, the head, body, and legs are worked in a continuous spiral, so you never slip stitch to close a round. Just keep a stitch marker in the first stitch of each round so you know where you started.

Where exactly do the safety eyes go?

The eyes are secured with glue between rounds 6 and 7 of the head, using the snout's eventual position as your guide for placement. It helps to have the snout roughly positioned first even though you sew it on later.

Can I use a different hook size than the G-6?

You can, but a smaller hook will make a denser fabric that holds stuffing in better, while a larger one may let fiberfill show through the stitches. If you swap sizes, work a quick swatch first to check the fabric feels firm enough for an amigurumi.

How much fiberfill will I need?

The pattern doesn't give an exact amount, but expect to stuff the body and head quite firmly, plus lighter stuffing in the arms and legs. Have your fiberfill open and ready before you start closing up the head, since you'll add it in stages rather than all at once at the end.

Are the arms and snout worked differently from the head and body?

Yes, the head, body, and legs are worked in continuous spiral rounds, while the arms and snout are worked in flat rows. That means you'll be turning your work for the arms and snout in a way you don't for the rest of the pieces.