Intermediate 4-6 hours Worsted yarn

Worked on the glider, counted out loud —

Colorful ringed worm amigurumi pattern

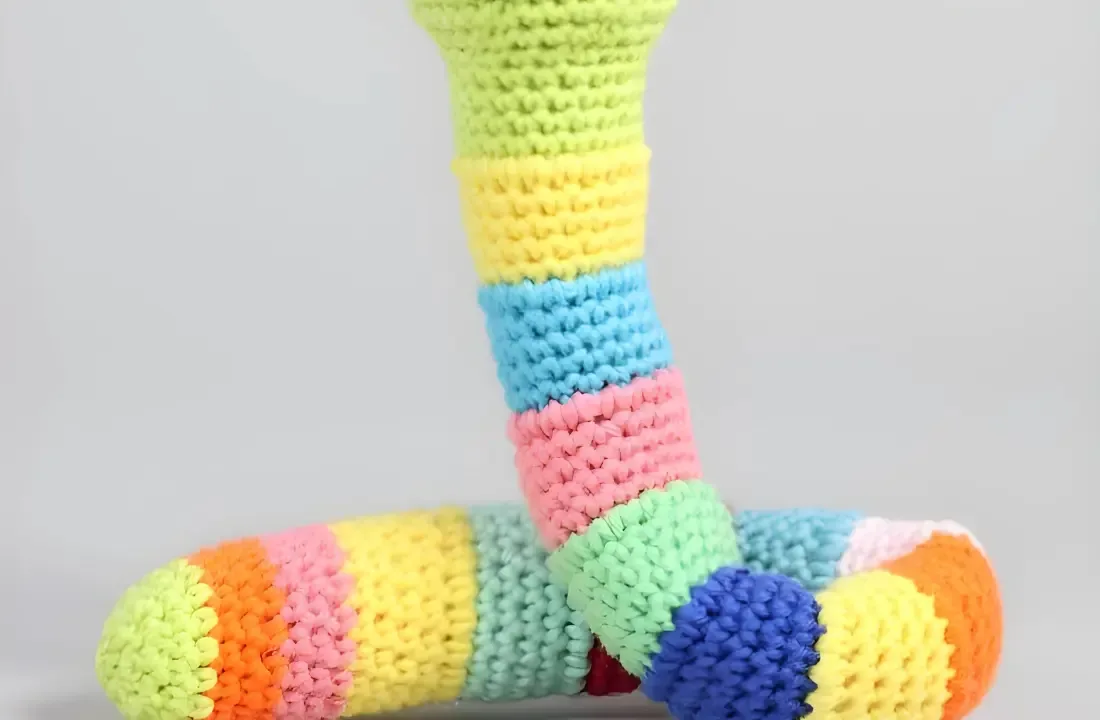
A cheerful ringed worm amigurumi with twelve color changes, suited to confident beginners; about 4-6 hours start to finish.

Jump to the rounds

What this one is

There's a particular kind of evening that calls for a project you can pick up and put down without losing your place, and this worm is exactly that. Each ring is its own small commitment, a handful of rounds in one color before you move to the next. It suits a maker who likes watching a spectrum build up gradually, and it makes a soft, silly companion for a kid's shelf or a gift that doesn't need wrapping paper to look cheerful.

Your hands spend most of this pattern doing plain single crochet in the round, with the real shaping saved for the head and tail sections where you increase and decrease. In between, you're changing color again and again, stuffing as you go so the worm stays even instead of lumpy at the end. Between the ring work, the eye placement, and a bit of embroidery for the face, you can expect somewhere around four to six hours total.

Try it another way

What makes this one satisfying is the rhythm of it: you work a short stretch of single crochet, change color, and repeat, so the piece visibly grows more colorful the longer you sit with it. The shaping itself is minimal and tucked into just two spots, the increase round at the head and the decrease round at the tail, which means most of your attention goes to color and stitch count rather than tricky construction. There's also something quietly pleasing about the slip stitch round that opens the body section; it sets a clean line before the single crochet takes over. By the time you've worked through a dozen color changes, you've got a genuinely striking rainbow body to show for an otherwise simple stitch.

The rounds, in full

Written out, round by round

Intermediate4-6 hours8 mmWorsted

Bring to the porch

Everything this one takes, in the order you will reach for it.

  • embroidery needle & black yarn, 2 safety eyes 0.3 inches (8 mm), fiber filling.
  • Recommended crochet hook: US size B/1-C/2 (2.5 mm)

Yarn

  • Rainbow Cotton 8/4
  • 1 x main color: Light Lime (017)

12 different colors for the body

  • 1 x Pastel yellow (053)
  • 1 x Petrol blue (035)
  • 1 x Light coral (050)
  • 1 x Light green (019)
  • 1 x Cobalt Blue (096)
  • 1 x Burned orange (066)
  • 1 x Pastel pink (042)
  • 1 x Turquoise (033)
  • 1 x Dark red (059)
  • 1 x Pastel Mint (025)
  • 1 x Abricot (065)
  • 1 x Baby pink (044)

Head

Worked in the main color (light lime), the head begins with a magic ring and increases every round through Round 6 to reach 36 stitches, works even for five rounds while you insert the safety eyes, then decreases back down through Round 14 to 18 stitches before the body begins.

  1. Round 16 sc in a mr [6](6)
  2. Round 2increase 6x [12](12)
  3. Round 31 sc, increase 6x [18](18)
  4. Round 42 sc, increase 6x [24](24)
  5. Round 53 sc, increase 6x [30](30)
  6. Round 64 sc, increase 6x [36](36)
  7. Rounds 7–111 sc in each stitch (5 rounds) [36] Insert the safety eyes between round 9 and 10 with an interspace of 8 stitches between the eyes.(36)
  8. Round 124 sc, decrease 6x [30](30)
  9. Round 133 sc, decrease 6x [24](24)
  10. Round 142 sc, decrease 6x [18](18)
  11. Rounds 15–181 sc in each stitch (4 rounds) [18] Color change You change color by finishing the last stitch with a new color.(18)

Body (Color-Changed Rings)

Each of the twelve body colors is worked as a distinct ring: a round of slip stitches sets a clean edge (Round 19), single crochet is then worked over those slip stitches (Round 20) and continued for four more rounds (Rounds 21-24), and this whole sequence repeats twelve times, one per color, stuffing the worm continuously as your work develops.

  1. Round 19Work 1 round of slip stitches [18](18)
  2. Round 20Work sc over sl from the last round, and place them in the same stitch as you placed the sl st.
  3. Rounds 21–241 sc in each stitch (4 rounds) [18] Repeat … 12 times. Stuff the worm, and do so continuously as your work develops.After 12 color changes, crochet like this using the main color (light lime): 1 sc in each stitch (3 rounds) [18]1 sc in each stitch (3 rounds) [18]1 sc in each stitch (2 rounds) [18]1 sc, decrease 6x [12] decrease 6x [6]Stuff the worm firmly.Cut the yarn and insert the thread through the front loops of the 6 last stitches and tighten.Weave in the ends.(18)

Marlene's notes

Note 01

Keep a stitch marker in play throughout the ring section; with no visible shaping to guide you, it's the only reliable way to know where each round begins and ends.

Note 02

clean color changes, finish the last stitch of the old color by pulling the new color through the final two loops, so the join sits right at the top of the stitch rather than showing a stray bump.

Note 03

Stuff continuously as you complete each set of rounds rather than waiting until the end; a worm this long gets hard to fill evenly once it's closed up.

Note 04

The finished worm measures about 12.6 inches (32 cm) long, worked at a beginner-friendly gauge with the recommended US size B/1-C/2 (2.5 mm) hook.

Before you sit down

  • Lay out all thirteen colors before you begin so you know your color order for the twelve changes, rather than deciding on the fly mid-round.
  • Place a stitch marker in the first stitch of each round once you're past the shaping sections, since the plain single crochet rounds give you no other way to track where a round starts.
  • Work a small test round to confirm your 18-stitch and 36-stitch circles feel snug enough to hold stuffing without gaps between stitches.

How the hours go

Head shaping and eye placement (R1-R14)
about 45 minutes because of the increase rounds up to 36 stitches, the decrease rounds back to 18, and positioning the safety eyes with an 8-stitch gap between rounds 9 and 10
Body rings with color changes (R19 onward)
about 2.5 to 3 hours because of the slip stitch setup round followed by twelve separate color changes, each needing its own stuffing pass
Tail shaping and finishing
about 45 minutes to an hour because of the decrease sequence back down to 6 stitches and the embroidered face details

Looking after it

  • Hand wash the finished worm in cool water with a gentle soap, since the cotton yarn holds its stitch definition best without a washing machine's agitation.
  • Reshape the rings gently while still damp and lay flat to dry, keeping the safety eyes away from direct heat so they don't warp the surrounding stitches.
FAQs

Asked on the glider

the ones that come up on the glider

Do I need all thirteen colors listed?

You need enough colors to cover the twelve color changes plus the main color used at the start and end, so thirteen gives you one shade per change with the main color doing double duty. You could repeat colors instead if you'd rather work with fewer skeins.

Can I substitute the safety eyes for something else?

Yes, embroidered eyes in black yarn work just as well and are gentler for very young children. Just keep the same rough placement, between rounds 9 and 10 with space between them, so the face reads correctly.

Why does the pattern start the body with a round of slip stitches?

That first slip stitch round in Round 19 sets up a defined ridge before the single crochet rounds begin, giving the first color band a cleaner edge. It's worked once, then you move straight into single crochet for the rest of that color.

How do I keep my color changes from looking messy?

Finish the stitch before the change by drawing the new color through the last two loops instead of finishing with the old color first. This tucks the join into the top of the stitch so it barely shows.

When exactly do I insert the safety eyes?

They go in during the head section, positioned between rounds 9 and 10 with eight stitches of space between them. It helps to do this before you stuff that section fully, since it's easier to check the spacing from inside.

How much should I stuff as I go?

Stuff firmly but evenly after each color change rather than saving it all for the end, since a long piece like this is much harder to fill consistently once it's closed. Aim for a fullness that lets the ring hold its round shape without straining the stitches.