Intermediate 4-6 Hours Bulky yarn

Worked on the glider, counted out loud —

Chubby Amigurumi Rabbit Pattern: Make Your Own Plush Toy

Crochet an adorably chubby amigurumi rabbit with this detailed pattern covering head, ears, snout, nose, legs, heels, arms, body, and tail for a huggable h

Jump to the rounds

Before you sit down

Crochet the chubby head first, shaping it gradually over its rounds before stuffing it firmly.

Make two matching ears separately, keeping them small and neat to attach to the head later.

Attach the safety eyes and embroider eyelashes and a mouth once the head shape is finalized.

Crochet two legs and two heels, working the heel sections carefully so the rabbit can sit upright and stable.

Work two arms in fewer rounds than the legs, then crochet the body, working the legs and arms directly into it as you go.

Crochet the tail, then stuff every piece firmly and evenly as you finish it, rather than waiting until final assembly.

Pin all the pieces onto the head and body to check symmetry before sewing everything securely in place.

What this one is

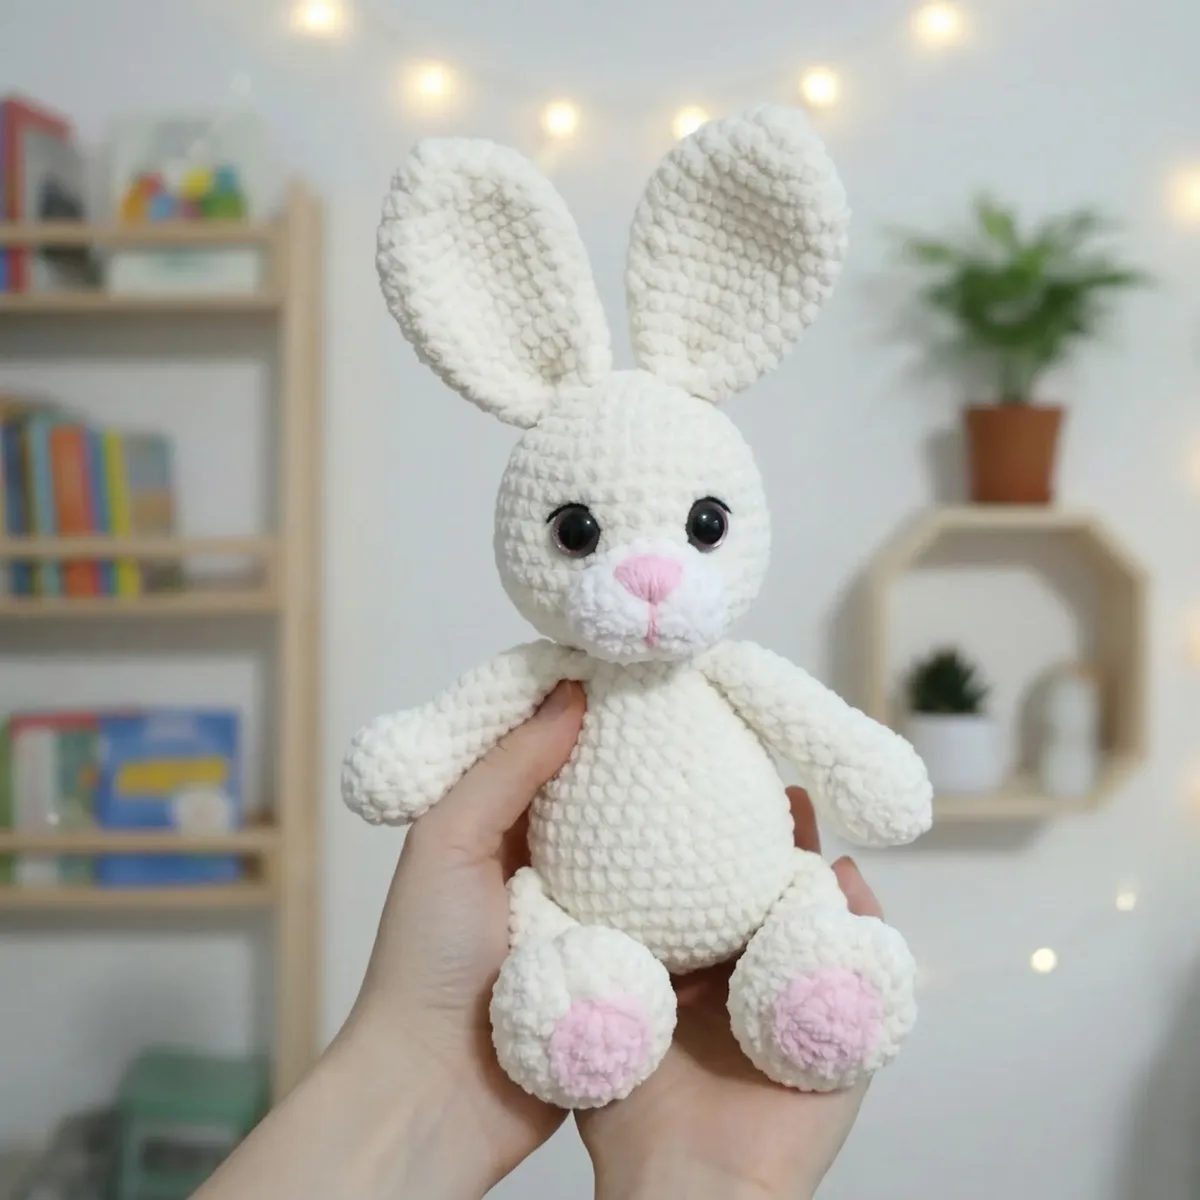
This chubby amigurumi rabbit is the kind of project that makes you fall back in love with crochet toys. Worked up in soft plush yarn, it features a rounded head, perky ears, a contrasting white snout, and a tiny pink nose that gives it so much personality. The chunky legs with defined heels give this bunny a stable, sit-up-and-beg pose that's irresistibly charming. It's perfect for anyone who wants to make a special handmade gift for a baby shower, a birthday, or just to add a soft little friend to their own shelf.

You'll work through a head built up over eighteen rounds, ears over fourteen rounds, a snout and nose, legs and heels, arms, a body worked over twenty-one rounds, and a tail — all in continuous spiral rounds with a stitch marker to keep your place. Expect to use color changes for the white snout and pink nose sections, plus safety eye placement and firm stuffing techniques throughout. This is a comfortable intermediate project: not overly complex, but with enough shaping and assembly to keep things interesting. Set aside a relaxed weekend afternoon, or a few cozy evenings, to bring your rabbit fully to life.

When it's all stitched and stuffed, you'll have a plush, huggable rabbit with a rounded chubby body silhouette, a soft plush-yarn texture that begs to be squeezed, and an expressive little face thanks to the embroidered eyelashes and mouth. The finished size is generous and satisfying to hold — substantial enough to feel like a real cuddle buddy, not a tiny trinket. It's the kind of handmade toy that becomes a lifelong keepsake, making it an especially meaningful gift for a new baby, a bunny lover, or your own cozy corner.

Variations

One of the best things about this rabbit is how easy it is to make it your own. Swap the main color plush yarn for a soft lavender, buttery yellow, or dusty blue instead of the classic white or gray, and pair it with a contrasting snout color like cream or blush for a totally different look. Try Bernat Blanket in 'Vintage White' with a Himalaya Dolphin Baby pink snout for a soft pastel bunny, or go bold with a charcoal gray main color and a bright white snout for high contrast. For a mini version, work one fewer round on the head and reduce the legs and arms by one round each — this shrinks the overall size nicely while keeping proportions balanced; just stuff a little less firmly to match the smaller shape. Want a bigger, extra-huggable rabbit? Add an extra round or two to the head and legs before starting decreases, keeping increases proportional to avoid puckering. Seasonal fans can lean into a spring theme with soft pink and mint accents, or make a fall bunny in warm caramel and cream tones. If you can't find plush yarn locally, Baby Hugs Medium or Comfy Cotton Blend make lovely substitutes with a slightly different texture but similar squish. For gifting, personalize with a tiny crocheted bowtie or a small fabric ribbon around the neck, or embroider a heart on one ear for a sweet, one-of-a-kind touch.

Common mistakes

  • Losing track of the beginningPlace a stitch marker in the first stitch of every round and move it up as you go — don't rely on counting stitches alone, since it's easy to drift off by one.
  • Stuffing the head, legs, or armsStuff firmly and in small handfuls as you work each part, checking that the fabric feels dense and rounded before closing it up, especially in the chubby head shaping rounds.
  • Attaching safety eyes before finalizingComplete all head shaping rounds first, then temporarily test the eye placement with stitch markers, step back to check symmetry, and only snap the safety eyes in place once you're happy with the spacing.
  • Skipping or rushing the heel sectionWork the heel rounds carefully as written and stuff them just as firmly as the rest of the leg so the rabbit can sit stably once assembled.
  • Sewing the ears, arms, or legsPin all pieces in place first with removable stitch markers, check the overall pose and symmetry from multiple angles, and only sew permanently once everything looks balanced.

The rounds, in full

Written out, round by round

Intermediate4-6 Hours4.0 mmBulky

Materials

Everything this one takes, in the order you will reach for it.

  • Crochet hook suitable for your chosen yarn (e.g., 4.0mm–5.0mm for plush yarn)
  • Plush yarn (e.g., Bernat Blanket, Himalaya Dolphin Baby, Sweet Snuggles)
  • Main color (approx. 100g)
  • White plush yarn (for snout, small amount)
  • Pink plush yarn (for nose, very small amount)
  • Safety eyes (e.g., 10mm–12mm, depending on desired size)
  • Black embroidery floss (for eyelashes/mouth)
  • Fiberfill stuffing
  • Yarn needle (tapestry needle)
  • Scissors
  • Stitch markers

keep this to hand

Abbreviations

US crochet terms, as used in this pattern.

  1. chChain
  2. sl stSlip Stitch
  3. scSingle Crochet
  4. hdcHalf Double Crochet
  5. dcDouble Crochet
  6. incIncrease (2 sc in same stitch)
  7. decDecrease (invisible decrease for 3D/spiral work)
  8. mrMagic Ring
  9. BLOBack Loop Only
  10. FLOFront Loop Only
  11. (X)Stitch count at the end of the round/row

Head

  1. Round 16 sc in a mr (6)
  2. Round 26 inc (12)
  3. Round 3(1 sc, 1 inc) * 6 (18)
  4. Round 4(2 sc, 1 inc) * 6 (24)
  5. Round 5(3 sc, 1 inc) * 6 (30)
  6. Round 6(4 sc, 1 inc) * 6 (36)
  7. Round 7-836 sc (2 rounds) (36)
  8. Round 9(5 sc, 1 inc) * 6 (42)
  9. Round 10-1342 sc (4 rounds) (42)Insert safety eyes between Rnds 10-11, approximately 7-8 stitches apart.
  10. Round 14(5 sc, 1 dec) * 6 (36)
  11. Round 15(4 sc, 1 dec) * 6 (30)
  12. Round 16(3 sc, 1 dec) * 6 (24)Begin stuffing the head firmly, shaping as you go.
  13. Round 17(2 sc, 1 dec) * 6 (18)
  14. Round 18(1 sc, 1 dec) * 6 (12)Fasten off and cut the yarn, leaving a long tail for sewing. Continue stuffing to achieve a desired firm shape.

Ears (Make 2)

  1. Round 16 sc in a mr (6)
  2. Round 26 inc (12)
  3. Round 3(1 sc, 1 inc) * 6 (18)
  4. Round 4(2 sc, 1 inc) * 6 (24)
  5. Round 5-824 sc (4 rounds) (24)
  6. Round 9(6 sc, 1 dec) * 3 (21)
  7. Round 1021 sc (21)
  8. Round 11(5 sc, 1 dec) * 3 (18)
  9. Round 12-1418 sc (3 rounds) (18)Do not stuff. Fold the ear flat and sc through both layers to close, making 9 sc across the top. Fasten off, leaving a long tail for sewing.

Snout

Use white plush yarn for this piece.

  1. Round 16 sc in a mr (6)
  2. Round 26 inc (12)
  3. Round 3(1 sc, 1 inc) * 6 (18)
  4. Round 418 sc (18)Fasten off, leaving a long tail for sewing. Lightly stuff before attaching to the head.

Nose

Use pink plush yarn for this piece.

  1. Round 16 sc in a mr (6)
  2. Round 26 sc (6)Fasten off, leaving a long tail for sewing. No stuffing needed.

Legs (Make 2)

  1. Round 16 sc in a mr (6)
  2. Round 26 inc (12)
  3. Round 3(1 sc, 1 inc) * 6 (18)
  4. Round 4(2 sc, 1 inc) * 6 (24)
  5. Round 5-624 sc (2 rounds) (24)
  6. Round 76 dec, 12 sc (18)
  7. Round 83 dec, 12 sc (15)
  8. Round 93 dec, 9 sc (12)Begin stuffing the leg firmly, shaping as you go.
  9. Round 10-1712 sc (8 rounds) (12)

Do not stuff the very top. Fold the leg flat and sc through both layers to close, making 6 sc across the top. Fasten off, leaving a long tail for sewing if not attaching directly to the body. (Note: These legs will be crocheted into the body in Rnd 8 of the Body section, so you may not need a long tail for sewing, depending on your preferred attachment method).

Heels (Make 2)

  1. Round 16 sc in a mr (6)
  2. Round 26 inc (12)Fasten off, leaving a long tail for sewing. No stuffing needed.

Arms (Make 2)

  1. Round 15 sc in a mr (5)
  2. Round 25 inc (10)
  3. Round 3(1 sc, 1 inc) * 5 (15)
  4. Round 4-515 sc (2 rounds) (15)
  5. Round 63 dec, 9 sc (12)
  6. Round 72 dec, 8 sc (10)Begin stuffing the arm firmly, shaping as you go.
  7. Round 8-1510 sc (8 rounds) (10)

Do not stuff the very top. Fold the arm flat and sc through both layers to close, making 5 sc across the top. Fasten off, leaving a long tail for sewing if not attaching directly to the body. (Note: These arms will be crocheted into the body in Rnd 20 of the Body section, so you may not need a long tail for sewing).

Body

  1. Round 16 sc in a mr (6)
  2. Round 26 inc (12)
  3. Round 3(1 sc, 1 inc) * 6 (18)
  4. Round 4(2 sc, 1 inc) * 6 (24)
  5. Round 5(3 sc, 1 inc) * 6 (30)
  6. Round 6(4 sc, 1 inc) * 6 (36)
  7. Round 7(5 sc, 1 inc) * 6 (42)
  8. Round 842 sc (42)

In this round, you will crochet the legs into the body. Position the legs evenly on the sides of the body, usually by crocheting a few stitches of the leg together with the body stitches. For example, sc a few stitches on the body, then sc through both the body and leg stitches for 3-4 stitches, then continue sc on the body, repeat for the second leg.

  1. Round 9-1142 sc (3 rounds) (42)
  2. Round 12(5 sc, 1 dec) * 6 (36)
  3. Round 13-1436 sc (2 rounds) (36)
  4. Round 15(4 sc, 1 dec) * 6 (30)
  5. Round 16-1730 sc (2 rounds) (30)
  6. Round 18(3 sc, 1 dec) * 6 (24)
  7. Round 1924 sc (24)
  8. Round 2018 sc (18)

In this round, you will crochet the arms into the body, similar to how the legs were attached. Position the arms evenly on the sides of the body.

  1. Round 2118 sc (18)Fasten off and cut the yarn, leaving a long tail for sewing. Begin stuffing the body firmly, shaping as you go.

Tail

  1. Round 16 sc in a mr (6)
  2. Round 26 inc (12)
  3. Round 3-412 sc (2 rounds) (12)
  4. Round 56 dec (6)Fasten off and cut the yarn, leaving a long tail for sewing. Stuff the tail firmly.

Assembly

Step 1

Bringing all the crocheted pieces together is where your amigurumi really comes to life! Take your time with these steps for the best finish.

Step 2

Attach the Snout: Position the white snout onto the front of the head, centered just below the eyes. Pin it in place and sew it securely using the long tail. Lightly stuff the snout before fully closing the seam.

Step 3

Embroider the Nose: Using pink yarn or embroidery floss, embroider a triangular or oval nose shape onto the center of the snout. Alternatively, you can sew the small pink crocheted nose on top of the snout.

Step 4

Embroider Facial Details: With black embroidery floss, carefully embroider eyelashes above the safety eyes. You can also add a small "Y" shaped mouth directly below the nose for a cute expression.

Step 5

Attach the Ears: Pinch the flat closed edge of each ear and position them on top of the head, slightly to the sides and a few rounds back from the crown. Ensure they are evenly spaced and symmetrical. Sew them firmly in place.

Step 6

Attach the Heels: Sew the two small heel circles to the bottom of each leg, covering the initial magic ring and shaping the foot.

Step 7

Attach Head to Body: The head and body are substantial pieces. Ensure both are firmly stuffed. Position the head on top of the body, aligning the neck opening. Use the long tail from the head (or body if preferred) and a mattress stitch or whip stitch to securely join the two pieces. Go around the join multiple times for a strong connection, burying the yarn end when finished.

Step 8

Attach the Tail: Position the stuffed tail on the back of the body, centered and towards the lower portion. Sew it securely in place using the long tail.

Important notes

Note 01

💡 Gauge is not critical for this project, but aim for tight, consistent stitches to prevent stuffing from showing through — use a hook one size smaller than usually recommended for your plush yarn (around 4.0mm–5.0mm) if needed.

Note 02

💡 Work all rounds in a continuous spiral unless otherwise stated, and keep a stitch marker in the first stitch of every round throughout the head, ears, legs, and arms — plush yarn's fuzzy texture makes it easy to lose your spot.

Note 03

💡 Stuff all parts firmly as you go — especially the head — ensuring a smooth, even finish without overstuffing to avoid distortion.

Note 04

💡 Test safety eye placement with stitch markers before pushing them through the plush yarn, since safety eyes can't be repositioned once fully secured.

Note 05

💡 Save your embroidery floss work for eyelashes and the mouth until after the head is fully assembled and stuffed, so you can adjust placement based on the finished shape.

Note 06

💡 This pattern uses US crochet terminology, and pieces needing to be closed through both layers should be folded flat and single crocheted through both the front and back loops of the corresponding stitches on each side.

FAQs

Asked on the glider

the ones that come up on the glider

What yarn works best for this chubby amigurumi rabbit?

A soft plush yarn like Bernat Blanket, Himalaya Dolphin Baby, or Sweet Snuggles gives the rabbit its signature chubby, squishy look. Any plush or chenille-style yarn in a similar weight will work well as a substitute.

Can I make this rabbit without safety eyes?

Yes, you can embroider the eyes with black yarn or floss instead, which is a safer option for very young children. Just plan the placement carefully since embroidered eyes are trickier to reposition than safety eyes.

How much yarn do I need to complete the whole rabbit?

Plan on roughly 100g of your main color plus small amounts of white and pink plush yarn for the snout and nose. Exact usage can vary slightly depending on your tension and hook size.

Why does my rabbit look lumpy instead of smooth and chubby?

This usually means the stuffing was added unevenly or the stitches are too loose. Stuff firmly in small amounts as you go and consider sizing down your hook slightly for tighter, more even stitches.

Is this pattern good for a first amigurumi project?

It's better suited to someone with a little amigurumi experience, since it involves color changes, safety eye placement, and multiple shaped pieces to assemble. That said, a confident beginner comfortable with magic rings and basic increases/decreases could still enjoy the challenge.