Intermediate 4-6 hours Bulky yarn

Worked on the glider, counted out loud —

Chibi speedster amigurumi crochet pattern

A bulky-yarn chibi speedster for confident amigurumi fans, ready to sit on your shelf in one weekend.

Jump to the rounds

What this one is

You know the friend who still runs through the house pretending to be faster than everyone else, cape or no cape. This chibi speedster is for them, or for the shelf of anyone who collects a little joy in yarn form. He is built round by round from the head down, with wing-shaped ears, a mask, a belt, and a lightning bolt worked right into his chest.

Your hands will mostly be doing single crochet in the round, with a handful of short-row ears added onto the head after the fact and some tidy embroidery for the face and logo. Between the twelve rounds of the head, the eight of the oval body, and the two arms, you're looking at a project you can finish over a couple of relaxed sittings rather than one long haul. This is rated an intermediate-level pattern, best suited to crocheters comfortable with color changes and embroidery details.

Try it another way

Once you've made him once, there is a lot of room to play. Swap the suit colors for any hero palette you like — the construction does not change, only which color you pick up at each color-change point on the arms and body. If you want a smaller keepsake version, try dropping to a finer yarn with a smaller hook and expect the finished size to shrink below the 19 cm the bulky-yarn version gives you, though you'll want to test your gauge first since the stitch counts stay the same. You could also give him a second set of ears in a contrast color, or embroider a different symbol where the lightning bolt sits if you'd rather make an original character than a specific speedster. The oval bottom that lets him sit upright also makes him a natural little paperweight or shelf sitter, so consider adding a small loop of yarn at the back of the head if you'd like to hang him instead. For gift-giving, working the belt buckle in a metallic-look yarn adds a nice bit of shine without changing a single round of the pattern.

There is something genuinely satisfying about building a face from safety eyes and embroidery rather than more crochet — you get to watch the personality show up in real time once the mask and lightning bolt go on. The wing ears are a nice small technical treat too: instead of crocheting a separate piece and sewing it on, you attach yarn right into round four of the head and build the ear outward in short chained rows, slip-stitching back into the head as you go. It is a technique that feels a bit like origami with a hook. Add in the oval-shaped lower body, which gives him a stable sitting pose without any wire or extra shaping fuss, and you end up with a toy that looks far more engineered than the stitch count actually asks of you.
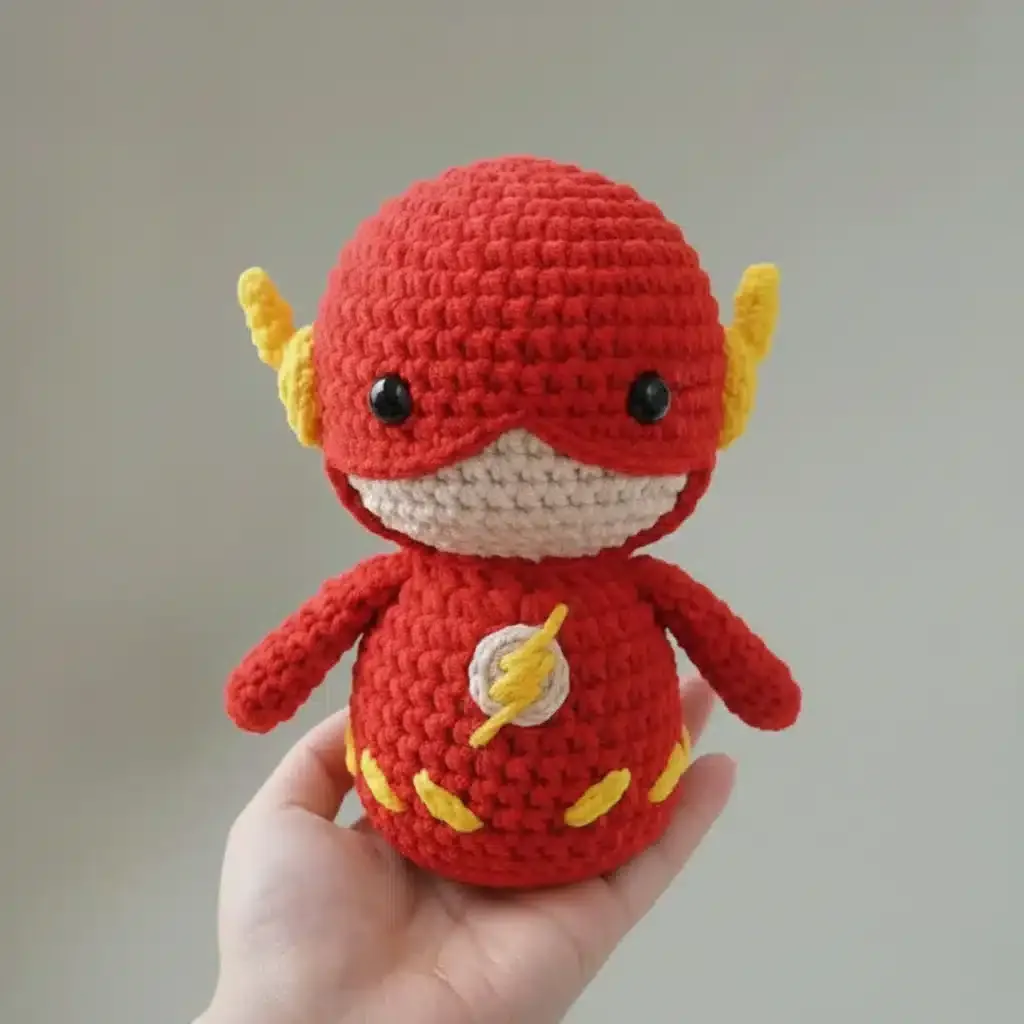
The rounds, in full

Written out, round by round

Intermediate4-6 hours4.5 mmBulky

Bring to the porch

Everything this one takes, in the order you will reach for it.

  • Bulky yarn (Yarn Weight #5)
  • 4.5 mm crochet hook (US size 7)
  • Plastic safety eyes (12mm)
  • Colors: Red, Yellow, Beige (skin tone), White (optional for logo)
  • Stitch marker
  • Sewing needle
  • Scissors
  • Fiberfill stuffing

Head Section

  1. Round 16SC in a MR (6)
  2. Round 26INC (12)
  3. Round 3(SC, INC) 6 times (18)
  4. Round 4(SC, INC) 9 times (27)
  5. Round 527SC (27)
  6. Round 6(8SC, INC) 3 times (30)
  7. Round 730SC (30)
  8. Round 87SC, 3INC, 10SC, 3INC, 7SC (36)
  9. Round 9Red 9SC, BEIGE 18SC, Red 9SC (36)

This row creates the beige face area in the center. Switch to Beige yarn for the middle 18 stitches while keeping red on the sides.

Eye Placement Guide: Mark the position for the eyes between rounds 8 and 9. Place the first eye between the 14th and 15th stitches, and the second eye between the 21st and 22nd stitches.

  1. Round 1010SC, BLO 4SC, 12SC, BLO 4SC, 6SC (36)
  2. Round 11(2SC, DEC) 9 times (27)
  3. Round 12(SC, DEC) 9 times (18)Critical Step: Insert the plastic safety eyes between Rows 8–9 at the marked positions now. Secure them with the backings from the inside before continuing, as the opening will become too small later.Stuffing the Head: After Row 12, stuff the head firmly with fiberfill to create a nice round shape that will hold the chibi's characteristic proportions.Flash Mask Embroidery: Once the head is stuffed, use red yarn to embroider Flash's iconic mask around the eyes. Create a horizontal band across both eyes, add pointed edges extending outward toward the ears, and create small angular wing details on each side. Keep the edges sharp and clean for an authentic superhero look.

Neck Transition

  1. Round 1318SC (18)
  2. Round 14FLO for all sts: (SC, INC) 9 times (27)Continue with red yarn for Flash's suit.

Body Section – Upper Chest and Belt

  1. Round 1527SC (27)
  2. Round 16(INC, 8SC) 3 times (30)
  3. Round 1730SC (30)
  4. Round 1830SC (30)The Flash lightning bolt logo will be embroidered on the chest between Rows 16-18 after completing the body.
  5. Round 1930SC (30) – Continue with Red(30)
  6. Round 2030SC in YELLOW (30) – This creates Flash's utility beltUtility Belt Details: The yellow belt is created in Row 20 as a complete stripe around the body. For additional definition, use yellow yarn to embroider a small rectangular buckle in the center front of the belt (approximately 4-5 stitches wide and 2-3 rows tall). Add small red accent stitches inside for buckle detail.(30)
  7. Round 2130SC (30) – Return to Red(30)

Lower Body – Oval Shape

  1. Round 2230SC (30)
  2. Round 2330SC (30)
  3. Round 24(3SC, DEC) 6 times (24)
  4. Round 2524SC (24)
  5. Round 26(2SC, DEC) 6 times (18)Continue stuffing as you work.
  6. Round 27(SC, DEC) 6 times (12)
  7. Round 2812SC (12)
  8. Round 296DEC (6)Cut the yarn and use a yarn needle to close the gap. The body has a rounded oval bottom with no legs, creating a cute chibi sitting pose.

Arms (Make 2)

Start with red yarn for the suit portion of each arm.

  1. Round 16SC in a MR (6)
  2. Round 26SC (6)
  3. Round 36SC (6)
  4. Round 46SC (6)
  5. Round 56SC (6)
  6. Round 66SC (6)Switch to yellow yarn for Flash's gloves:
  7. Round 76SC (6)
  8. Round 86SC (6)Stuff lightly with fiberfill. Do not close the opening yet. Flatten the arm and sew the opening shut. Attach the completed arms to the sides of the body at Rows 16-17, angling them slightly forward for an active superhero pose.

Ears (Flash Wing Ears)

Flash's signature winged ears are a key feature that distinguishes this speedster from other heroes.

Right Ear

Attach yellow yarn at Row 4 of the head.

  1. Round 1Chain 5, begin at the second chain from hook: 4SC, SLST to the next stitch on the head
  2. Round 2Chain 1, turn, 4SC along the previous chain, SLST to the next stitch on the head
  3. Round 3Chain 1, turn, 4SC along the previous chain, SLST to the next stitch on the head
  4. Round 4Chain 1, turn, 4SC along the previous chain, SLST to the next stitch on the headEdge detail: Work around the edge of the wing with (SC, HDC, DC, HDC, SC) along one side to create the curved wing shape.Fold the ear slightly at the base and sew to create Flash's signature winged ear look. Add a small amount of stuffing at the base if needed for structure. Cut the yarn and weave in ends.Repeat the same instructions on the opposite side of the head to create the left ear.

Putting it together

Step 1

This design features an oval bottom body with no legs, creating an adorable chibi sitting pose. Keep stuffing firm in the head and upper body for good structure, while the lower oval section should be slightly softer so the figure sits flat and stable. Position the arms at Rows 16-17, angling them forward to suggest motion and speed. All embroidery and logo details should be added after full assembly.

Marlene's notes

Note 01

This pattern is worked with bulky yarn and a 4.5 mm hook, so keep your tension a touch firmer than usual to stop stuffing from peeking through the stitches.

Note 02

The ears are not a separate crocheted piece — you attach yellow yarn directly at Row 4 of the head and slip stitch back into the head stitches as you finish each short row, so keep track of exactly where you started.

Note 03

Finish each round with a slip stitch and a chain one as the source notes suggest, which helps keep the rounds sitting flat and even rather than spiraling out of shape. If you prefer working in continuous spirals instead, be aware that certain sections may become misaligned.

Note 04

The finished piece will measure approximately 19 cm (7.5 inches), though size may vary depending on your yarn choice and tension.

Note 05

This pattern is rated intermediate skill level, suitable for crocheters who have experience with basic amigurumi techniques and are comfortable working with color changes and embroidery details.

Before you sit down

  • Lay out one full skein each of your suit colors before you start the arms, since the pattern notes you should have a full skein on hand to avoid running out mid-project.
  • Read through Row 4 of the head section before you begin, since that is the round where you'll come back later to attach yarn for the ears.
  • Have a couple of stitch markers ready to flag the start of each round on the head and the oval body, where the stitch counts climb quickly.
  • Work a small test swatch in your bulky yarn to check your gauge against the 19 cm finished size, especially if you're substituting a yarn.

How the hours go

Head section
about 1.5 to 2 hours because it runs twelve rounds and carries the most shaping of any single piece
Lower body and arms
about 1.5 to 2 hours because the oval body's eight rounds, the upper chest and belt rounds, and the two arms are straightforward repeats once the shaping settles
Ears, mask, belt, and lightning logo
about 1.5 to 2 hours because attaching the ear rows into the head and stitching the face and logo details is fiddly, careful work rather than fast crochet

Looking after it

  • Since this is worked in bulky yarn, hand wash gently in cool water if he needs a clean, and press out excess water in a towel rather than wringing, which protects the shaping in the head and oval body.
  • Let him air dry fully flat and reshape by hand while damp, then store him upright or lying flat away from direct sun so the colors in the suit and lightning logo don't fade over time.
FAQs

Asked on the glider

the ones that come up on the glider

What yarn weight does this pattern use?

It calls for bulky yarn worked with a 4.5 mm hook. That combination is what gives you the roughly 19 cm finished size.

How long does this pattern actually take to finish?

Plan on somewhere around 4 to 6 hours total across the head, body, arms, and all the finishing details. It splits nicely into a few shorter sessions rather than one sitting.

Do I crochet the ears separately and sew them on?

No, you attach yellow yarn directly into Row 4 of the head and build each ear outward in short rows, slip stitching back into the head stitches as you go. It is worked in place rather than as a separate applique.

What size will my finished piece be?

The source notes a finished size of approximately 19 cm, or about 7.5 inches. Your exact result will depend on your yarn choice and how tightly or loosely you crochet.

Why does the lower body use an oval shape instead of a round base?

The oval-shaped lower body, worked over eight rounds, is what lets the finished piece sit upright on its own. It gives you a stable base for posing without needing wire or a separate stand.

Do I need safety eyes, or can I embroider the face instead?

The materials list calls for safety eyes for this pattern, and the mask and other face details are added afterward with embroidery. If you prefer an all-embroidered face for safety reasons with young children nearby, you can substitute embroidered eyes using the same placement.