Intermediate 4-6 hours Plush (worsted-weight) yarn

Worked on the glider, counted out loud —

Baby chick egg amigurumi crochet pattern for a cozy gift

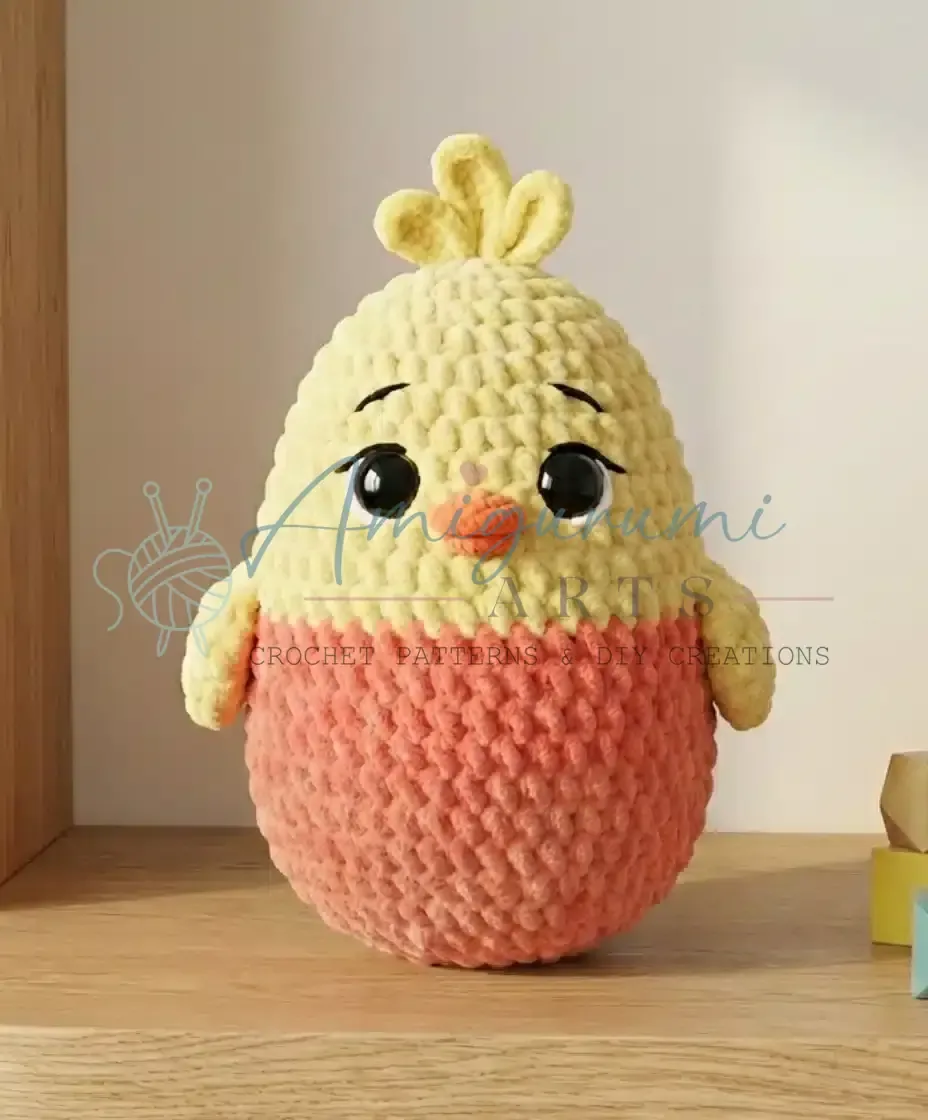
A plush baby chick and egg amigurumi for confident beginners, worked over a few relaxed sittings in about 4-6 hours.

Jump to the rounds

What this one is

I love handing this one over on a quiet evening, when the hook is already warm from your other work. This little chick tucked into its own egg shell feels like something for a baby's nursery shelf, a gift for a new parent, or a shower favor that looks hand-made in the best way. It suits you if you already know your way around a hook but want a project that still asks a little from your hands.

Your hands spend most of the time on two plush pieces: the yellow head and body worked over 19 rounds, and the coral egg shell worked over 26 rounds of increases. Add two small wings at 6 rounds each, a tiny 3-round beak, plus a crest, feet, and tail finished with embroidery and DK yarn. Expect a few sittings rather than one long stretch, since plush yarn and safety-eye placement both reward going slow. Finished size is approximately 5 inches (13cm) tall when made with the materials listed below.

The rounds, in full

Written out, round by round

Intermediate4-6 hours4 mmPlush (worsted-weight)

Bring to the porch

Everything this one takes, in the order you will reach for it.

  • Yellow plush yarn (50g) – Himalaya Dolphin Baby or similar velvet yarn
  • Coral/pink plush yarn (40g) – for egg shell bottom
  • Orange DK yarn (small amount) – YarnArt Jeans or similar for beak and feet
  • Yellow DK yarn (small amount) – for crest/tuft
  • Black embroidery thread – for eyebrows and details

Crochet hook

  • 4mm (G/6) for body

Crochet hook

  • 2mm (B/1) for small details

Safety eyes

  • 8mm black (2 pieces)

Other Supplies

  • White felt: small piece for eye backing
  • Fiberfill stuffing
  • Tapestry needle
  • Thin embroidery needle
  • Stitch markers
  • Straight pins
  • Scissors

Head and Body (Yellow Plush)

Use 4mm hook and yellow plush yarn

  1. Round 16 sc in mr (6)
  2. Round 2Inc × 6 (12)
  3. Round 3[Sc 1, inc] × 6 (18)
  4. Round 4[Sc 2, inc] × 6 (24)
  5. Round 5Sc in each st (24)
  6. Round 6[Sc 3, inc] × 6 (30)
  7. Round 7Sc in each st (30)
  8. Round 8Sc in each st (30)
  9. Round 9Sc in each st (30)
  10. Round 10Sc in each st (30)
  11. Round 11Sc in each st (30)Insert 8mm safety eyes after round 7, spacing 3 stitches apart. Add white felt circles behind eyes before securing.
  12. Round 12[Sc 5, inc] × 5 (35)
  13. Round 13Sc in each st (35)
  14. Round 14Sc in each st (35)
  15. Round 15Sc in each st (35)
  16. Round 16[Sc 5, dec] × 5 (30)
  17. Round 17[Sc 3, dec] × 6 (24)Begin stuffing head firmly with fiberfill
  18. Round 18[Sc 1, dec] × 8 (16)
  19. Round 19Dec × 8 (8)Pull yarn through remaining stitches, tighten to close hole. Fasten off, weave in end.

Egg Body (Coral/Pink Plush)

Use 4mm hook and coral/pink plush yarn

  1. Round 18 sc in mr (8)
  2. Round 2Inc × 8 (16)
  3. Round 3[Sc 1, inc] × 8 (24)
  4. Round 4[Sc 2, inc] × 8 (32)
  5. Round 5[Sc 3, inc] × 8 (40)
  6. Round 6Sc in each st (40)
  7. Round 7[Sc 4, inc] × 8 (48)
  8. Round 8Sc in each st (48)
  9. Round 9Sc in each st (48)
  10. Round 10Sc in each st (48)
  11. Round 11Sc in each st (48)
  12. Round 12[Sc 6, dec] × 6 (42)
  13. Round 13Sc in each st (42)
  14. Round 14Sc in each st (42)
  15. Round 15Sc in each st (42)
  16. Round 16Sc 3, join first wing with 3 sc, sc 18, join second wing with 3 sc, sc 15 (42 total)

Wings are crocheted separately first, then joined into this round

  1. Round 17[Sc 5, dec] × 6 (36)
  2. Round 18Sc in each st (36)
  3. Round 19Sc in each st (36)
  4. Round 20[Sc 4, dec] × 6 (30)
  5. Round 21Sc in each st (30)Add more stuffing to maintain egg shape
  6. Round 22[Sc 3, dec] × 6 (24)
  7. Round 23Sc in each st (24)
  8. Round 24[Sc 2, dec] × 6 (18)Stuff firmly
  9. Round 25[Sc 1, dec] × 6 (12)
  10. Round 26Dec × 6 (6)Pull yarn through remaining stitches, tighten to close. Fasten off, weave in end.

Wings (Make 2)

Use 4mm hook and yellow plush yarn

  1. Round 16 sc in mr (6)
  2. Round 2Inc × 6 (12)
  3. Round 3Sc in each st (12)
  4. Round 4Sc in each st (12)
  5. Round 5[Sc 1, dec] × 4 (8)
  6. Round 6Fold piece in half and sc through both layers with 3 sc to closeFasten off, leaving long tail for sewing or joining into body. Do not stuff wings.

Beak

Use 2mm hook and orange DK yarn

  1. Round 1Ch 2, work 4 sc in 2nd ch from hook (4)
  2. Round 2Inc × 4 (8)
  3. Round 3[Inc, sc 3] × 2 (10)Fasten off, leaving long tail for sewing. Stuff very lightly with small amount of fiberfill.

Feet (Make 2)

Use 2mm hook and orange/red DK yarn Each foot has 3 toes: First toe: Ch 6, sl st in 5th ch from hook, sl st in 4th ch from hook

Second toe: Ch 2, sl st in 2nd ch from hook, sl st in 4th ch of foundation chain Third toe: Ch 2, sl st in 2nd ch from hook, sl st in next ch of foundation chain

Foot base: Continue along foundation chain with sl st, then work 2 sc in remaining 2 chains Fasten off, leaving long tail for sewing.

Crest/Top Tuft

Use yellow or orange DK yarn Yarn Fringe Method: Cut 15 strands of yarn, each 10cm (4 inches) long Divide into 3 equal groups of 5 strands each

Attach first group to center top of head by creating a loop and pulling yarn bundle through Attach second group adjacent to first

Attach third group on other side Trim all strands to 1-2cm length Fluff with fingers for volume

Tail (Worked directly on body)

After completing round 15 of egg body: Locate 4 center stitches at back of body Attach coral yarn to rightmost stitch Ch 2

Work 3 hdc under next 3 stitches Fasten off and weave in end

Putting it together

Step 1

1: Prepare and Insert Eyes: Cut white felt circles slightly larger than 8mm safety eye diameter

Step 2

Cut small hole in center of each felt circle

Step 3

Place felt on back of safety eye

Step 4

Insert eyes into head after round 7, spacing 3 stitches apart

Step 5

Secure backing washers tightly

Step 6

2: Embroider Eyebrows: Using black embroidery thread: Position lower part of eyebrow: 1 stitch to the side and 1 stitch up from outer edge of eye

Step 7

Position inner part of eyebrow: 3 stitches up from inner edge of eye

Step 8

Create curved line connecting these two points

Step 9

Eyebrows should angle slightly toward outer edges

Step 10

Repeat for second eyebrow, ensuring symmetry

Step 11

3: Attach Beak: Center beak between eyes

Step 12

Position slightly below top edge of eyes

Step 13

Pin in place to check positioning before sewing

Step 14

Sew around edges using orange thread and whip stitch

Step 15

Add tiny bit more stuffing before closing completely

Step 16

Secure all stitches firmly

Step 17

4: Attach Wings: If wings were joined at round 16: Wings are already attached, skip to next step. If sewing wings separately: Position top of each wing 2 rounds below eyes

Step 18

Pin both wings, checking carefully for symmetry

Step 19

Sew around edge of approximately 60% of wing perimeter using whip stitch

Step 20

Leave wing tip free and unsewn for dimensional effect

Step 21

Wings should angle slightly downward

Step 22

5: Attach Feet: Position feet at bottom front of egg body

Step 23

Feet should be sewn so only toes are visible from front view

Step 24

Main foot body should be hidden underneath chick

Step 25

Angle toes slightly outward for natural stance

Step 26

Sew securely with orange thread

Step 27

6: Attach Crest: Position yarn fringe bundles at center top of head

Step 28

All 3 groups should cluster around the central point

Step 29

Sew base of each bundle securely into head

Step 30

Trim to uniform 1-2cm length with sharp scissors

Step 31

Fluff and separate strands with fingers or fine comb

Step 32

Shape into natural tuft appearance

Step 33

7: Attach Egg Bottom to Yellow Body: If made as separate pieces: Pin yellow head/body piece to coral egg bottom piece

Step 34

Align openings carefully

Step 35

Using matching thread, whip stitch around entire circumference

Step 36

Add extra stuffing before closing final gap

Step 37

Ensure join is neat and secure If made as one continuous piece: Body is already complete.

Step 38

8: Final Touches: Ensure all yarn ends are securely woven in

Step 39

Check that all parts are firmly attached

Step 40

Gently shape egg body into proper oval form

Step 41

Adjust wing positions if needed

Step 42

Fluff crest one more time

Step 43

Optional: Add pink blush to cheeks with chalk pastels or fabric markers
Marlene's notes

Note 01

Insert the 8mm safety eyes after round 7 of the head and body, spacing them 3 stitches apart, and back each one with a cut felt circle before you close the washer.

Note 02

Stuff the egg body and head firmly but evenly as you go rather than all at once at the end, since plush yarn hides lumps less than it hides seams.

Note 03

Finished size is approximately 5 inches (13cm) tall when made with the recommended materials.

Before you sit down

  • Weigh out your plush yarn before you start the body - you'll want close to 50g of yellow and 40g of coral or pink, so there's no scrambling for a second skein mid-round.
  • Set a stitch marker in round 1 of each piece and move it every round - with 19 rounds on the head and body and 26 on the egg, it's easy to lose your place.
  • Work a small swatch with your plush yarn first, since velvet yarn behaves differently under a 4mm hook than standard DK, and you want your tension settled before round 1 counts.
  • Read through round 7 of the head and body before you start stuffing, since that's where the safety eyes go in, spaced 3 stitches apart, and you'll want the stitches still a little open to work with.

How the hours go

Head and Body (yellow plush)
about 1.5-2 hours because of the 19 rounds plus eye placement and eyebrow embroidery
Egg Body (coral/pink plush)
about 2-2.5 hours because it's the longest piece at 26 rounds of shaping
Wings, beak, and finishing details
about 1 hour because the wings, beak, feet, crest, and tail are all small but each needs its own attachment

Looking after it

  • Hand wash your finished chick in cool water if it needs cleaning, since the plush yarn body holds dust and loses its soft nap with hot water or a machine cycle.
  • Let it air dry fully stuffed and reshape the egg's rounded bottom and the head's curve by hand while damp, then store it away from direct sun so the yellow and coral plush yarn don't fade.
FAQs

Asked on the glider

the ones that come up on the glider

Can I use a different plush yarn than Himalaya Dolphin Baby?

Yes, any similar velvet yarn works as long as it's roughly the same weight, since the pattern is written in rounds and stitch counts rather than a specific brand. Just keep your hook at 4mm and check your gauge against the 6 sc in the magic ring for round 1.

Why does the egg body have more rounds than the head?

The egg body is worked over 26 rounds compared to 19 for the head and body, since it needs to hold a wider, flatter shape to look like a shell. That extra shaping is what gives it the rounder, more egg-like silhouette once stuffed.

What size eyes should I use?

The pattern calls for 8mm black safety eyes with a felt backing, inserted after round 7 and spaced 3 stitches apart. If you're making the miniature version, drop down to 6mm eyes to match the smaller scale.

How much yarn do I actually need?

You'll want about 50g of yellow plush yarn for the head and body and about 40g of coral or pink plush yarn for the egg, plus small amounts of orange and yellow DK yarn for the beak, feet, and crest. Keep a little extra on hand in case your tension runs looser than the pattern's.

What's the best way to firm up the stuffing without losing the round shape?

Stuff a little at a time as you close each round rather than packing it all in at the end, especially through the egg body's longer 26-round climb. This keeps the shape even and stops the plush yarn from puckering at the seams.