Intermediate 4-6 Hours Worsted yarn

Worked on the glider, counted out loud —

Baby Capybara Amigurumi Crochet Pattern

Crochet an adorable Baby Capybara amigurumi with this detailed pattern covering head, ears, arms, legs, and body shaping for a huggable stuffed animal.

Jump to the rounds

Before you sit down

Begin the head in a magic ring and work through its rounds, increasing to shape the wide, rounded capybara face.

Decrease the head gradually in the later rounds to close it up neatly before setting it aside to stuff.

Crochet the small ears separately and set them aside for attaching once the head is complete.

Work the body in its own set of rounds, shaping a rounded form that will support the head and limbs.

Crochet the arms in just a couple of quick rounds, keeping them short and stubby to match the capybara's build.

Shape the legs over four rounds so they're sturdy enough to help your capybara sit upright.

Stuff the head, body, arms, and legs firmly but evenly before closing up each piece.

Sew the ears, arms, and legs onto the body and head following the assembly steps to bring your capybara together.

What this one is

This Baby Capybara Amigurumi pattern turns a few balls of worsted weight yarn into the trendiest little critter on your shelf. Capybaras have taken the internet by storm with their calm, friendly faces, and this pattern captures that same gentle charm in stitched form. It's perfect for crocheters who love working through a full amigurumi build — head, ears, arms, legs, and body — and want a finished piece with real personality and presence.

You'll work primarily in continuous rounds using a 3 mm hook, shaping the signature capybara head through nine rounds of careful increases and decreases to get that rounded, blunt-nosed silhouette just right. The body, arms, and legs come together with straightforward round-by-round construction, making this an ideal project for confident beginners ready to level up, or intermediate crocheters who enjoy the meditative rhythm of amigurumi assembly. Expect to spend a relaxed weekend afternoon or two bringing your capybara to life.

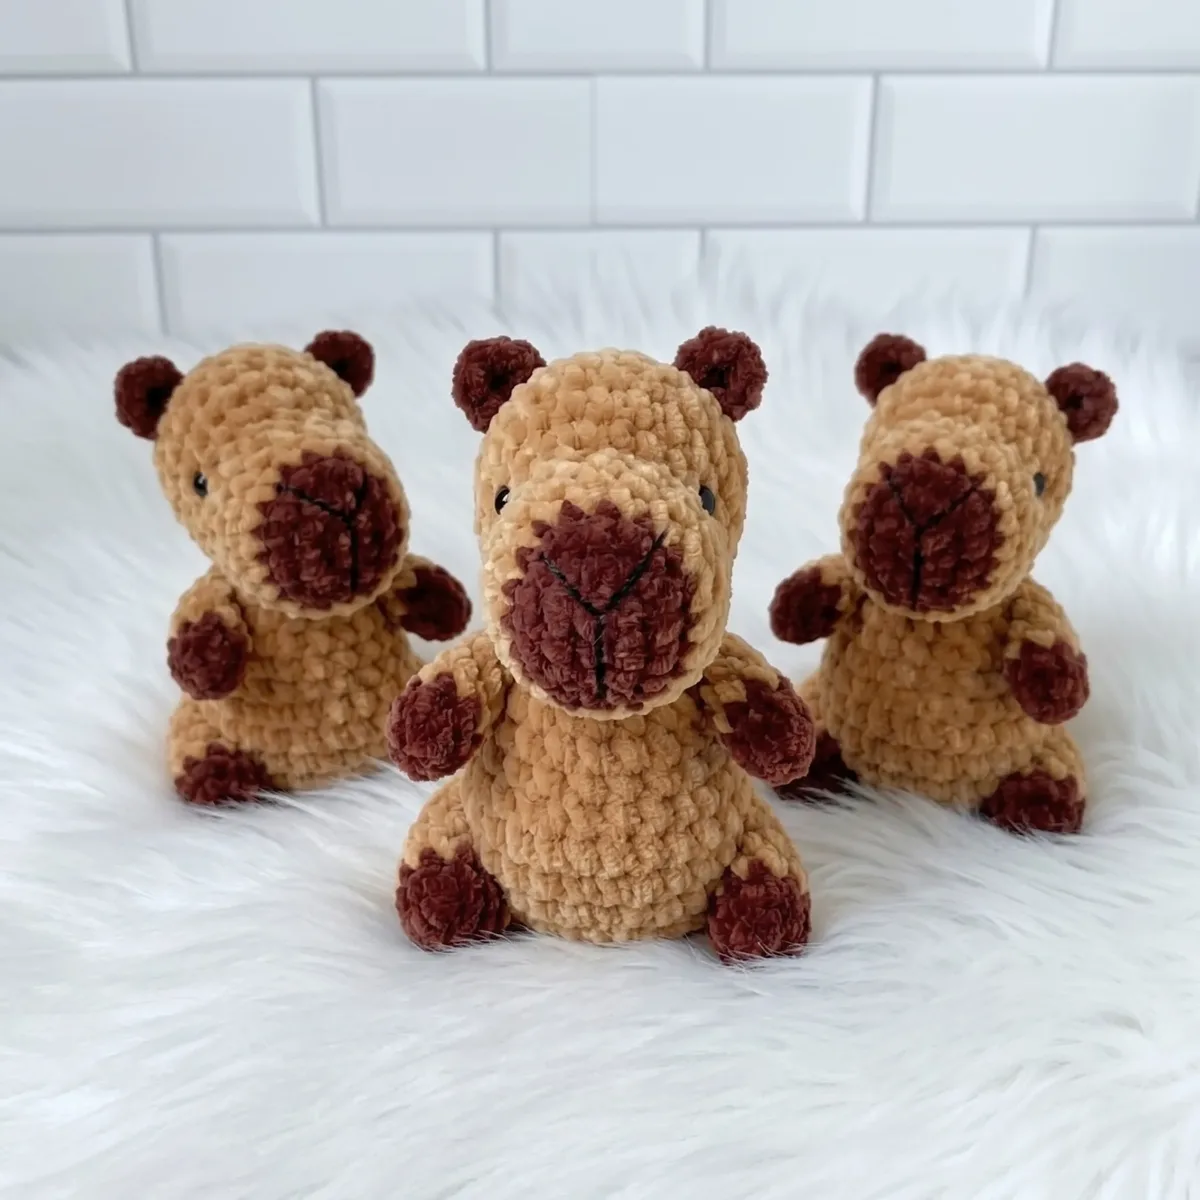
Once assembled, you'll have a plump, palm-to-forearm-sized capybara — approximately 12 cm / 4.75 inches tall — with a rounded head, small ears, sturdy little legs, and stubby arms perfect for a permanent seated pose. The finished texture is soft and squeezable, with a face that somehow manages to look both sleepy and content — exactly like the real thing. Whether it lands on a nursery shelf, a desk, or in a friend's arms as a handmade gift, this little capybara is guaranteed to earn an 'aww.'

Variations

I fell hard for capybaras the moment I started designing this pattern — there's something about their sleepy, unbothered expression that just translates beautifully into amigurumi. What I love most is how the nine rounds of the head let you really sculpt that classic capybara profile, wide and rounded with a flattened little snout, instead of just working a generic ball shape. The four-round legs give just enough structure to let your capybara sit upright on its own, which feels so satisfying once you position it just right. Assembling the separate pieces — head, ears, arms, legs, and body — into one cohesive little creature is genuinely one of my favorite parts of any amigurumi project, and this one comes together with fewer fussy details than you'd expect for something this charming. It's a pattern that rewards patience during the shaping rounds but never feels tedious. By the time you're stitching on that final ear, you'll already be planning who gets to keep this one — because trust me, everyone who sees it will want it.

Common mistakes

  • Starting the head with a loose magicPull the tail yarn firmly after your first round of single crochets to cinch the ring completely closed, and weave in the tail through several stitches to secure it before continuing.
  • Losing track of stitch countsPlace a stitch marker at the start of each round and count your stitches after every increase or decrease round before moving on — it takes seconds and saves you from unraveling later.
  • Overstuffing the small pieces likeStuff firmly but stop before the piece feels rock-hard; amigurumi limbs should have a gentle give so they drape naturally when attached to the body.
  • Attaching the ears too high or too farPin the ears in place with stitch markers first, step back and compare both sides before sewing, and reference the rounded top-front area of the head where capybara ears naturally sit.
  • Rushing the invisible decrease roundsWork invisible decreases by inserting your hook through the front loops only of the next two stitches, pulling up a loop, then completing as a single crochet — this keeps the surface smooth and gap-free.
  • Sewing the legs on before confirmingTemporarily prop the stuffed body between the leg pieces before sewing to check balance, adjusting leg angle slightly forward if the capybara tips backward.

The rounds, in full

Written out, round by round

Intermediate4-6 Hours3 mmWorsted

Materials

Everything this one takes, in the order you will reach for it.

  • Crochet Hook: 3mm (adjust up or down based on your personal gauge)
  • Yarn (Main Color / MC) — Light Warm Brown / Caramel / Tan: a plush or velour yarn in a warm honey-beige or caramel tone, such as Wolans Sweather 100g / 160m or similar-weight plush yarn; you'll need less than half a skein
  • Yarn (Contrasting Color / CC) — Dark Rust / Burgundy-Terracotta: a deep reddish-brown plush yarn in a rust or burgundy-terracotta shade for the muzzle, inner ears, paws, and feet, such as Dolce Baby yarn or a similar plush yarn in this warm, earthy tone
  • Fiberfill Stuffing: polyfill, hollowfiber, or similar
  • Safety Eyes: 8–10mm (x2), or embroider eyes with black thread if making for a young child
  • Tapestry Needle: large-eye needle for sewing pieces together
  • Scissors

keep this to hand

Abbreviations

US crochet terms, as used in this pattern.

  1. chchain
  2. ststitch
  3. stsstitches
  4. scsingle crochet
  5. incincrease
  6. decdecrease
  7. mrmagic ring
  8. rndround
  9. rndsrounds

Head

Begin with CC (Dark Rust / Burgundy-Terracotta) — this creates the capybara’s distinctive darker muzzle area.

Foundation: Ch 7. Starting in 2nd ch from hook:

  1. Round 15 sc, 3 sc in same st, 4 sc, inc. (14)
  2. Round 2(inc, 4 sc) ×2, inc, 3 sc. (17)Switch to MC (Light Warm Brown / Caramel / Tan).
  3. Round 3-6sc in each st around. [4 rnds] (17)
  4. Round 7Work to the center of the round (fold piece in half so the foundation chain sits centered — this locates the midpoint). Work sc to midpoint, then work 4 consecutive inc at midpoint (increases sit symmetrically above the foundation chain centerline), sc to end of rnd. (21)The visible bump/ridge on the piece marks the increase placement.
  5. Round 8-11sc in each st around. [4 rnds] (21)Insert safety eyes before continuing.Fold head in half again to locate center line.Count 4–5 sts to each side of centerline and insert eyes.Approximately 9–10 sts between eyes.Try both eyes in position and check for symmetry before securing.

Eyes are placed in the same rnd as the increases (Rnd 7).

  1. Round 12(5 sc, dec) ×3. (18)
  2. Round 13(4 sc, dec) ×3. (15)
  3. Round 14(3 sc, dec) ×3. (12)Stuff head firmly and evenly.
  4. Round 15dec ×6. (6)Fasten off. Close opening. Weave in end.

Arms

Make 2. The paw tips are worked in CC (Dark Rust / Burgundy-Terracotta), transitioning to MC (Caramel / Tan) for the upper arm. mr (or ch 2, sc in 2nd ch from hook): 6 sc. (6)

  1. Round 1-2sc in each st around. [2 rnds] (6)Switch to MC (Light Warm Brown / Caramel / Tan).
  2. Round 3-5sc in each st around. [3 rnds] (6)Joining: Hold both arm pieces together and work 3 sc through both layers to join. Fasten off, leaving a 20 cm / ~8 in tail for sewing.

Legs

Make 2. The foot area is worked in CC (Dark Rust / Burgundy-Terracotta), transitioning to MC (Caramel / Tan) for the upper leg — matching the paw color detail on the arms. mr (or ch 2, sc in 2nd ch from hook): 6 sc. (6)

  1. Round 1(1 sc, inc) ×3. (9)
  2. Round 2sc in each st around. (9)Switch to MC (Light Warm Brown / Caramel / Tan).
  3. Round 3-4sc in each st around. [2 rnds] (9)
  4. Round 5(1 sc, dec) ×3. (6)Fold in half and work 3 sc through both layers to join. Fasten off, leaving a long tail for sewing.

Body

Worked entirely in MC (Light Warm Brown / Caramel / Tan). mr (or ch 2, sc in 2nd ch from hook): 7 sc. (7)

  1. Round 1inc in each st around. (14)
  2. Round 2(1 sc, inc) ×7. (21)
  3. Round 3(2 sc, inc) ×7. (28)
  4. Round 4-6sc in each st around. [3 rnds] (28)
  5. Round 7(2 sc, dec) ×7. (21)
  6. Round 8-10sc in each st around. [3 rnds] (21)
  7. Round 11(1 sc, dec) ×7. (14)
  8. Round 12sc in each st around. (14)Fasten off. Stuff body firmly. Weave in end.

Ears

Make 2. Worked entirely in CC (Dark Rust / Burgundy-Terracotta) to create the rich-toned inner ear detail.

Leave a long starting tail — you will use this same tail to sew the ear to the head later. mr, 7 sc. (7)

Fasten off, leaving a long tail for sewing. Fold ear in half and join with one stitch through both layers to shape.

Assembly

Step 1

Once all pieces are complete, it’s time to bring your Baby Capybara to life. Take your time with this step — careful pinning before sewing makes a huge difference in the final look.

Step 2

Head to Body: Pin the head to the body using long sewing needles or thin knitting needles to check placement and symmetry before sewing. The caramel body and rust muzzle should face cleanly forward. Sew securely.

Step 3

Arms: Pin both arms with straight pins to the upper sides of the caramel body, with the rust/burgundy paw tips pointing downward. Adjust until symmetrical, then sew in place.

Step 4

Legs: Pin both legs with straight pins to the lower sides of the body, rust/burgundy feet facing forward. Adjust for balance, then sew securely.

Step 5

Ears: Sew the rust/burgundy ears to the top of the head, evenly spaced on either side. The rich dark tone of the ears creates a lovely contrast against the caramel head.

Step 6

Face Finishing: Using dark brown or black yarn, embroider eyelid lines over the safety eyes, pull the eyes inward slightly to create the characteristic capybara eye indentation, and embroider a small nose on the rust-colored muzzle area.

Important notes

Note 01

💡 Stuff the head and body firmly but incrementally, adding small amounts of polyester fiberfill as you close each round rather than cramming it all in at the very end, which helps avoid lumpy, uneven shaping.

Note 02

💡 Place a locking stitch marker in the first stitch of every round from the very beginning — with nine rounds on the head alone, it's easy to lose your place without one.

Note 03

💡 Leave a long yarn tail (at least 8-10 inches) when finishing the ears, arms, and legs since you'll need this length for sewing each piece onto the body neatly.

Note 04

💡 Block or lightly steam the finished ears before attaching them if they seem to curl inward, giving you cleaner, flatter pieces that sit more naturally against the head.

Note 05

📏 Finished Size: Approximately 12 cm / 4.75 inches tall.

Note 06

🎨 Color Note: The warm caramel/tan MC paired with the deep rust/burgundy CC creates a beautifully natural, earthy capybara palette that mimics the animal's real-life coloring. Look for plush yarns labeled 'camel,' 'honey,' 'tan,' or 'caramel' for the MC, and 'rust,' 'terracotta,' 'brick,' or 'burgundy' for the CC.

Note 07

💡 Plush yarn can be tricky — use a hook size that gives you a tight, firm fabric so stuffing doesn't show through.

Note 08

💡 Check eye placement carefully before clicking them permanently into place — once secured, safety eyes cannot be removed without cutting.

FAQs

Asked on the glider

the ones that come up on the glider

What specific yarn colors should I look for to match the caramel and rust palette?

the Main Color (MC), look for plush or velour yarn labeled 'camel,' 'honey,' 'tan,' 'caramel,' or 'warm beige' — any light warm brown with golden undertones will work beautifully. For the Contrasting Color (CC), search for shades labeled 'rust,' 'terracotta,' 'brick,' 'burgundy,' or 'reddish brown.' Holding both yarns together before purchasing helps you check that the contrast between the two tones is visible but harmonious.

Can I make this capybara without safety eyes for a baby or toddler?

Yes! The pattern specifically mentions this option. Simply embroider the eyes using black yarn or thread instead of inserting safety eyes. This makes the toy completely safe for babies and very young children, as there are no small parts that could detach.

What yarn weight works best for this Baby Capybara pattern?

A worsted weight (medium, #4) yarn paired with a 3 mm hook gives you the tight, dense stitches needed to keep stuffing from peeking through. Cotton-acrylic blends work especially well since they hold their shape nicely for amigurumi.

How long does it take to finish the whole capybara?

Most crocheters comfortable with amigurumi finish this pattern in about 4-6 hours total, though it's easy to break up across a weekend since each part — head, ears, arms, legs, and body — is worked separately. The head, with its nine rounds, typically takes the longest single sitting.

Why does my capybara's head look lumpy after stuffing?

This usually happens from adding too much stuffing at once or leaving air pockets near the increase rounds. Add fiberfill gradually in small pieces as you work the later rounds, gently pushing it into the sides rather than just the center.

Can I make this capybara without prior amigurumi experience?

If you're comfortable with magic rings, single crochet increases and decreases, and basic sewing to assemble pieces, you can absolutely tackle this pattern even as a newer amigurumi maker. The nine-round head is the most involved part, so consider practicing invisible decreases on a scrap swatch first if you're unfamiliar with the technique.