Intermediate 6-10 Hours Size 10 Crochet Thread yarn

Worked on the glider, counted out loud —

Autumn Maple Ear Climber Crochet Pattern (Micro Crochet Jewelry)

Make a stunning Autumn Maple Ear Climber with micro crochet flowers and leaves, brass findings, and beading. A detailed intermediate jewelry pattern.

Jump to the rounds

Before you sit down

Crochet five small flower motifs in the round, each with five petals, in burnt orange, golden yellow, and burgundy.

Crochet seven to nine maple leaf motifs in the round using olive green thread, keeping tension even throughout.

Pin every flower and leaf motif flat on blocking foam and apply fabric stiffener or diluted PVA glue to set their shape.

Let all motifs dry completely and undisturbed until they hold a crisp, dimensional form.

Glue a small brass bead into the center of each dried flower for a decorative focal point.

Arrange the flowers and leaves against the brass ear cuff to test spacing before attaching anything permanently.

Use jewelry wire and pliers to secure the motifs to the ear cuff, following your planned layout.

Attach the brass chain and jump ring at the bottom, then connect a stud or clip finding to complete the lobe drop.

What this one is

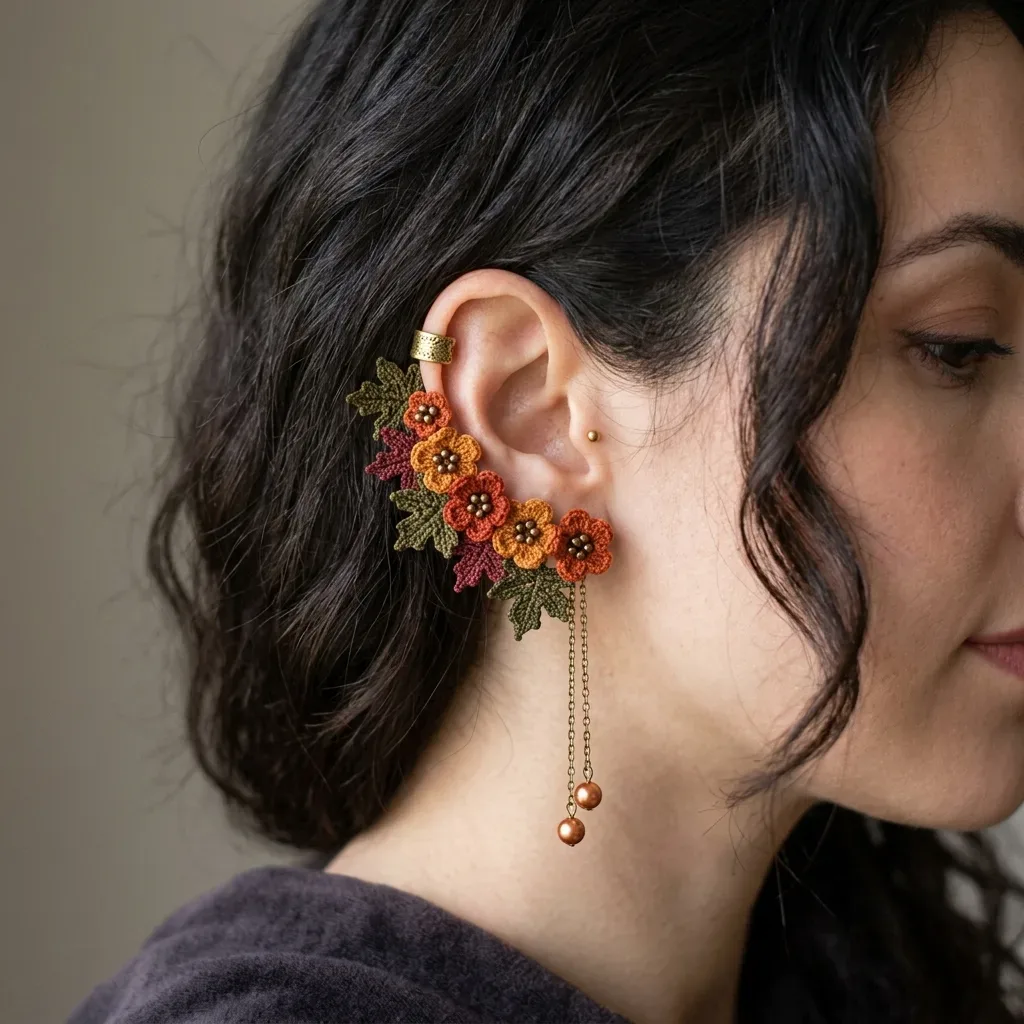
This Autumn Maple Ear Climber pattern turns humble crochet thread into a piece of botanical jewelry you'd expect to find in a boutique. Five tiny five-petal flowers in burnt orange, golden yellow, and burgundy nestle among seven to nine olive green maple leaf motifs, all climbing along a brass ear cuff before dropping into a delicate chain at the lobe. It's perfect for crocheters who love a challenge beyond the usual amigurumi or blanket square, and for anyone who wants a genuinely unique handmade accessory for fall.

Every motif here — the flowers and the maple leaves — is worked flat and finished individually before assembly, so the actual stitching stays beginner-friendly even though the overall project reads as intermediate. What raises the skill level is the precision required at micro scale: working in the round with size 10 thread and a steel hook, keeping tight, even tension, and then blocking, stiffening, and hand-assembling everything onto brass findings. Set aside 6 to 10 hours total, and know that most of that time goes toward finishing rather than crocheting.

The finished ear climber spans about 3.5 inches along the outer ear curve with roughly 2 inches of chain dangling below the lobe, giving it real movement and presence without feeling heavy. Once stiffened, the flowers and leaves hold a crisp, dimensional shape topped with brass bead centers that catch the light beautifully. It makes a stunning gift for a fiber artist, a fall wedding accessory, or a statement piece for yourself — the kind of handmade jewelry people will ask about.

Variations

I adore this pattern because it proves crochet thread can be fine jewelry, not just doilies and dishcloths. Working the small flower motifs flat in the round with size 10 cotton is genuinely satisfying — five quick petals, and suddenly you have a little bloom in your hand. The maple leaf motifs are just as fun, each one only 0.75 inch tall, but they capture that unmistakable maple silhouette. What really hooks me is the assembly stage: nestling five flowers among seven to nine leaves, tucking a brass bead into each flower center, and watching the whole cluster curve naturally along a brass ear cuff. There's something almost meditative about stiffening the pieces, pinning them to block, and then piecing the puzzle together with wire and jewelry findings. It's a slow project, and I mean that as a compliment — every hour you put in shows in the finished piece. By the time you attach that final jump ring to the chain, you'll have made something that looks like it came from a small-batch jewelry designer, entirely with a hook and thread.

Common mistakes

  • Using a hook that's too large or smallCrochet one flower and one leaf first, measure them, and adjust hook size up or down before committing to all your motifs — gauge shifts matter enormously at this scale.
  • Skipping the stiffening stepPin each stiffened motif flat onto blocking foam while damp with diluted PVA glue or stiffener, and let it dry fully and undisturbed before moving it, so it holds its shape permanently.
  • Joining rounds sloppily on the tinyUse a slip stitch join and weave in the tail immediately through several stitches on the wrong side while the piece is small and easy to manage, before it's stiffened and harder to manipulate.
  • Gluing brass bead centers onto flowersWait until each flower is completely dry and holding its shape, then apply a small dot of clear-drying jewelry glue to the center back before pressing the brass bead into place with tweezers or pliers.
  • Overcrowding or under-spacingDry-lay all your motifs against the brass ear cuff before attaching anything permanently, adjusting spacing until the arrangement follows the curve, then secure pieces one at a time with wire or thread.
  • Attaching the jump ring or chainUse both flat-nose and round-nose pliers to twist the jump ring closed cleanly, checking that the opening is fully sealed flush before considering the assembly finished.

The rounds, in full

Written out, round by round

Intermediate6-10 Hours1.65 mmSize 10 Crochet Thread

Materials

Everything this one takes, in the order you will reach for it.

  • You will work with size 10 crochet cotton thread in the following colors:
  • Steel crochet hook size 7 (1.65 mm), adjust up or down as needed to match gauge

Color A

  • Olive green for all leaves

Color B

  • Burnt orange for approximately 2 flowers

Color C

  • Golden yellow or mustard for approximately 2 flowers

Color D

  • Burgundy or dark red for approximately 1 flower and optional leaf accents
  • Approximately 4 inches of fine link gold-tone brass chain
  • 28 gauge gold tone jewelry wire
  • Jewelry pliers, both flat nose and round nose
  • Sewing needle and gold or neutral thread
  • Fabric stiffener or diluted PVA glue
  • Straight pins and blocking foam
  • One adjustable brass filigree ear cuff, approximately 10 mm wide
  • One pair of flat-pad stud earring posts with butterfly backs, or one ear clip finding in brass or gold tone
  • Two copper or bronze freshwater pearl beads or faux pearls, approximately 8 mm
  • Five small brass flower center beads or Czech glass beads, approximately 3 to 4 mm each
  • Clear-drying jewelry glue for extra security on bead attachments
  • One 4 mm gold tone jump ring for connecting chain to lobe finding

keep this to hand

Abbreviations

US crochet terms, as used in this pattern.

  1. chchain
  2. sl stslip stitch (insert hook, yarn over, pull through stitch and loop on hook in one motion)
  3. scsingle crochet (insert hook, pull up loop, yarn over, pull through both loops)
  4. hdchalf double crochet (yarn over, insert hook, pull up loop, yarn over, pull through all 3 loops)
  5. dcdouble crochet (yarn over, insert hook, pull up loop, yarn over and pull through 2 loops twice)
  6. trtreble crochet (yarn over twice, insert hook, pull up loop, yarn over and pull through 2 loops three times)
  7. skskip
  8. spspace
  9. rndround
  10. st(s)stitch(es)
  11. RSright side
  12. WSwrong side
  13. yoyarn over
  14. reprepeat
  15. lp(s)loop(s)
  16. begbeginning
  17. pmplace marker
  18. MRmagic ring (adjustable starting loop that can be pulled closed)
  19. picotChain 3, slip stitch into the first chain of the chain-3. This creates a small decorative point at leaf tips.
  20. petal stitch(for 5-petal flower) Chain 4, work 4 double crochet into the 4th chain from hook, slip stitch into the base stitch. This creates one rounded petal.
  21. leaf point increaseWork 3 single crochet into one stitch to create a sharp outward point at leaf lobes.
  22. sc2tog(single crochet two together) Insert hook into next stitch, pull up a loop, insert hook into following stitch, pull up a loop, yarn over and pull through all 3 loops on hook. This decreases by one stitch.

Flower Motif

Make 5 total: 2 in Color B, 2 in Color C, 1 in Color D.

Foundation Foundation: Make a magic ring (MR).

  1. Round 1Chain 1, work 5 single crochet into the MR, slip stitch into first sc to join, pull MR closed. (5 sc)
  2. Round 2Chain 1. In each sc around, work one petal stitch as follows: Chain 4, work 4 dc into the 4th chain from hook (this forms the rounded petal head), slip stitch into the same sc at the base to close the petal. Repeat in each of the remaining 4 sc. (5 petals made)(5)
  3. Round 3(optional petal outline for crisper definition): Slip stitch to the base of any petal. Chain 1. Working along the outside edge of the petal: sc into the side of each dc across the petal (4 sc), sc into the tip chain space (1 sc), sc down the other side (4 sc), slip stitch into the base of the same petal. Slip stitch along the base to the next petal and repeat. Work this outline on all 5 petals.Fasten off, leaving a 6-inch tail for sewing.Using your tapestry needle and the tail, weave through the center stitches once more and pull slightly to close any gap at the center before fastening off fully.Attach one brass flower center bead to each flower using jewelry wire or needle and thread. Pull the bead snug against the center sc rounds. Knot securely on the wrong side and dab with clear glue if desired.

Checkpoint: Each finished flower should measure approximately 0.75 inch across. The center hole should be small and tight. If petals are cupping rather than lying flat, block face-down under a heavy book while stiffener is wet.

Maple Leaf Motif

Make 7 in Color A. Optionally add Color D accent on 2 to 3 leaves.

The maple leaf is worked in rows, beginning at the base of the stem and building outward to three main lobes and two side lobes.

Foundation Foundation chain: Chain 8.

  1. Row 1(RS, stem and base): Sc into 2nd chain from hook, sc into each of the next 5 chains, 3 sc into the last chain (this is the base of the leaf where lobes will branch). Do not turn. Working back along the underside of the foundation chain: sc into each of the 6 remaining chain loops. (15 sc total along the oval base)

Do not join. This creates the central vein of the leaf as a flat oval base.

  1. Row 2(first right lobe): With RS facing, slip stitch to the 8th stitch of the base oval (the top center point). Chain 1. Chain 7, sc into 2nd chain from hook, sc into next 2 chains, hdc into next chain, dc into next chain, tr into last chain, slip stitch into the top-center base stitch to anchor lobe. (6 sts in lobe arm, 1 sl st anchor)
  2. Row 3(first right lobe outer edge): Chain 1, turn to work back along the outer edge of the right lobe. Sc into each of the 6 stitches, work picot at the lobe tip (chain 3, slip stitch into first chain of chain-3), sc back down the other side (6 sc), slip stitch into base. (13 sts along outer edge plus 1 picot)
  3. Row 4(central top lobe): From the top-center base stitch, chain 9. Sc into 2nd chain from hook, sc into next 3 chains, hdc into next chain, dc into next chain, tr into next chain, tr into last chain, slip stitch back into the top-center base stitch. (8 sts in central lobe arm, 1 sl st anchor)
  4. Row 5(central lobe outer edge): Chain 1, turn. Sc along outer edge of central lobe (8 sc), picot at tip, sc back down other side (8 sc), slip stitch into base. (17 sts along outer edge plus 1 picot)
  5. Row 6(first left lobe): From the top-center base stitch, chain 7. Sc into 2nd chain from hook, sc into next 2 chains, hdc into next chain, dc into next chain, tr into last chain, slip stitch back into base stitch. (6 sts in lobe arm, 1 sl st anchor)
  6. Row 7(first left lobe outer edge): Chain 1, turn. Sc along outer edge (6 sc), picot, sc back down (6 sc), slip stitch into base. (13 sts plus 1 picot)
  7. Row 8(lower right side lobe): Slip stitch along the base oval down to the 4th stitch from center (approximately 4 slip stitches to reposition). Chain 5. Sc into 2nd chain from hook, sc into next chain, hdc into next chain, dc into last chain, slip stitch back into base. (4 sts in mini-lobe arm, 1 sl st anchor)
  8. Row 9(lower right side lobe outer edge): Chain 1, turn. Sc along outer edge (4 sc), picot, sc back (4 sc), slip stitch into base. (9 sts plus 1 picot)
  9. Row 10(lower left side lobe): Slip stitch along the base oval to the corresponding position on the left side (approximately 4 slip stitches to reposition). Chain 5. Sc into 2nd chain from hook, sc into next chain, hdc into next chain, dc into last chain, slip stitch back into base. (4 sts in mini-lobe arm, 1 sl st anchor)
  10. Row 11(lower left side lobe outer edge): Chain 1, turn. Sc along outer edge (4 sc), picot, sc back (4 sc), slip stitch into base. (9 sts plus 1 picot)Border round (optional but recommended): Starting at the stem tip, sc evenly around the entire leaf perimeter, working 1 sc per stitch, 3 sc at outer lobe points, and sc2tog at inner valleys between lobes. Work 1 slip stitch to join at stem tip. Fasten off.Fasten off, leaving a 6-inch tail for sewing.

Optional Color D accent: For 2 to 3 leaves, join Color D with a slip stitch at one lower side lobe base before working the outer edge row of that lobe only (Rows 9 or 11). Work the outer edge in Color D, then fasten off Color D and return to Color A. This creates the impression of a single lobe turning deep red, mimicking a turning autumn maple leaf.

Checkpoint: Each finished leaf should measure approximately 0.75 inch tall and 0.625 inch wide. If lobes are not distinct, use a pin to ease each lobe point open while the stiffener is wet and re-pin until dry.

Assembly

Step 1

Step 1: Lay out all 5 flowers and 7 leaves on a flat surface. Arrange them in a gentle diagonal curve, working from top (helix end) to bottom (lobe end):

Step 2

Position 1 (topmost): One large leaf, oriented so the central lobe points upward and slightly left, overlapping slightly with the ear cuff finding placement.

Step 3

Position 2: One Color D flower, overlapping the base of the leaf at Position 1 by approximately one-third.

Step 4

Position 3: One leaf, angled slightly downward and to the right, with its side lobe tucking behind the Color D flower.

Step 5

Position 4: One Color C flower, overlapping the leaf at Position 3 by one-third.

Step 6

Position 5: One leaf, angled further along the curve.

Step 7

Position 6: One Color B flower, overlapping the leaf at Position 5 by one-third.

Step 8

Position 7: One leaf, tucked partially behind the Color B flower, with side lobes visible at the edges.

Step 9

Position 8: One Color C flower.

Step 10

Position 9: One leaf (with optional Color D accent lobe) angled to follow the curve.

Step 11

Position 10: One Color B flower, positioned nearest the lobe, slightly larger in visual weight to anchor the bottom.

Step 12

Position 11: One or two additional small leaves tucked behind or beside the bottom flower as needed.

Step 13

Step 2: Using sewing needle and matching thread, sew each motif to its neighbors where they overlap. Use small, invisible stitches on the wrong side. Sew through both layers at every overlap point. The assembled piece should curve gently and lie flat without buckling.

Step 14

Step 3: Attach the brass ear cuff finding to the back of the topmost leaf using a small length of 28-gauge gold wire. Thread the wire through the stitches at the back of the leaf twice and then through the cuff opening, twist wire ends together on the inside of the cuff, and trim.

Step 15

Step 4: Attach the lobe finding to the back of the bottommost flower using 28-gauge wire or strong thread. If using a stud post, use jewelry glue to affix the flat pad to the back of the motif and allow to cure fully. If using a clip finding, sew it securely with wire.

Step 16

Step 5: Cut the gold-tone chain into two equal lengths of approximately 2 inches each. Using a jump ring or by looping the chain link directly, attach both chain lengths to the loop on the lobe finding below the bottom flower.

Step 17

Step 6: Thread one pearl bead onto a short length of 28-gauge wire. Bend the wire into a wrapped loop above the bead. Attach the wrapped loop to the bottom end of both chains, joining them together so both chains terminate at the same pearl. Trim wire ends neatly. Alternatively, attach one pearl to each chain separately for a twin-drop look.

Step 18

Step 7: Check the full assembled piece. The flowers should face forward with petals open. The leaves should angle behind and beside the flowers, with picot tips visible at the edges. The chain should hang freely. The cuff should be oriented to clip over the helix.

Step 19

Final Checkpoint: Hold the assembled climber along your own ear to verify the curve sits naturally. The topmost motif should reach the upper helix area. The bottom flower should sit at or just above the lobe.

Important notes

Note 01

💡 Test your gauge with a single flower and leaf before making all your motifs — since everything is worked at micro scale with size 10 thread, even a small tension difference will throw off the final fit against the ear cuff.

Note 02

💡 Keep your steel hook size 7 (1.65 mm) consistent throughout, but don't hesitate to size up or down if your first test motifs come out larger or smaller than the 0.75 inch target.

Note 03

💡 Work in a well-lit space and consider a magnifier or good task lamp — the fine thread and small stitch counts on these motifs are much easier to track with strong lighting.

Note 04

💡 Block and stiffen every single motif, flower and leaf alike, before assembly begins — trying to shape thread crochet after it's wired together is nearly impossible and risks distorting your careful stitchwork.

Note 05

💡 Lay out your full arrangement of five flowers and seven to nine leaves on a flat surface first and take a photo for reference before you start attaching pieces to the brass ear cuff.

Note 06

💡 Budget your 6 to 10 hours realistically across multiple sessions — crochet the motifs in one sitting, then dedicate separate time to blocking and stiffening, and finally a focused session for wire assembly and finishing.

Note 07

💡 Stick with size 10 crochet cotton — do not substitute heavier thread or lightweight yarn, since the scale of these tiny motifs depends on that fineness, and synthetic threads may not absorb fabric stiffener as effectively as cotton.

Note 08

💡 After stiffening, let motifs dry completely — at least 4 hours or overnight — before assembling, and keep the right side facing you on all flower rounds since every motif is worked flat.

Note 09

💡 This pattern is written for the left ear as shown. To make it for the right ear, reverse the curve direction when assembling.

FAQs

Asked on the glider

the ones that come up on the glider

What size crochet hook do I need for the Autumn Maple Ear Climber?

This pattern calls for a steel crochet hook size 7 (1.65 mm), but you should adjust up or down based on your gauge test with the flower and leaf motifs. If your motifs come out larger than 0.75 inch, go down a hook size; if smaller, go up one.

What crochet thread works best for this project?

DMC Cebelia Size 10 Crochet Cotton is the top recommendation because its mercerized finish gives crisp stitch definition and takes stiffener beautifully without becoming brittle. Aunt Lydia's Classic Crochet Thread Size 10 is a great substitute if that's what you have on hand, and for a premium option, Lizbeth Size 10 Egyptian Cotton Thread offers exceptional color saturation and smooth texture. Stick with size 10 crochet cotton throughout — heavier thread or lightweight yarn will throw off the scale of these tiny motifs, and synthetic threads may not absorb fabric stiffener as effectively as cotton.

How long does it actually take to make one ear climber?

Plan for 6 to 10 hours total, though the crocheting itself moves faster than you'd expect. Most of that time goes into blocking, stiffening, and the careful assembly work with jewelry findings.

Is this pattern really beginner-friendly or is it advanced?

The individual motifs are quite beginner-friendly since they use basic in-the-round techniques, but the overall project is rated intermediate because of the precise assembly and jewelry finishing skills required. If you're new to micro crochet, give yourself extra patience and time.

What jewelry findings and tools do I need besides the crochet thread?

You'll need a brass ear cuff, a stud or clip finding for the lobe, about 4 inches of fine gold-tone brass chain, a 4mm jump ring, 28 gauge gold-tone jewelry wire, and both flat-nose and round-nose jewelry pliers. Fabric stiffener, straight pins, blocking foam, and clear-drying jewelry glue round out the finishing supplies.