Intermediate 4-6 Hours Worsted yarn

Worked on the glider, counted out loud —

Crochet Mushroom Doll Pattern: Cozy Amigurumi Pal

Crochet an adorable mushroom doll with a spotted cap, tiny arms, and stubby legs. A detailed amigurumi pattern for a huggable 12-inch toy.

Jump to the rounds

Before you sit down

Crochet two legs separately in cream yarn, shaping each with increases before setting the first one aside.

Join both legs together with a chain to begin working the body directly upward in one continuous spiral.

Shape the body through a long series of rounds, increasing and decreasing to create the classic curved mushroom-stem silhouette.

Stuff the body firmly partway through so it holds its shape before finishing the remaining rounds.

Crochet the head separately, then sew it securely and centered onto the top of the finished body.

Make two arms with a flattened, sewn-shut tip and attach them to either side of the body.

Crochet the two-tone hat, working a longer beige double crochet brim followed by a red single crochet cap.

Whip up an assortment of small, medium, and large spots, then arrange and sew them onto the hat before angling and attaching it to the head.

What this one is

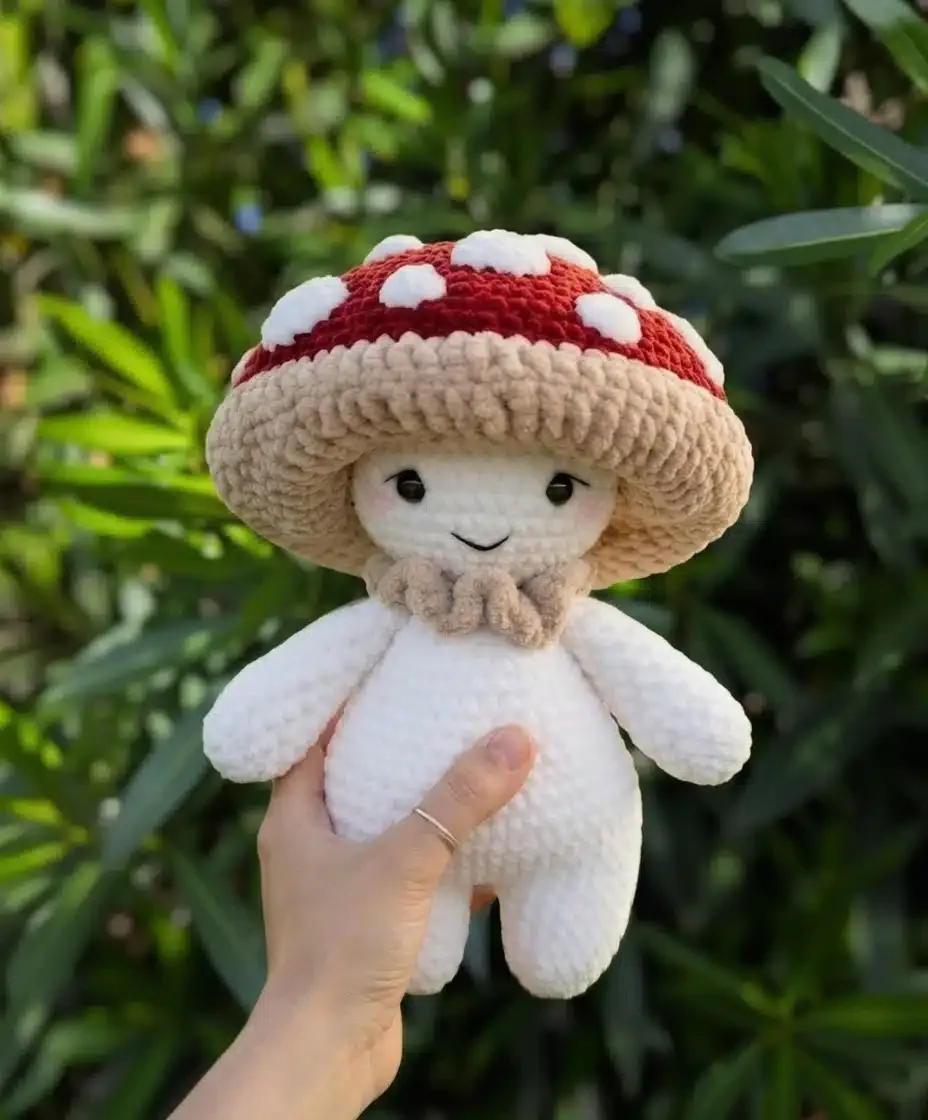
This pattern brings to life a plump, huggable mushroom doll complete with a rounded cap, a soft cream body, and the sweetest little arms and legs that let it sit or stand on its own. What makes this design so special is the layered cap construction — a beige double crochet brim paired with a red single crochet dome, finished with scattered spots in three different sizes for a truly whimsical, storybook look. It's perfect for anyone who loves woodland-inspired toys or wants a charming handmade gift that doesn't look like every other amigurumi on the shelf.

You'll work through a satisfying mix of techniques here: magic rings, increases and decreases for shaping, BLO (back loop only) work for defining the collar edge, and both single and double crochet stitches to create the hat's two-tone texture. The legs are worked separately and then joined directly into the body round, a technique that gives amigurumi makers a real sense of accomplishment once they see the shape click into place. Expect to spend somewhere between four and six hours total, making this a lovely intermediate-level project for a relaxed weekend.

When it's all sewn together, you'll have a soft, sturdy mushroom friend standing about 30 cm (12 inches) tall — sizable enough to feel like a real cuddle companion, but not so large that it takes over a shelf. The spotted cap and jaunty forward-tilted brim give it real personality, and the firm stuffing throughout means it holds its shape beautifully whether it's sitting on a bed or a bookshelf. It makes a wonderful handmade gift for a nursery, a woodland-themed room, or anyone who just needs a little extra whimsy on their desk.

Variations

Once you've got the basic mushroom shape down, there's so much room to play. Try swapping the classic red-and-cream toadstool coloring for a golden chanterelle look using mustard yellow and cream, or go moody with a deep forest green cap and dusty rose spots for a more woodland-fairy vibe. If you want a fully monochrome mushroom, work the entire hat in one color and skip the spots altogether for a sleek, modern take on the same silhouette. Since this pattern uses Yarnart Dolce Baby and Himalaya Dolphin Baby (both soft baby-weight yarns), you can easily substitute any worsted-weight yarn with a similar hand — just keep your 4mm hook consistent and check that your stitches stay snug enough to hold stuffing without gaps. For a mini version, work the same rounds but stop the increase sequences earlier on the legs, arms, and body to create a pocket-sized mushroom buddy, though you'll want to recalculate your own stitch counts if you go that route. You could also make a whole mushroom family in graduated sizes using different hook sizes (try 3mm for a petite version) paired with lighter-weight yarn. If you're making this as a gift, consider using novelty or self-striping yarn for the spots to create a naturally speckled, hand-painted look with zero extra effort. Swapping the black embroidery thread for brown could soften the facial details for an even more huggable, less googly-eyed expression, and adding a tiny crocheted flower or leaf tucked beside the hat brim gives it an extra charming, one-of-a-kind touch.

Common mistakes

  • Losing track of rounds inAlways place a stitch marker in the first stitch of each new round and move it up as you go — this pattern is worked in continuous spirals, so there's no slip stitch to signal round changes.
  • Joining the legs into the bodyBefore joining, check that the increases from the earlier leg rounds point forward — this creates the front of the feet and keeps your mushroom balanced on a flat surface.
  • Under-stuffing the body before closingStuff the body firmly as instructed after the later rounds, pushing fill into the legs and lower body first so the shape stays plump and stands well on its own.
  • Confusing the BLO round on the collarSlow down on the collar round and consciously insert your hook only under the back loop — this small detail creates the visible ridge that defines the collar edge.
  • Attaching the hat brim backwardDouble check orientation before sewing: the beige double crochet section (the longer part) should face forward, with the single crochet section sitting toward the back near the neck.
  • Rushing the arm closure and leavingFlatten the arm opening evenly and single crochet through both layers for the full four stitches specified, then weave in the tail securely so the seam stays closed.

The rounds, in full

Written out, round by round

Intermediate4-6 Hours4 mmWorsted

Materials

Everything this one takes, in the order you will reach for it.

Plush Yarn

  • Yarnart Dolce Baby in shade 775 (Cream/Off-White) for the body and spots
  • Yarnart Dolce Baby in shade 771 (Beige) for the hat brim
  • Himalaya Dolphin Baby in shade 80322 (Red) for the hat cap
  • Crochet Hook: 4mm
  • Safety Eyes: 14mm

Polyfill Stuffing

  • For filling your mushroom friend

Tapestry Needle

  • For sewing pieces together and weaving in ends

Scissors

  • Your trusty crafting companion
  • Black Embroidery Thread: For embroidering facial details

Stitch Marker

  • To keep track of your rounds

keep this to hand

Abbreviations

US crochet terms, as used in this pattern.

  1. MRmagic ring
  2. scsingle crochet
  3. incincrease (2 sc in same stitch)
  4. sl stslip stitch
  5. chchain
  6. decdecrease (single crochet 2 together)
  7. dcdouble crochet
  8. dc decdouble crochet decrease (double crochet 2 together)
  9. BLOback loop only

Legs

Make 2

Using Cream/Off-White yarn.

For the first leg, fasten off and weave in ends. Do not cut the yarn for the second leg; continue directly into the body.

  1. Round 1sc 5 in MR (5)
  2. Round 2(inc) 4 times, sc 1 (9)
  3. Round 3(2 sc, inc) * 3 (12)
  4. Round 4(inc, sc) * 3, 6 sc (15)
  5. Round 5(2 sc, inc) * 3, 6 sc (18)
  6. Round 6(3 sc, inc) * 3, 6 sc (21)
  7. Round 710 sc, inc, 10 sc (22)
  8. Round 822 sc (22)

Arms

Make 2

Using Cream/Off-White yarn.

Flatten the arm and single crochet through both layers for 4 stitches to close the opening. Leave a long tail for sewing later, or continue directly to attach it to the body.

  1. Round 1sc 6 in MR (6)
  2. Round 26 inc (12)
  3. Round 3(2 sc, inc) * 4 (16)
  4. Round 4-616 sc (3 rounds)
  5. Round 7(2 sc, dec) * 4 (12)
  6. Round 8-1212 sc (5 rounds)
  7. Round 13(2 sc, dec) * 3 (9)
  8. Round 149 sc (9)

Head

Using Cream/Off-White yarn.

The increases and decreases in Rounds 8 and 12 help shape the sides of the head — keep this in mind when placing safety eyes.

Insert 14mm safety eyes between Rounds 10 and 11, with approximately 8 stitches visible between them. Begin stuffing the head firmly as you go.

Fasten off leaving a long tail for sewing the head to the body.

  1. Round 1sc 6 in MR (6)
  2. Round 26 inc (12)
  3. Round 3(sc, inc) * 6 (18)
  4. Round 4(2 sc, inc) * 6 (24)
  5. Round 5(3 sc, inc) * 6 (30)
  6. Round 6(4 sc, inc) * 6 (36)
  7. Round 7(5 sc, inc) * 6 (42)
  8. Round 820 sc, inc, 20 sc, inc (44)
  9. Round 9-1144 sc (3 rounds)
  10. Round 1220 sc, dec, 20 sc, dec (42)
  11. Round 13(5 sc, dec) * 6 (36)
  12. Round 14(4 sc, dec) * 6 (30)
  13. Round 15(3 sc, dec) * 6 (24)
  14. Round 16(2 sc, dec) * 6 (18)
  15. Round 17(sc, dec) * 6 (12)

Hat

Rounds 1-16 use Red yarn for the hat cap.

Change to Beige yarn for the brim. The first round of the brim is worked in back loop only (BLO) to create a nice defined edge, mixing sc and dc stitches.

Fasten off leaving a very long tail for sewing the hat to the head.

  1. Round 1sc 6 in MR (6)
  2. Round 26 inc (12)
  3. Round 3(sc, inc) * 6 (18)
  4. Round 418 sc (18)
  5. Round 5(2 sc, inc) * 6 (24)
  6. Round 6(sc, inc) * 12 (36)
  7. Round 736 sc (36)
  8. Round 8(2 sc, inc) * 12 (48)
  9. Round 9(5 sc, inc) * 8, sc 1 (57)
  10. Round 10-1157 sc (2 rounds)
  11. Round 12(7 sc, inc) * 7, sc 1 (64)
  12. Round 13dec, 62 sc (63)
  13. Round 14(6 sc, inc) * 9 (72)
  14. Round 15(7 sc, inc) * 9 (81)
  15. Round 1681 sc, sl st 1 (81)
  16. Brim Round 1(BLO): (2 sc, dec) * 4 (12 sts), (3 dc, dc dec) * 3 (12 sts), 23 dc, (dc dec, 3 dc) * 3 (12 sts), (2 sc, dec) * 3 (9 sts) (68)
  17. Brim Round 2(3 sc, dec) * 2, 2 sc, dc dec, 43 dc, dc dec, dec, 3 sc, dec, 2 sc (62)
  18. Brim Round 3(sc, dec) * 4, (7 dc, dc dec) * 5, (sc, dec) * 2 (52)
  19. Brim Round 48 sc, 42 dc, 2 sc (52)
  20. Brim Round 5dec, 5 sc, dec, 40 dc, dec, 4 sc (49)
  21. Brim Round 68 sc, (8 sc, dec) * 4, 5 sc (45)

Collar

Using Cream/Off-White yarn.

Fasten off, leaving a long tail for tying or sewing around the neck.

  1. Round 1Ch 20. Starting in the 2nd ch from hook, make 3 sc in each chain stitch across. (57 sc)

Spots for Hat

Using Cream/Off-White yarn. Make a small, medium, and large version — these spots will make your mushroom's hat truly pop!

Small Spot Small Spot:

  1. Small Spot R1sc 6 in MR (6)
  2. Small Spot R2(sc, inc) * 6 (18)Fasten off, leaving a long tail for sewing.

Medium Spot Medium Spot:

  1. Medium Spot R1sc 6 in MR (6)
  2. Medium Spot R26 inc (12)Fasten off, leaving a long tail for sewing.

Large Spot Large Spot:

  1. Large Spot R1sc 6 in MR (6)
  2. Large Spot R26 inc (12)Fasten off, leaving a long tail for sewing.Make a few of each size to create a lovely, varied look on the hat!

Body

Continuing with Cream/Off-White yarn directly from the second leg.

Make sure the legs are oriented correctly, with the increases from Rounds 4-6 pointing forward to create the front of the feet, so the mushroom will stand nicely.

Stuff the body firmly before continuing after Round 25.

Fasten off leaving a long tail after Round 34; weave the tail through the front loop of each remaining stitch and pull tight to close the opening, then weave in the end securely.

  1. Round 9Ch 1, sc in 22 stitches around the first leg, sc in the ch-1 stitch, sc in 22 stitches around the second leg, sc in the other side of the ch-1 stitch (46)
  2. Round 109 sc, inc, 24 sc, inc, 10 sc, inc (49)
  3. Round 114 sc, inc, 17 sc, 2 dec, 17 sc, inc, 5 sc (49)
  4. Round 128 sc, inc, 14 sc, dec, 14 sc, inc, 9 sc (50)
  5. Round 1350 sc (50)
  6. Round 1412 sc, inc, 23 sc, inc, 13 sc (52)
  7. Round 158 sc, dec, 10 sc, dec, 7 sc, dec, 11 sc, dec, 8 sc (48)
  8. Round 163 sc, dec, 7 sc, dec, 20 sc, dec, 7 sc, dec, 3 sc (44)
  9. Round 1742 sc, dec (43)
  10. Round 18dec, 41 sc (42)
  11. Round 19(5 sc, dec) * 6 (36)
  12. Round 20-2136 sc (2 rounds)
  13. Round 22(4 sc, dec) * 6 (30)
  14. Round 2330 sc (30)
  15. Round 24(3 sc, dec) * 6 (24)
  16. Round 2524 sc (24)
  17. Round 266 sc, 4 sc joining with arm (crocheting through both the arm and body stitches), 8 sc, 4 sc joining with arm, 2 sc (24)
  18. Round 27(2 sc, dec) * 6 (18)
  19. Round 28(sc, dec) * 6 (12)
  20. Round 29-3312 sc (5 rounds)
  21. Round 346 dec (6)

Assembly

Step 1

Attach the Head: Carefully position the head onto the top of the body. Use the long tail left on the head and your tapestry needle to sew the head securely to the body, making sure it's centered and firmly attached.

Step 2

Place the Hat: Position the hat onto the head. The beige brim, with its longer double crochet section, should face forward, and the single crochet section should be at the back, closer to the neck. Angle it slightly backward for a whimsical look. Sew the hat firmly to the head, about 2-3 rounds above the safety eyes. Add a few stitches at the very top back of the hat to gently secure it to the head, allowing it to maintain its charming angle.

Step 3

Add the Collar: Wrap the ruffled collar around the mushroom's neck. Tie it in a pretty bow at the front or back, or use the tail to sew it discreetly in place for a neat finish.

Step 4

Sew on the Spots: Arrange the crocheted spots onto the red part of the hat. Play with different sizes and placements until happy with the design, then use your tapestry needle and the tails from the spots to sew them securely onto the hat.

Step 5

Embroider the Face: With your black embroidery thread, carefully embroider a sweet little mouth onto the head to complete your mushroom's charming expression.

Important notes

Note 01

This pattern uses US crochet terminology throughout, so double check your dc and sc stitches if you're used to UK terms, since they're reversed.

Note 02

Work in continuous spirals unless a step specifically says otherwise — a stitch marker isn't optional here, it's essential for keeping the 21-round body and hat sections accurate.

Note 03

Plush yarns like Yarnart Dolce Baby can make stitches hard to see; slow down and feel for the top of each stitch with your hook tip rather than relying on sight alone.

Note 04

Don't cut your yarn between the first and second leg — the pattern is designed so you continue directly into the body, saving you a color change and extra ends to weave in.

Note 05

Stuff firmly but evenly as you go, particularly before closing up the body after the later rounds, since amigurumi that's stuffed too loosely will sag over time.

Note 06

Take your time positioning the head and hat during assembly; both are sewn on rather than attached with glue, so a few extra pins or stitch markers to hold placement while you sew makes a big difference.

Note 07

This pattern is written in US crochet terminology.

Note 08

Worked in continuous spirals unless otherwise stated. A stitch marker is highly recommended to keep track of rounds.

Note 09

The finished Mushroom Pal will be approximately 30 cm (12 inches) tall when made with the recommended yarn and hook. Gauge isn't critical, but keep stitches consistent for a beautifully shaped toy.

Note 10

When working with plush yarn, it can be tricky to see stitches; feel for the top of the stitch with your hook and count frequently.

Note 11

Stuff pieces firmly as you go, especially the head and body, for a plump shape.

FAQs

Asked on the glider

the ones that come up on the glider

What yarn weight works best if I don't have the exact yarns listed?

Any soft worsted-weight or baby-weight yarn with good stitch definition will work well with a 4mm hook. Just keep your tension slightly tight so the stuffing doesn't peek through the stitches.

How many spots do I actually need to make?

The pattern lets you make as many small, medium, and large spots as you like, so it's entirely up to your taste. Most makers find that 5-8 spots scattered across the cap gives a nice balanced, natural look.

Can I make the legs and arms without joining them directly, and just sew them on later?

Yes — while the pattern is written to continue directly from the second leg into the body, you can fasten off and leave a long tail on each piece to sew on separately if you prefer more flexibility while assembling.

Why is my mushroom leaning instead of standing upright?

This usually happens when the leg increases aren't oriented correctly before joining to the body. Make sure the increased rounds face forward to form the front of the feet, which gives the mushroom its stable stance.

How much yarn do I need for the whole project?

You'll need a good amount of the cream/off-white shade since it covers the legs, arms, body, head, and spots, plus smaller amounts of beige and red for the hat. It's a good idea to have a full skein of the cream on hand before starting.