Intermediate 4-6 Hours Worsted yarn

Worked on the glider, counted out loud —

Amigurumi Monster Free Crochet Pattern

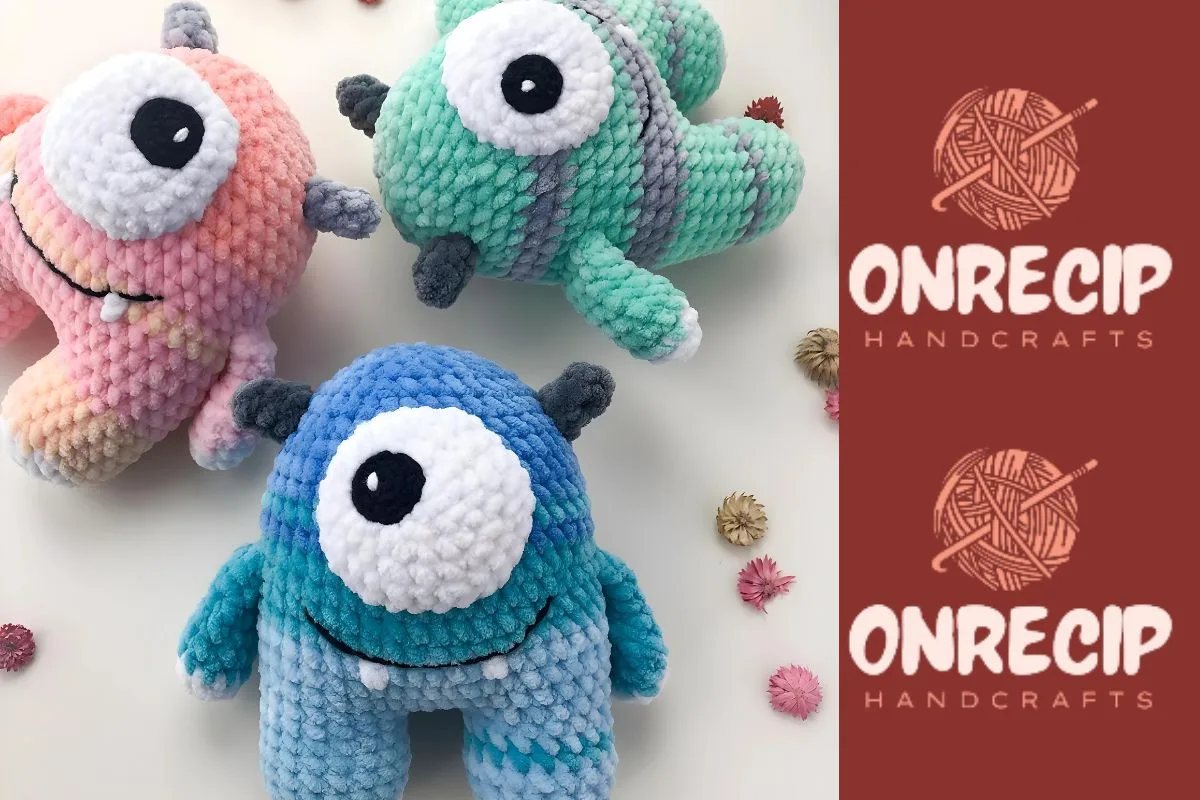
Make a cuddly amigurumi monster with this free crochet pattern featuring a round body, stubby limbs, and playful details kids adore.

Jump to the rounds

Before you sit down

Crochet two legs, then join them with a chain and continue directly into the body without cutting the yarn.

Work the body in continuous rounds, holding steady through the even rounds before a series of decrease rounds shapes the dome.

Stuff the body firmly with fiberfill before closing the final decrease round so it holds a solid, huggable form.

Make the pair of horns and the pair of arms separately, stuffing each lightly so they stay soft but shaped.

Sew the eye onto the face using thread-toned thread, checking placement carefully before stitching it permanently in place.

Attach the horns and arms to the body that's already joined with the legs.

Embroider the mouth with black yarn and the teeth with white yarn to finish your monster's expression.

What this one is

This amigurumi monster is the kind of pattern that makes you smile the second you finish the first round. With a plump six-round body, tiny expressive eye, and stubby little legs and arms, it has that irresistible 'so ugly it's cute' charm that monster amigurumi are known for. It's perfect for anyone who wants to make a quirky, huggable creature for a nursery shelf, a kid's toy basket, or a quick handmade gift that stands out from the usual teddy bear crowd.

You'll work primarily in continuous rounds using Himalaya Dolphin Baby or YarnArt Dolce yarn on a 4.0mm hook, with a much finer 2.5-3.0mm hook reserved for the tiny black pupil that gives this monster its personality. Expect to practice magic rings, single crochet increases, and careful piece assembly with a sewing needle and thread-toned thread. This is a comfortable intermediate project — not overly technical, but detail-oriented — that typically comes together over a relaxed weekend of stitching.

The finished monster is a soft, palm-to-forearm-sized plush with a rounded, fiberfill-stuffed body, a single sweet eye, and an embroidered mouth that gives it real character. It has that squishy, huggable feel babies and toddlers gravitate toward, while still being cute enough to sit on a shelf as a quirky bit of decor. Whether you're making it for a new baby, a monster-loving kid, or just for yourself, it's a gift that feels genuinely handmade and full of personality.

Common mistakes

  • Losing track of stitch countPlace a stitch marker at the start of every round and recount your stitches before moving on — with only six rounds total, catching an error early saves you from unraveling a nearly finished body.
  • Under-stuffing the body, legs, or armsStuff firmly with fiberfill in small pinches as you go, especially in the rounded top and bottom of the body, checking that the piece feels dense but not stretched before closing it.
  • Sewing the legs and arms onUse the thin thread in the tone of your yarn as specified, and take small, even stitches through the outer loops only so the seam blends invisibly into the body.
  • Embroidering the mouth before the headFinish stuffing the body completely first, then embroider the mouth with black yarn directly onto the firm, filled surface so the curve holds its shape permanently.
  • Attaching the single eye off-centerPin the eye piece in place with a scrap of yarn first and step back to check placement from multiple angles before permanently sewing it down with the thread-toned thread.

The rounds, in full

Written out, round by round

Intermediate4-6 Hours4.0 mmWorsted

Materials

Everything this one takes, in the order you will reach for it.

Yarn

  • Himalaya Dolphin Baby or YarnArt Dolce
  • Hook: 4.0 mm
  • Black YarnArt Jeans yarn and 2.5-3.0 mm crochet hook for pupil
  • Black yarn for embroidering mouth
  • Thin thread in the tone of yarn for sewing arms and horns
  • Sewing needle and scissors
  • Fiberfill

keep this to hand

Abbreviations

US crochet terms, as used in this pattern.

  1. Rrow
  2. mcmagic circle
  3. chchain
  4. sl stslip stitch
  5. scsingle crochet
  6. inc2 sc in the next stitch
  7. decsingle crochet 2 stitches together
  8. (12)number of stitches you should have at the end of the round/row
  9. (…)*6repeat whatever is between the brackets the number of times stated

Legs

Legs (make 2)

  1. Round 16 sc in mc (6)
  2. Round 2(inc)*6 (12)
  3. Round 3(1 sc, inc)*6 (18)
  4. Rounds 4-818 sc (5 rows)Sl st and fasten off.From second leg: 4 ch, join with the first leg.

Don’t cut the yarn when you will finish the second leg!

Body

Continue crocheting the body in the round:

  1. Round 918 sc on the first leg, 4 sc in 4 ch, 18 sc on the second leg, 4 sc in 4 ch (opposite side) (44)
  2. Rounds 10-2044 sc (11 rows)
  3. Round 2110 sc, dec, 20 sc, dec, 10 sc (42)
  4. Round 2242 sc
  5. Round 23(5 sc, dec)*6 (36)
  6. Round 2436 sc
  7. Round 25(4 sc, dec)*6 (30)
  8. Round 26(3 sc, dec)*6 (24)
  9. Round 27(2 sc, dec)*6 (18)
  10. Round 28(1 sc, dec)*6 (12)
  11. Round 29(dec)*6Sl st and fasten off.

Eye

With white yarn:

  1. Round 16 sc in mc (6)
  2. Round 2(inc)*6 (12)
  3. Round 3(1 sc, inc)*6 (18)
  4. Round 4(2 sc, inc)*6 (24)
  5. Round 524 scSl st and fasten off.

Pupil With black yarn:

  1. Round 16 sc in mc (6)
  2. Round 2(inc)*6 (12)
  3. Round 3(1 sc, inc)*3 (15)Fasten off and leave a long tail for sewing.

Horns

Horns (make 2)

  1. Round 14 sc in mc (4)
  2. Round 24 sc
  3. Round 3inc, 3 sc (5)
  4. Round 4inc, 4 sc (6)Fasten off.

Arms

Arms (make 2)

  1. Round 16 sc in mc (6)
  2. Round 2(inc)*6 (12)
  3. Rounds 3-412 sc (2 rows)
  4. Round 5dec, 10 sc (11)
  5. Round 6dec, 9 sc (10)
  6. Round 7dec, 8 sc (9)
  7. Round 89 scFold top of arm flat and 4 sc through both sides across.

Embroider mouth with black yarn. Embroider teeth with white yarn

Important notes

Note 01

💡 Keep two hooks on hand throughout this project — the 4.0mm for the body, legs, and arms, and the smaller 2.5-3.0mm reserved just for the black pupil so that detail stays tight and defined.

Note 02

💡 Stuff each piece — body, legs, and arms — a little more firmly than feels natural at first; amigurumi always softens slightly over time, and firm stuffing now keeps the monster's shape crisp for years.

Note 03

💡 The legs are worked first and joined with a chain to begin the body, while the arms and horns are worked separately — make sure both pieces of each pair match in size and stuffing firmness before sewing them on, so your monster stands and sits evenly.

Note 04

💡 Use a stitch marker at the beginning of every round on the body — it's easy to lose your place on a small, fast-growing sphere without one.

Note 05

💡 When sewing arms, legs, horns, and the eye onto the body, use the thin thread in the tone of your yarn rather than standard sewing thread; it blends invisibly and holds up to years of hugging.

Note 06

💡 Save your black yarn for embroidering the mouth until the very end, once the body is fully stuffed and closed, so the curve of the smile sits naturally on a firm surface.

FAQs

Asked on the glider

the ones that come up on the glider

What yarn weight works best for this amigurumi monster?

Himalaya Dolphin Baby or YarnArt Dolce, both worsted-weight-style yarns, are recommended and paired with a 4.0mm hook for the body, legs, and arms. Any comparable soft worsted-weight yarn will work as long as you keep your gauge consistent across all pieces.

Why does the pattern call for two different hook sizes?

The 4.0mm hook is used for the main body pieces to keep the fabric soft and slightly loose for stuffing, while the smaller 2.5-3.0mm hook tightens up the stitches on the black pupil so that tiny detail stays crisp and doesn't gap. Using the right hook for each part makes a big visual difference in the finished eye.

How much fiberfill do I need for one monster?

The exact amount depends on your yarn and finished size, but plan for a generous handful for the body and smaller pinches for the legs, arms, and horns. Stuff firmly and evenly so the monster holds its shape without looking lumpy.

Can I make this monster with just one eye like the pattern shows?

Yes, the pattern is designed with a single eye for that classic one-eyed monster look, made from a white base worked over 5 rounds with a black pupil worked over 3 rounds and sewn on top. If you'd like a two-eyed variation, simply repeat the eye piece and mirror its placement on the head.

Is this pattern good for a first amigurumi project?

It's best suited for someone with some amigurumi experience already, since it involves precise small-scale work on the pupil, careful stitch counting through the body's increase and decrease rounds, and hand-sewing multiple pieces together. A confident beginner who has completed one simple amigurumi before should still find it very manageable.