Intermediate 6-8 hours Worsted yarn

Worked on the glider, counted out loud —

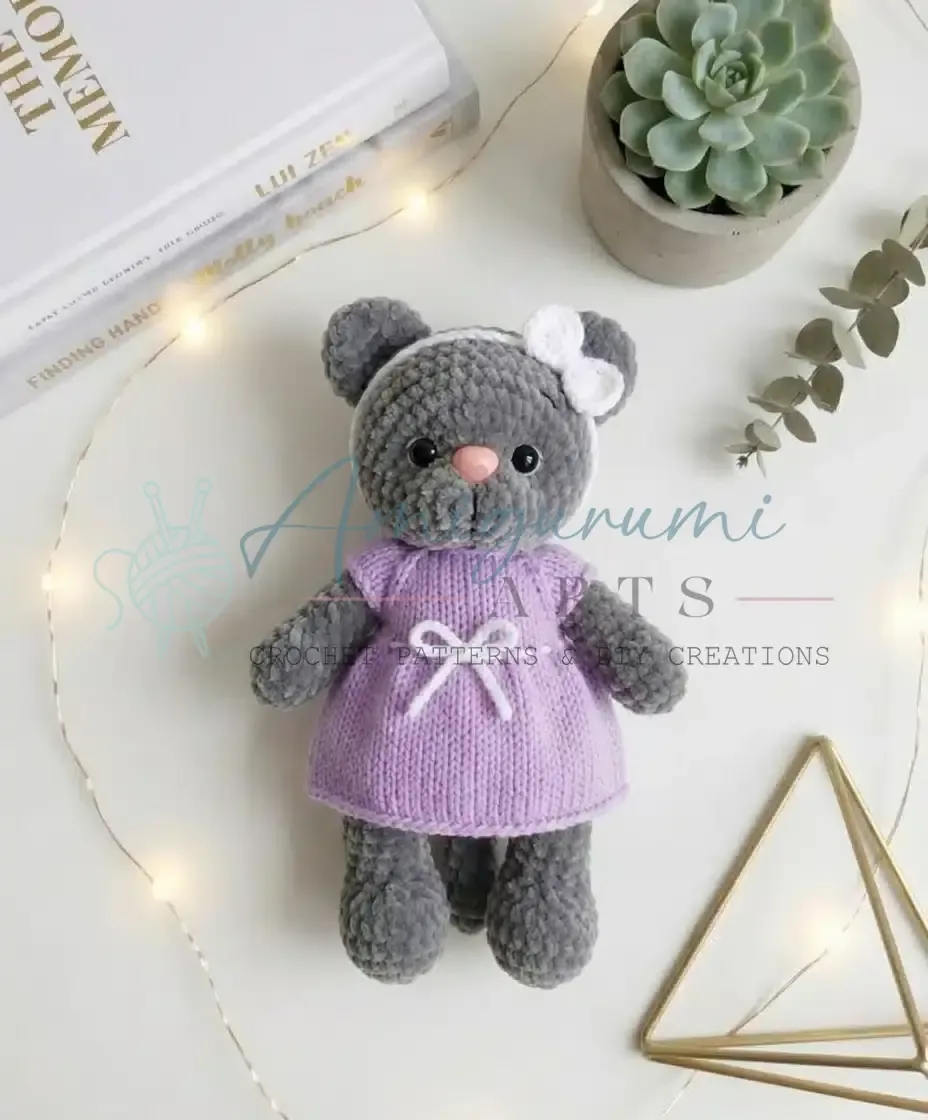
Amigurumi kitty doll with a knitted dress pattern

A 24-25cm crochet kitty with knitted dress, sized for confident beginners with about 6-8 hours to give it.

Jump to the rounds

What this one is

This is the kind of project you start when you want something on your hook that's soft in every sense — plush yarn, rounded shapes, a face that comes together stitch by stitch. It's for the person in your life who still keeps a stuffed animal on the bed, or the small person about to get their first one. There's a quiet satisfaction in making a toy that's going to be held.

Your hands spend most of their time in continuous spiral rounds, building the head, body, legs, arms, tail, and ears before moving into a knitted dress for the finishing touch. Between the fifteen rounds of the head, the leg shaping, and the face sculpting, plan on spreading this over a few sittings rather than one long stretch — six to eight hours total feels honest.

Try it another way

Once you've made the kitty as written, there's plenty of room to make it your own. Swap the plush yarn for a different plush brand in the same weight and your gauge should hold close enough, since the pattern is worked in forgiving continuous spirals rather than a strict gauge swatch. For the dress, try a contrasting worsted weight against the kitty's fur color — a bright dress against a pale plush body, or the reverse, makes the finished doll read as more of a gift piece. If you want a smaller kitty, going down a hook size on both the amigurumi and the dress will shrink the roughly 24-25 cm finished height without changing a single stitch count in the pattern. You can also play with the safety eye size within the 10-14mm range given — smaller eyes read as a kitten, larger ones give a wider-eyed, more cartoonish look. The small button on the dress is an easy swap too: a novelty button instead of a plain one turns the dress into more of a focal point. And if this is headed for a child under three, skip the safety eyes and nose altogether and embroider the face instead during the Face Sculpting step, for a toy with no small hardware at all.
The rounds, in full

Written out, round by round

Intermediate6-8 hours4 mmWorsted

Bring to the porch

Everything this one takes, in the order you will reach for it.

  • Plush yarn (Himalaya Dolphin Baby or LaVita yarn Velur) — 1 skein
  • Worsted weight yarn (Yarnart Jeans or similar) for the dress

Crochet hook

  • 4mm or 4.5mm

Knitting needles

  • 3.5mm or 4mm
  • Safety eyes: 10-14mm
  • Safety nose: 14-18mm
  • Polyfill stuffing (such as holofiber or synthetic fill)
  • Tapestry needle
  • Scissors
  • Stitch marker (highly recommended!)
  • Small button for the dress

Head

  1. Round 16 sc in mr (6)
  2. Round 2Inc in each st around (12)
  3. Round 3(1 sc, inc) x 6 (18)
  4. Round 43 sc, (1 sc, inc) x 6, 3 sc (24)
  5. Round 54 sc, inc, (2 sc, inc) x 5, 4 sc (30)
  6. Round 63 sc, (3 sc, inc) x 6, 3 sc (36)
  7. Round 75 sc, inc, (4 sc, inc) x 5, 5 sc (42)
  8. Rounds 8–12Sc in each st around (42)

Now is a good time to insert your safety eyes between Rnds 5 and 6, leaving approximately 4 stitches between them. Position your safety nose one round below the eyes, around Rnd 3 or 4. You can begin to lightly stuff the head after the eyes and nose are securely in place.

  1. Round 13(5 sc, dec) x 6 (36)
  2. Round 14Sc in each st around (36)
  3. Round 15(4 sc, dec) x 6 (30)
  4. Round 16(3 sc, dec) x 6 (24)
  5. Round 17(2 sc, dec) x 6 (18)Stuff the head firmly at this point, shaping it nicely as you go.
  6. Round 18(1 sc, dec) x 6 (12)
  7. Round 19Dec until closed. Fasten off, leaving a long tail for sewing. Weave in the end securely.

Your little head is looking adorable already!

Legs (Make 2)

  1. Round 1Ch 6. Starting in the 2nd ch from hook, sc in next 4 ch, 3 sc in last ch. Working on the opposite side of the chain: sc in next 3 ch, inc in last ch. (12)
  2. Round 2Inc in next 3 st, sc in next 3 st, inc in next 3 st, sc in next 3 st, inc in last st. (18)
  3. Round 31 sc, inc, 3 sc, inc, 3 sc, inc, 4 sc, inc, 3 sc, inc, 2 sc. (22)
  4. Rounds 4–5Sc in each st around. (22)
  5. Round 66 sc, (dec, 1 sc) x 4, 4 sc. (18)
  6. Round 75 sc, dec x 4, 5 sc. (14)
  7. Round 84 sc, dec x 3, 4 sc. (11)
  8. Rounds 9–15Sc in each st around. (11)Sc in next 2 stitches, sl st. Fasten off, leaving a long tail for sewing. Hide the yarn tail inside the leg.

These little legs are ready to be attached!

Arms (Make 2)

  1. Round 16 sc in mr (6)
  2. Round 2Inc in each st around (12)
  3. Rounds 3–4Sc in each st around (12)
  4. Round 54 sc, dec x 2, 4 sc (10)
  5. Rounds 6–12Sc in each st around (10)Sc in next 1 stitch, sl st. Fasten off, leaving a long tail for sewing. Hide the yarn tail inside the arm.

Your kitty’s arms are looking so sweet!

Body

  1. Round 16 sc in mr (6)
  2. Round 2Inc in each st around (12)
  3. Round 3(1 sc, inc) x 6 (18)
  4. Round 4(2 sc, inc) x 6 (24)
  5. Round 5(3 sc, inc) x 6 (30)
  6. Round 6(4 sc, inc) x 6 (36)

Next, we’ll attach the legs directly into the body.

  1. Round 7Sc in next 4 st, then take one leg and align it with the body. Working through both the leg and body stitches, sc in next 5 st to join the first leg. Continue with sc in next 12 st on the body, then take the second leg and align it. Working through both the leg and body stitches, sc in next 5 st to join the second leg. Finish the round with sc in next 10 st. (36)
  2. Rounds 8–9Sc in each st around (36)
  3. Round 10(4 sc, dec) x 6 (30)
  4. Round 11Sc in each st around (30)
  5. Round 12(3 sc, dec) x 6 (24)
  6. Rounds 13–14Sc in each st around (24)
  7. Round 15(2 sc, dec) x 6 (18)

Now we’ll attach the arms in a similar way.

  1. Round 16Sc in next 3 st, then take one arm and align it. Working through both the arm and body stitches, sc in next 4 st to join the first arm. Continue with sc in next 5 st on the body, then take the second arm and align it. Working through both the arm and body stitches, sc in next 4 st to join the second arm. Finish the round with sc in next 2 st. (18)
  2. Round 17Sc in each st around (18)Fasten off, leaving a long tail for sewing the head.

Your kitty’s body is taking shape beautifully!

Ears (Make 2)

  1. Round 16 sc in mr (6)
  2. Round 2Sc in each st around (6)
  3. Round 3Inc in each st around (12)
  4. Round 4(1 sc, inc) x 6 (18)
  5. Round 5Sc in each st around (18)Fold the ear flat and sc 9 stitches through both layers to close the opening. Leave a long tail for sewing.

These little ears will give your kitty so much character!

Tail

  1. Round 16 sc in mr (6)
  2. Round 2(1 sc, inc) x 3 (9)
  3. Rounds 3–4Sc in each st around (9)
  4. Round 5(1 sc, dec) x 3 (6)
  5. Rounds 6–12Sc in each st around (6)Fasten off, leaving a long tail for sewing.

A cute little tail to complete your kitty!

Dress (Knitted)

We'll use your worsted weight yarn and knitting needles for this charming little dress.

  1. Round 1Cast on 28 stitches. Knit 1 (selvedge), purl 26, knit 1 (selvedge). (28)
  2. Round 2Knit 1 (selvedge), knit 26, knit 1 (selvedge). (28)
  3. Round 3Knit 1 (selvedge), knit 3, (yo, knit 1, yo), knit 4, (yo, knit 1, yo), knit 4, (yo, knit 1, yo), knit 3, knit 1 (selvedge). (36)
  4. Round 4Knit 1 (selvedge), purl 34, knit 1 (selvedge). (36)
  5. Round 5Knit 1 (selvedge), knit 4, (yo, knit 1, yo), knit 6, (yo, knit 1, yo), knit 6, (yo, knit 1, yo), knit 4, knit 1 (selvedge). (44)
  6. Round 6Knit 1 (selvedge), purl 42, knit 1 (selvedge). (44)
  7. Round 7Knit 1 (selvedge), knit 5, (yo, knit 1, yo), knit 8, (yo, knit 1, yo), knit 12, (yo, knit 1, yo), knit 5, knit 1 (selvedge). (52)
  8. Round 8Knit 1 (selvedge), purl 50, knit 1 (selvedge). (52)
  9. Round 9Knit 1 (selvedge), knit 6, (yo, knit 1, yo), knit 10, (yo, knit 1, yo), knit 14, (yo, knit 1, yo), knit 6, knit 1 (selvedge). (60)
  10. Round 10Knit 1 (selvedge), purl 58, knit 1 (selvedge). (60)
  11. Round 11Knit 1 (selvedge), knit 7, (yo, knit 1, yo), knit 12, (yo, knit 1, yo), knit 16, (yo, knit 1, yo), knit 7, knit 1 (selvedge). (68)
  12. Round 12Knit 1 (selvedge), purl 66, knit 1 (selvedge). (68)
  13. Round 13Knit 1 (selvedge), knit 9, bind off 14 stitches (for the first sleeve), knit 20, bind off 14 stitches (for the second sleeve), knit 9, knit 1 (selvedge). (40)
  14. Round 14Knit 1 (selvedge), purl 9, pick up 1 stitch under the sleeve, purl 20, pick up 1 stitch under the sleeve, purl 9, knit 1 (selvedge). (42)
  15. Round 15Knit 1 (selvedge), knit 40 stitches while evenly distributing yarn overs to increase to 82 stitches total (e.g., knit 1, yo, knit 1, yo, etc.), knit 1 (selvedge). (82)Continue knitting in stockinette stitch (knit on right side rows, purl on wrong side rows) until the dress reaches your desired length. The original design suggests about 18 more rows for a lovely drape.Bind off all stitches on a knit row.Fold the dress in half lengthwise and sew the back seam from the wrong side, leaving the top 1/3 open for the dress opening.Sew a small button onto one side of the dress opening. Using your crochet hook and a little bit of the dress yarn, create a small chain loop on the opposite side to serve as your button closure.

Your kitty's dress is simply charming!

Face Sculpting

For a sweet, defined face, we’ll add a little sculpting.

Take a long strand of plush yarn and thread it onto your tapestry needle.

Insert your needle from the bottom of the head, bringing it out just below the inner corner of one eye. Re-insert the needle just below the outer corner of the same eye, and bring it back out through the bottom of the head. Gently pull on the yarn tails to create a subtle indentation around the eye. Tie the two yarn tails securely with two knots. Repeat this process for the second eye. You can do this a few times to achieve your desired level of sculpting.

Next, insert your needle from the bottom of the head, bringing it out directly under the center of the nose. Re-insert the needle a little further down on the muzzle and bring it back out through the bottom of the head. Pull gently to sculpt the muzzle area. Tie off the yarn tails, then hide all remaining tails inside the head and trim.

Putting it together

Step 1

Now for the magical part — bringing your adorable kitty to life by assembling all the pieces!

Step 2

Attach the Head: Using the long tail left on the body, carefully sew the head onto the top of the body. Take your time to ensure it's centered and securely attached, creating a strong neck.

Step 3

Attach the Tail: Position the tail on the back of the body, centered between Rnds 8 and 9. Sew it firmly in place.

Step 4

Attach the Ears: Place the ears on top of the head, between Rnds 14 and 15, folding them flat so they stand up nicely. They should be approximately 4-5 stitches apart. Sew them securely with the tails you left.

Step 5

Final Touches: Double-check that your safety eyes are between Rnds 5 and 6 of the head, and your safety nose is between Rnds 3 and 4. You've already completed the face sculpting, which truly enhances her sweet expression!

Step 6

Dress Her Up! Gently slip the knitted dress onto your kitty, button it up, and admire your beautiful creation.

Marlene's notes

Note 01

Plush yarn like Himalaya Dolphin Baby or LaVita Velur splits easily, so work at a slightly firmer tension than usual to keep your stitches even and your stuffing from peeking through.

Note 02

Keep your stitch marker moving every single round — with no chain or turning to orient you, it's the only thing standing between you and a lost round count on the head or body.

Note 03

Stuff as you go rather than all at once at the end, especially through the neck and leg tops, so the shaping holds once the head and limbs are attached.

Note 04

The finished kitty doll will be approximately 24-25 cm (about 9.5-10 inches) tall, but this can vary slightly depending on your hook size and personal tension.

Note 05

This pattern is written in US crochet terminology, and unless otherwise specified, all crochet components are worked in continuous spirals rather than joined rounds.

Note 06

Working with plush yarn can sometimes make it a little tricky to see your stitches. Don't be afraid to feel for them with your fingertips as you go — your hands are wonderful guides. For a truly professional finish, always use the invisible decrease method for your amigurumi projects, as it helps create a smooth, seamless fabric.

Before you sit down

  • Check that your one skein of plush yarn is enough for the head, body, legs, arms, tail, and ears combined — plush yarn is bulkier than it looks on the shelf, so weigh what you have if you're using leftovers.
  • Have a stitch marker ready before you cast on the first round — everything here is worked in continuous spirals, and losing your place in a plush yarn round is easy to do.
  • Read through the Face Sculpting section before you stuff the head, so you know what shaping you're working toward while there's still room to adjust the stuffing.
  • Set your safety eyes (10-14mm) and nose (14-18mm) aside where you can find them early — you'll want to test placement on the head before it's fully stuffed and closed.

How the hours go

Head and Face Sculpting
about 90 minutes because 15 rounds of shaping plus careful eye and nose placement take patience
Legs, Arms, and Tail
about 2 hours because six small pieces (two legs, two arms, one tail) each need their own shaping and stuffing

Looking after it

  • Hand wash the plush yarn body in cool water with a gentle detergent, press out the water in a towel rather than wringing, and lay flat to dry so the stuffing doesn't shift or clump.
  • Store the finished kitty somewhere it can keep its shape — sitting upright or propped, not squashed in a bag — and give the ears and tail a gentle fluff by hand if they've been packed away for a while.
FAQs

Asked on the glider

the ones that come up on the glider

Can I use a different plush yarn than the ones listed?

Yes, any plush yarn similar in weight to Himalaya Dolphin Baby or LaVita Velur will work fine. Just keep an eye on your one-skein amount, since plush yarns vary in how much yardage you get per skein.

Do I need to know how to knit to finish this pattern?

Yes, the dress is knitted rather than crocheted, so you'll want basic knitting skills for that section. Everything else — the head, body, legs, arms, tail, and ears — is worked entirely in crochet.

What size safety eyes and nose should I buy?

The pattern calls for 10-14mm safety eyes and a 14-18mm safety nose. Buying within those ranges gives you some room to choose a smaller or larger-eyed look depending on the expression you want.

How tall will my finished kitty be?

About 24-25 cm, or roughly 9.5 to 10 inches, though your exact hook size and tension will shift that slightly. If you want a smaller doll, sizing down your hook is the simplest way to adjust it.

Why does the pattern keep mentioning a stitch marker?

Every piece is worked in continuous spiral rounds rather than joined rounds, so there's no natural stopping point to tell you where a round begins or ends. A stitch marker is the only reliable way to keep your round count accurate, especially through 15-round sections like the head and body.

Can I skip the dress and just make the kitty?

Absolutely, the kitty doll stands complete on its own once the head, body, legs, arms, tail, and ears are assembled. The knitted dress is a lovely addition but it's a separate component you can leave for another day or skip entirely.