Beginner 4-6 hours Worsted yarn

Worked on the glider, counted out loud —

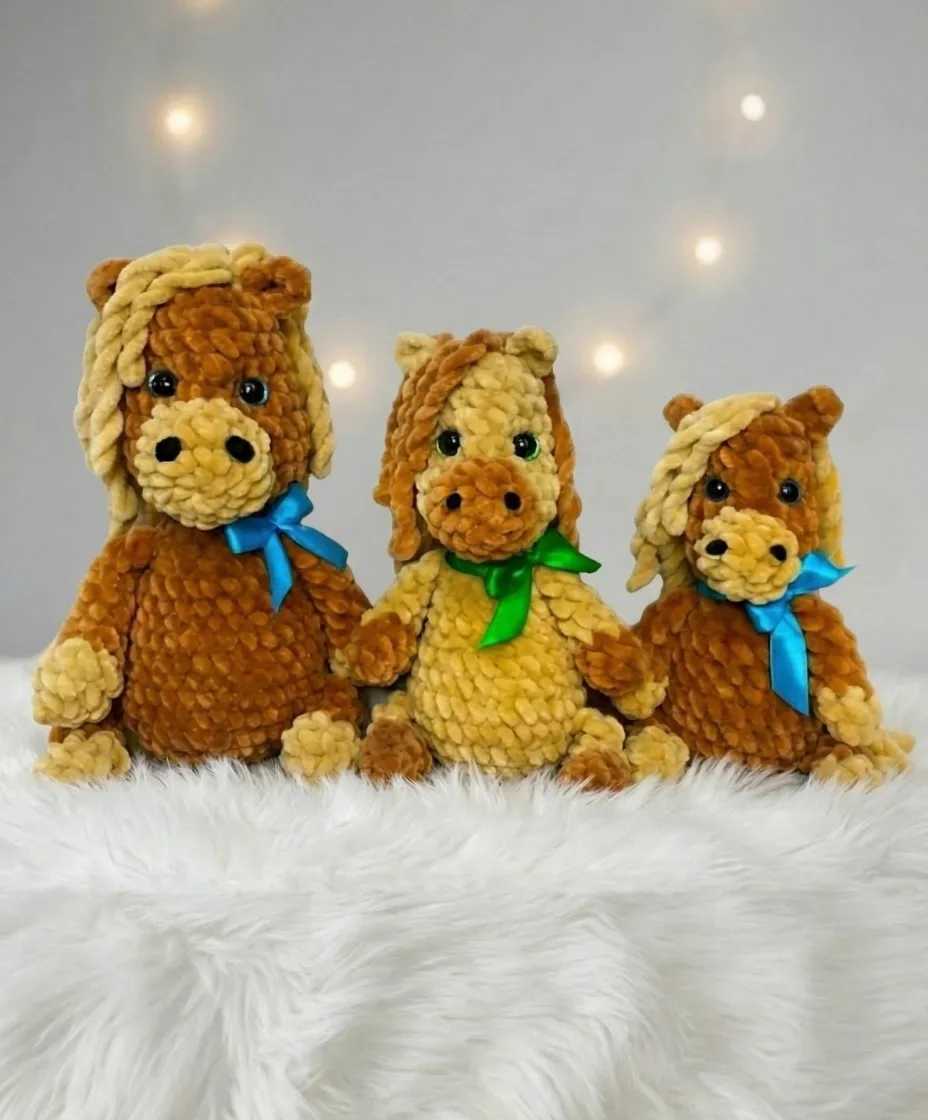
Amigurumi horse pattern in three cozy sizes

A friendly amigurumi horse pattern in three sizes, worked head to hoof over a few relaxed sittings.

Jump to the rounds

What this one is

This horse is the kind of project you reach for on a quiet evening when you'd like something finished, or nearly finished, by the time you set your hook down. It suits you if you've crocheted an amigurumi head and body before but haven't yet tried separate ears, a muzzle, and jointed legs. With three sizes on offer - 22 cm, 18 cm, and 15 cm - it also suits you if you're picturing a whole little herd, one horse in each size, rather than just one.

Your hands spend most of the time working a continuous spiral: single crochet increases growing the head from a six-stitch magic ring up through a dozen rounds, then a smaller ring for the muzzle's three or four rounds, four short rounds for each ear, and five rounds per leg. There's a fair stretch of seaming afterward too - easing the muzzle into place below the eyes, then joining the head to the body stitch by stitch. Expect a few sittings rather than one long stretch, since the head alone runs a dozen rounds before the muzzle and ears even enter the picture.

Try it another way

The pattern already hands you three sizes - 22 cm, 18 cm, and 15 cm - so the easiest swap is simply picking a different one to sit next to a horse you've already made, giving you a small herd at different heights. Beyond size, the brown-and-beige pairing is only a suggestion: since the head, muzzle, ears, and legs are each worked as separate colored pieces, you can flip which color goes where, put beige on the head and brown on the muzzle instead, or use a completely different pair of contrasting colors from your own stash. The legs are especially good for experimenting, since they're worked in two colors with the break falling right at the joint - try a third color there instead of matching your head or body, and you get a sock-like effect without changing a single round. Safety eye size can shift too: 12 mm suits the 22 cm horse, while 10 mm suits the two smaller versions, though sizing slightly up or down is mostly a matter of what looks right against your particular head. If you're making several as gifts, keeping one size consistent but varying the colors is a simple way to make each one feel individually made.

There's something satisfying about watching the ears take shape - starting flat with a chain-4 and two turned rows of single crochet, then closing into a small joined round so you get a gentle cupped curve without any extra shaping tricks. The head grows from a six-stitch magic ring through steady increases up to a dozen rounds, and by the time you reach the muzzle - just three or four tidy rounds - the horse's face is already recognizable before the safety eyes go in. The legs, worked in beige and brown so the color break falls right at the joint, give you a small, contained color-change practice without the fuss of stripes. It's a project built from short, clearly finished sections, so you feel real progress every time you sit down with it.
The rounds, in full

Written out, round by round

Beginner4-6 hours2.5 mmWorsted

Bring to the porch

Everything this one takes, in the order you will reach for it.

Yarn

  • Worsted weight, approximately 100g / 120 meters per skein — 2 skeins in contrasting colors (e.g., brown and beige). A smooth, plush yarn works beautifully here.

Hook

  • C-2 (2.5 mm)

Safety eyes

  • 12 mm (for the 22 cm horse) or 10 mm (for smaller versions) — 2 per horse

Stuffing

  • Fiberfill / polyfill

Black felt

  • For nostrils and facial details

Craft glue

  • For attaching felt pieces
  • Stitch markers
  • Tapestry needle / yarn needle
  • Scissors

Head — 22 cm Horse (Brown Yarn)

Step by step: Start with brown yarn.

Step by step: Start with beige yarn.

Step by step: Start with beige yarn.

  1. Round 1MR, 6 sc. (6)
  2. Round 2Inc in each st around. (12)Step by step: Switch to brown yarn. Cut beige yarn and weave in end.Sc in each st around. (9) — work 3 rounds Stuff with fiberfill. Cut yarn and weave in end.Step by step: Fold flat and join with 2 sc . Cut yarn, leaving a short tail.Step by step: Switch to brown yarn. Cut beige yarn and weave in end; 3 sc, dec. (5).Sc in each st around. (5) — work 3 rounds Stuff the hoof only. Fold flat and join with 3 sc . Cut yarn, leaving a short tail.Step by step: Switch to beige yarn. Cut brown yarn and weave in end; (2 sc, dec) × 2. (6) — work 2 rounds for lower legs; (2 sc, inc) × 2. — work 2 rounds (lower legs only) Stuff the hoof with fiberfill; Fold flat and join both sides with 3 sc . Cut yarn, leaving a short tail.

Note: the count after Rnd 3 should read 9 sts based on the increase pattern applied to 6 sts — work carefully.

Sc in each st around. — work 2 rounds Cut yarn, leaving a long tail for sewing. Set aside.

  1. Round 3(1 sc, inc) × 6. (18)Step by step: (2 sc, inc) × 3. (8).
  2. Rounds 4–5Sc in each st around. (18) — work 2 rounds3 sc (joining with 3 sc of lower leg), 12 sc (joining with 3 sc of second lower leg), 12 sc. (30)Step by step: Sc in each st around. (30).Sc in each st around. (24) — work 2 rounds Place safety eyes between Rnds 5 and 6, with 5 sts between them. Secure firmly.Step by step: (3 sc, inc) × 6. (18); (2 sc, dec) × 6. (12); Sc in each st around. (12).
  3. Round 6(3 sc, inc) × 6. (24)3 sc (joining with 3 sc of lower leg), 4 sc (joining with 3 sc of second lower leg), 10 sc. (24)
  4. Round 7Sc in each st around. (24)
  5. Round 83 sc, (1 sc, inc) × 6. (30)
  6. Rounds 9–10(4 sc, inc) × 6. (24) — work 2 rounds Place safety eyes between Rnds 5 and 6, with 5 sts between them. Secure firmly.
  7. Round 11(3 sc, dec) × 6. (24)
  8. Round 12(2 sc, dec) × 6. (18)Stuff the head firmly with fiberfill.
  9. Round 13(1 sc, dec) × 6. (12)
  10. Round 14Dec 6 times. (6)Step by step: Cut yarn and close the remaining opening with a tapestry needle.Cut yarn and close the opening with a tapestry needle by weaving through the remaining 6 stitches and pulling tight.

Muzzle — 15 cm Horse (Brown Yarn)

  1. Round 1MR, 6 sc. (6)
  2. Round 2(1 sc, inc) × 3. (9)
  3. Rounds 3–4Sc in each st around. — work 2 rounds Cut yarn, leaving a long tail for sewing.

Ears — 22 cm Horse (Beige Yarn) — Make 2

  1. Round 1Ch 4. Starting in the 2nd ch from hook, work 2 sc. (2)
  2. Round 2Ch 1, turn. Inc in each st. (4) — working 2 inc = 4 sts

Note: original source indicates 6 sts after ch-1 turn and 2 inc from 2 sts — adjust tension as needed to match your ear shape.

  1. Round 3Ch 1, work 6 sc across. (6)
  2. Round 4Continue working in the round along the edge: 1 sc in last worked st, 1 sc, 2 sc in next st, 2 sc, sl st to join.Cut yarn, leaving a tail for sewing.

Ears — 18 cm Horse (Brown Yarn) — Make 2

  1. Round 1Ch 3. Starting from the 2nd ch from hook: sl st, sc, sc, hdc, 1 dc. Cut yarn, leaving a tail for sewing.

Ears — 15 cm Horse (Brown Yarn) — Make 2

  1. Round 1Ch 4. Starting from the 2nd ch from hook: sl st, sc, sc, 1 dc. Cut yarn, leaving a tail for sewing.

Legs (Upper & Lower) — 22 cm Horse (Beige + Brown Yarn) — Make 4

Start with beige yarn.

  1. Round 1MR, 6 sc. (6)
  2. Round 2Inc in each st around. (12)
  3. Round 3(2 sc, inc) × 3. (9) — work to st 9, then: At stitch 9: switch to brown yarn. Cut beige yarn and weave in end.
  4. Round 43 sc, dec, 2 sc, dec, 2 sc. (7)
  5. Rounds 5–10Work the leg rounds as follows — upper legs: 7 sc for 6 rounds; lower legs: 14 sc joining with 4 sc of adjacent lower leg section, then 14 sc. (36 joined)Stuff the hooves only with fiberfill. Do not stuff the upper leg.Fold the leg flat and sc through both layers — 4 sc for upper legs, 3 sc for lower legs — to close. Cut yarn, leaving a short tail.

Body — 22 cm Horse (Brown Yarn)

  1. Round 1MR, 6 sc. (6)
  2. Round 2Inc in each st around. (12)
  3. Round 3(1 sc, inc) × 6. (18)
  4. Round 4(2 sc, inc) × 6. (24)
  5. Round 5(3 sc, inc) × 6. (30)
  6. Round 6(4 sc, inc) × 6. (36)
  7. Round 76 sc (joining with 3 sc of upper front leg), 14 sc, 4 sc (joining with 4 sc of second upper front leg), 14 sc. (36)
  8. Round 8Sc 18 around. (18)
  9. Round 9(4 sc, dec) × 6. (30)
  10. Rounds 10–11Sc in each st around. (30) — work 2 rounds
  11. Rounds 12–13(3 sc, dec) × 6. (24) — work 2 rounds
  12. Rounds 14–15(2 sc, dec) × 6. (18) — work 2 rounds
  13. Round 16(2 sc, inc) × 6. (18)
  14. Round 174 sc, 4 sc (joining with 4 sc of upper back leg), 5 sc, 4 sc (joining with 4 sc of second upper back leg), 3 sc. (18)
  15. Round 18(1 sc, dec) × 6. (12)Step by step: Sc 3 around. (3).3 sc (joining with 3 sc of upper leg), 4 sc (joining with 3 sc of second upper leg), dec. (11)Step by step: Stuff firmly with fiberfill. Cut yarn and weave in end.1 sc, 3 sc (joining with 3 sc of upper leg), 4 sc (joining with 3 sc of second upper leg), 1 sc. (12)Step by step: Sc in each st around. (12); Stuff firmly with fiberfill. Cut yarn and weave in end.Stuff firmly with fiberfill. Cut yarn and weave in end.

Head — 15 cm Horse

Follow the 18 cm head instructions, placing safety eyes between Rnds 4 and 5.

Putting it together

Step 1

Attach the muzzle: Sew the muzzle to the row just below the safety eyes using the yarn tail. As you sew, lightly stuff the muzzle with a small amount of fiberfill for a rounded shape. Bury the yarn ends inside the head.

Step 2

Attach the head to the body: Sew the head to the top of the body stitch-by-stitch, aligning the pieces carefully for a straight, centered join.

Step 3

Attach the ears: Sew one ear to each side of the head, starting from the first complete round at the top. Bury all yarn tails inside the head.

Step 4

Create the mane and tail: Insert your hook near one ear and pull through a long loop of mane-colored yarn. Use the working yarn from the skein to create small spirals (curls), then use the pulled-through tail end to catch and secure each spiral using your hook — wrap the securing strand around each curl to lock it in place. Repeat along the neck for the mane, and at the rump for the tail.

Step 5

Attach felt details: Cut small oval or teardrop shapes from black felt for the nostrils. Apply craft glue to the back of each piece and press firmly onto the muzzle. Allow to dry completely before handling.

Marlene's notes

Note 01

Every round is worked in a continuous spiral, so a stitch marker moved up each round is the only reliable way to know where you are, especially once you're past round 10 or so on the head.

Note 02

Stuff the muzzle only lightly as you sew it on, and stuff the head and body firmly enough that the surface stays smooth once the safety eyes - 12 mm for the 22 cm horse, 10 mm for the smaller two - are snapped into place.

Before you sit down

  • Check that both skeins are wound and within reach, since the head, muzzle, ears, and legs each move between brown and beige rather than staying in one color.
  • Place a stitch marker before your very first stitch and plan to move it every round, since everything here is worked in a continuous spiral with no join.
  • Work a small test swatch in single crochet first to check your tension gives you a firm, gap-free fabric before you commit yarn to the head.
  • Read through the increase pattern for round 2 of whichever head size you're starting, since the stitch counts differ depending on which of the three sizes you choose.

How the hours go

Head (22 cm version)
about 45-60 minutes because it runs 12 rounds with several increase rounds to track carefully
Body, legs, and assembly
about 60-90 minutes because the body runs 15 rounds, there are four legs to make, and the stitch-by-stitch sewing takes patience

Looking after it

  • Since this is worked in a smooth, plush worsted weight yarn, spot clean with a damp cloth first and only hand wash in cool water if you really need to, then press out excess water in a towel rather than wringing, since the fiberfill inside holds water.
  • Lay the horse flat to dry away from direct heat, reshaping the ears and muzzle gently with your fingers while still damp, and store it somewhere dry and out of direct sun so the brown and beige stay true.
FAQs

Asked on the glider

the ones that come up on the glider

Can I make just one size instead of all three?

Yes, each size - 22 cm, 18 cm, or 15 cm - is written as its own complete set of head, muzzle, and ear instructions, so you only need to follow the rounds for the size you want.

Do I need both a 12 mm and a 10 mm safety eye?

Not for a single horse - the 12 mm pair is for the 22 cm version and the 10 mm pair is for the two smaller sizes, so you only need one matching set per horse you make.

How do I keep track of where I am in a continuous spiral?

Place a stitch marker in the first stitch of round 1 and move it up into the first stitch of every new round as you go, since there's no join or turning chain to mark your place for you.

How much yarn do I actually need?

The materials list calls for two skeins at about 100 g / 120 m each in contrasting colors, which is enough for one horse in any of the three sizes with some allowance for the color-blocked legs.

Is this a good pattern if I've never made amigurumi before?

You'll want to be comfortable with magic rings and single crochet increases before you start, but the pieces are small and clearly separated, so it works well as an early project once you know those two basics.