Intermediate 4-6 hours Worsted yarn

Worked on the glider, counted out loud —

Amigurumi Flamingo Pattern with Wire Legs and Neck

A wire-framed crochet flamingo for confident amigurumi makers, worked in one long piece over a few cozy sittings.

Jump to the rounds

What this one is

You know that stretch of evening when the house has gone quiet and you want something in your hands that isn't quite work? This flamingo is built for that. It's a good project for anyone who's made a round or two of amigurumi before and wants to try something with a bit more personality — a long curved neck, a proper standing frame, a face that actually looks back at you.

Your hands spend most of the time in single crochet, working the body, neck, and head as one continuous piece before turning to a pair of wings and the wire legs underneath. Between the shaping rounds and the wire work for the frame and legs, plan on spreading this across a few sittings rather than knocking it out in one go.

Try it another way

The easiest change is color: swap the pink for a deeper rose or a pale blush and you get a completely different mood without touching a single round. If you want a smaller flamingo for a shelf or a bag charm, try the same pattern in a lighter-weight yarn with a smaller hook — the round-by-round shape (6, 12, 18, 24 and on) will hold, just at a smaller scale, though you'll need less filler and shorter wire lengths to match. Going bigger works the other way: a heavier yarn and larger hook will puff the body out further, so give the wire a bit more length to keep the proportions of the neck and legs looking right. The beak is a natural spot to play, too — try swapping the brown-and-beige combination for orange and black, or a single solid color, if you want a different look for the face. Since the wings are made separately as a pair, you could also experiment with a contrast color there, or add a few extra stitches around the edge for a slightly ruffled feel. And because the legs and frame are wire, you have real freedom in how you pose the finished bird — standing tall, head tucked down, or neck curved to one side — so consider that when you decide how long to cut and shape your wire before you start.

There's something genuinely satisfying about a pattern that builds body, neck, and head as one unbroken piece — no seaming a head onto a body, no guessing at the join. The shaping does the work for you: you can feel the curve of that flamingo neck taking form round by round just from the increase pattern, which is a nice bit of magic the first time you notice it happening under your fingers. Add in the wire armature for the legs and frame, and you're not just making a soft toy that sits wherever it falls — you're making one that can actually stand, curl its neck, or perch the way a real flamingo does. Finishing with a two-tone beak in brown and beige, plus bead eyes, is where the piece really comes alive and stops looking like a shape and starts looking like a bird.
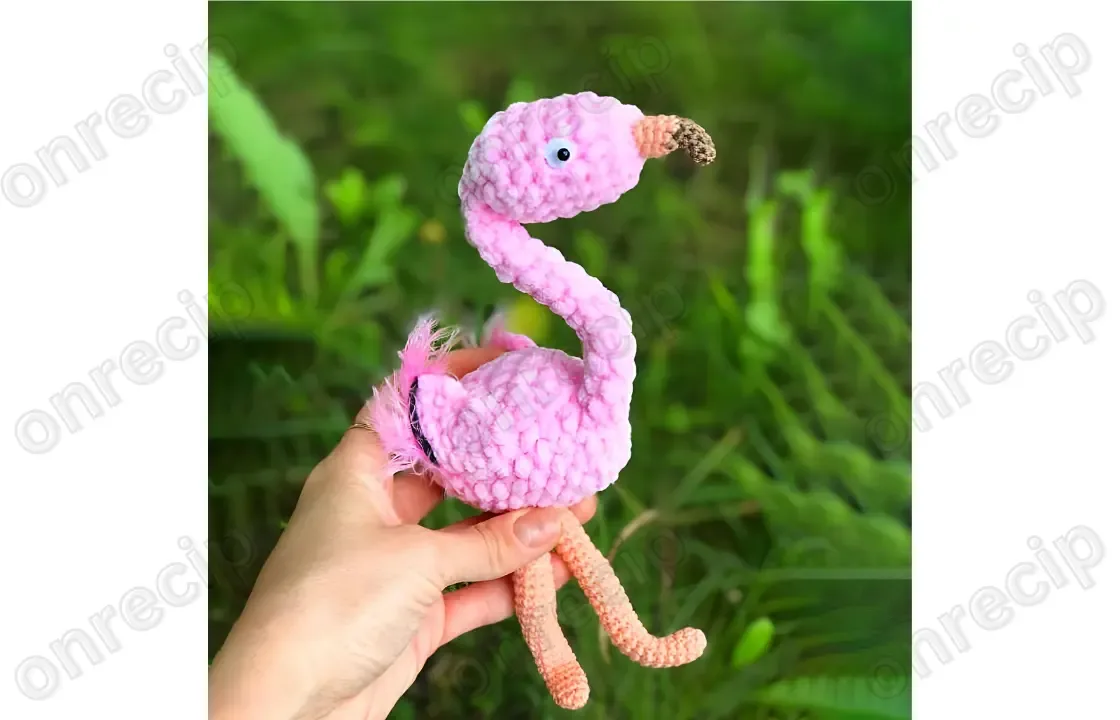
The rounds, in full

Written out, round by round

Intermediate4-6 hoursWorsted

Bring to the porch

Everything this one takes, in the order you will reach for it.

  • Yarn pink Yarn pink Dloce, new yarn or jeans
  • brown and beige for the beak, beige for the legs
  • Wire for frame and legs
  • Filler
  • Yarn for stitching parts
  • Bead eyes

Body

We knit the body, neck and head together .

  1. Round 16 sc in MR
  2. Round 26 inc (12)
  3. Round 3(1 sc,inc)*6 (18)
  4. Round 4(2 sc,inc)*6 (24)
  5. Rounds 5–924 sc
  6. Round 10(2 sc,dec)*6 (18)

We put the wire

  1. Round 11(1 sc,dec)*6 (12)
  2. Round 126 dec
  3. Rounds 13–276 sc
  4. Round 286inc (12)
  5. Round 29(1 sc,inc)*6 (18)
  6. Rounds 30–3518 sc
  7. Round 36(1 sc,dec )*6(12)
  8. Round 376 dec

Wings (Make 2)

Ready to Learn More? Open the next page for Further Guidance!

Pages: 1 2

Marlene's notes

Note 01

Because the body, neck, and head are worked as one continuous piece, keep a stitch marker on your working round at all times — it's easy to lose track over 14 rounds with no natural break.

Note 02

Work your stitches on the snug side so the wire frame stays fully hidden once the piece is stuffed; loose tension will let it show through, especially along the neck.

Note 03

Stuff as you close in the head and firm up the neck rather than waiting until the very end, since the wire needs filler packed around it to hold its shape once you start posing the bird.

Note 04

Attach the bead eyes and stitch on the brown-and-beige beak only after the head is fully stuffed and closed, so you can judge placement against the finished shape rather than guessing early.

Before you sit down

  • Check you have enough pink yarn on hand for the full 14-round body before you start, since it's worked continuously through the neck and head with no obvious stopping point.
  • Set aside your brown and beige scraps for the beak and your beige for the legs so you're not hunting for small amounts mid-project.
  • Cut and shape your wire for the frame and legs ahead of time, or at least have it within reach, since it needs to go in as you build rather than after.
  • Read through the first few body rounds before you cast on so the increase pattern (the jump from 6 to 12 to 18 to 24 stitches) makes sense as you go.

How the hours go

Body, neck, and head
about 2 to 3 hours because it's 14 rounds worked continuously with shaping through the neck and head that you'll want to do without rushing
Wings (make 2)
about 45 minutes to an hour total because you're repeating a small piece twice and it goes quickly once you've made the first
Wire legs, frame, and finishing
about 1 to 2 hours because shaping and inserting the wire, stuffing around it, and attaching the beak and bead eyes all take a careful hand

Looking after it

  • Spot clean with a damp cloth and mild soap rather than submerging the piece, since the wire frame inside the legs and neck won't take well to soaking.
  • Reshape the neck and legs by gently bending the wire back into place if it shifts, and store the flamingo upright or lying flat away from damp to keep its pose and stuffing firm over time.
FAQs

Asked on the glider

the ones that come up on the glider

Do I need to know how to work with wire to make this flamingo?

Some comfort with wire helps since it forms the frame and legs, but the wire work itself is mostly bending and shaping rather than anything technical. If you've never used wire in amigurumi before, this is a gentle way to start.

Can I make the body without the wire frame?

You can, but the flamingo won't stand or hold a neck pose without it, so you'd end up with a softer, floppier bird. If that's the look you want, it's a reasonable trade to skip the wire and simply stuff the piece a little firmer.

How much yarn do I actually need?

The pattern doesn't give exact yardage, so weigh or estimate based on your gauge for a 14-round continuous body plus two wings. It's worth having a bit more pink on hand than you think you need, since running out mid-neck is inconvenient.

What's the trickiest part of this pattern?

Most crocheters find the neck shaping and getting the wire seated correctly inside it the fiddliest step. Take it slowly there and stuff firmly around the wire as you go rather than after the fact.

Can I use a different eye option instead of bead eyes?

Yes, safety eyes or embroidered eyes would both work in place of bead eyes if that's what you have on hand. Just place them after the head is fully stuffed so you can judge the spacing against the finished shape.

Is this a good project if I've only made simple amigurumi before?

It's a reasonable next step up — the increases follow a familiar pattern, but the continuous body-neck-head construction and the wire frame add a bit more complexity than a basic round animal. Give yourself a few sittings rather than expecting to finish it in one evening.