Intermediate 4-6 hours Worsted yarn

Worked on the glider, counted out loud —

Amigurumi bunny with two-tone ears and soft tail

A medium-skill bunny pattern for a quiet weekend, about 23 cm tall, roughly 4-6 hours from ring to sewn-on tail.

Jump to the rounds

What this one is

This is the bunny you make when someone in your life needs a small, solid thing to hold onto — a new baby, a kid starting school, a friend having a rough month. Pink through the body, cream at the ears and feet, with two dark eyes that catch the light: it reads as gentle before anyone even picks it up. You're making a keeper, not a quick gift-wrap filler.

Your hands spend most of the time on the increase-and-decrease shaping that builds the round head and body, then shift to sewing when the six pieces come together at the end. Between the head's 14 rounds, the body's 17, and the smaller limbs and ears, expect to work in sessions rather than one sitting — the whole bunny runs about 4 to 6 hours, sewing included.

Try it another way

Once you've made this bunny as written, there's plenty of room to play. Swap the pink Himalaya Dolphin Baby for a soft gray or lavender and keep the cream ears, muzzle, and feet as your contrast — the two-tone construction is built for exactly that kind of swap. If you want a smaller version, working the same rounds in a lighter worsted-weight yarn with a smaller hook will shrink the finished 23 cm (29 cm with ears) down without changing a single stitch count. The chest and tail, both worked in YarnArt Mink for that fuzzy texture, could instead be done in a smooth cotton for a cleaner, more graphic look against the pink body. You could also skip the tightened muzzle detail on a first attempt and simply sew the nose flat, saving the strong-thread tightening technique for a second bunny once you're comfortable with the shaping. And if eyelashes aren't your style, they're already marked optional in the materials, so leaving them off changes nothing about the construction. For a keepsake version, consider embroidering a name or date somewhere hidden on the body before you sew it closed.

There's real satisfaction in the head shaping here — that first round worked from a 5-chain oval, then rounds worked flat in sl st before you swap from cream to pink, is a nice bit of problem-solving for the hands. The double-layer ears (inner and outer pieces crocheted separately, then joined with sc around) give you a clean, finished edge with no visible seam trick needed. And placing the eyes precisely — counting three stitches from each of the four increase points in round 6 — turns a stuffed blob into a face with real expression. By the time you're sewing the chest and tail onto the body, you can feel the whole thing becoming a specific little creature rather than a generic toy.
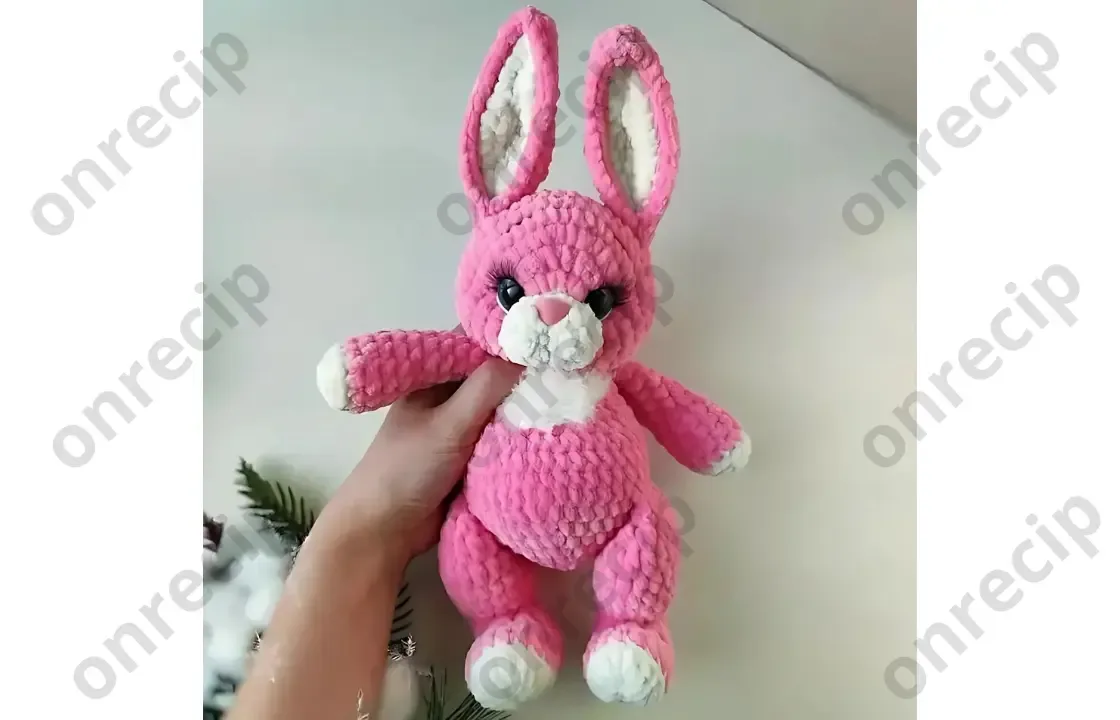
The rounds, in full

Written out, round by round

Intermediate4-6 hours4 mmWorsted

Bring to the porch

Everything this one takes, in the order you will reach for it.

  • Himalaya Dolphin Baby yarn: 309-pink (1 skein), 308-cream (for ears, muzzle, and feet)
  • YarnArt Mink yarn: 330-white (for chest and tail)
  • YarnArt Jeans yarn: pink (for tightening the muzzle), white and black (for embroidering the eyes)
  • 4 mm crochet hook
  • 16 mm toy eyes
  • 15×13 mm toy nose
  • Stuffing for toys
  • Needle for sewing parts
  • Scissors

Head

Worked in cream yarn through Round 4; change to pink yarn for Round 5 onward.

Insert eyes between rows 5 and 6. Find the 4 inc stitches made in row 6, count 3 stitches from each side and insert the eyes there. Insert the nose between rows 2 and 3.

Stuff the piece.

Cut the yarn, close the opening, and hide the yarn end.

With thin pink yarn, make the eye indentations: insert the needle at the bottom of the head, bring it out under the eye, insert it again at the outer top corner of the eye, and pull it back to the starting point; tighten and repeat for the other eye.

With thin pink yarn, make the muzzle indentation: insert the needle at the bottom of the cream muzzle, bring it out under the nose, and pull it back to the starting point; tighten, cut, and hide the yarn end.

With thin white yarn, embroider the whites around the eyes; with black yarn, embroider arrows and eyebrows, and glue the eyelashes.

  1. Round 1Chain of 5 ch, from the second chain from hook: 1 inc, 2 sc, 3 sc in last stitch, 3 sc along the other side of the chain. (10)
  2. Round 22 inc, 2 sc, 3 inc, 2 sc, 1 inc. (16)
  3. Round 316 sc. (16)
  4. Round 416 sl st. (16)
  5. Round 512 inc, 4 sc. (28)
  6. Round 61 sc, 3 inc, 6 sc, 4 inc, 5 sc, 3 inc, 6 sc. (38)
  7. Round 74 sc, 1 inc, 10 sc, (1 inc, 2 sc) x 2, 8 sc, 1 inc, 8 sc. (42)
  8. Rounds 8–1242 sc. (42)
  9. Round 138 sc, 3 dec, 11 sc, 3 dec, 11 sc. (36)
  10. Round 146 sc, (1 dec, 1 sc) x 3, 5 sc, (1 dec, 1 sc) x 3, 7 sc. (30)
  11. Round 15(3 sc, 1 dec) x 6. (24)
  12. Round 16(2 sc, 1 dec) x 6. (18)
  13. Round 17(1 sc, 1 dec) x 6. (12)
  14. Round 186 dec.

Ears (inner)

Make 2

Made with cream yarn.

Crochet in turning rows, with 1 ch at the end of each row.

  1. Round 1Chain of 2 ch, from the second chain: 1 sc. (1)
  2. Round 21 inc. (2)
  3. Round 32 sc. (2)
  4. Round 42 inc. (4)
  5. Rounds 5–64 sc. (4)
  6. Round 72 dec. (2)
  7. Rounds 8–92 sc. (2)
  8. Round 101 dec. (1)
  9. Round 111 sc. (1)
  10. Round 12Without turning the work, crochet around the entire piece with single crochet; cut and hide the yarn.

Ears (outer)

Make 2

Made with pink yarn.

Crochet in turning rows, with 1 ch at the end of each row.

  1. Round 1Chain of 3 ch, from the second chain: 2 sc. (2)
  2. Round 22 inc. (4)
  3. Round 34 sc. (4)
  4. Round 41 inc, 2 sc, 1 inc. (6)
  5. Rounds 5–66 sc. (6)
  6. Round 71 dec, 2 sc, 1 dec. (4)
  7. Rounds 8–94 sc. (4)
  8. Round 102 dec. (2)
  9. Rounds 11–122 sc. (2)
  10. Round 131 dec. (1)
  11. Round 14Without turning the work, crochet around the entire piece with single crochet; cut and hide the yarn.

Legs

Make 2

Round 1 worked in cream yarn; change to pink yarn from Round 2 onward.

  1. Round 1Chain of 15 ch, from the second chain: 4 sc, 4 hdc, 4 dc, 2 dc in the second to last stitch, 2 dc in the last stitch, 2 dc in the first ch, 2 dc in the second ch, 4 dc, 4 hdc, 4 sc. (32)
  2. Round 2In the back loops only, 32 sc. (32)
  3. Round 31 inc, 1 sc, 3 dec, 8 dc decreases (make a dc, then a decrease), 3 dec, 1 sc, 1 inc. (20)
  4. Round 42 inc, 2 dec, 4 dc decreases, 2 dec, 2 sc. (14)
  5. Round 52 inc, 2 sc, 1 dec, 3 dc decreases, 2 sc. (12)
  6. Round 62 sc, 2 inc, 3 sc, 3 inc, 2 sc. (17)
  7. Round 79 sc, (1 inc, 1 sc) x 4. (21)
  8. Round 8(2 sc, 1 inc) x 2, 15 sc. (23)
  9. Round 923 sc. (23)
  10. Rounds 10–1113 sc, 9 hdc, 1 sc. (23)
  11. Round 123 sc, 3 dec, 6 sc, 4 dc decreases. (16)
  12. Round 132 sc, 3 dec, 4 sc, 2 dec. (11)
  13. Round 14Crochet 5 more sc, fold the piece in half and crochet 6 sc through both sides; cut the yarn.

Arms

Make 2

Rounds 1-2 worked in cream yarn; change to pink yarn from Round 3 onward.

  1. Round 16 sc in KA.
  2. Round 26 inc. (12)
  3. Round 3In the back loops only, 12 sc. (12)
  4. Rounds 4–612 sc. (12)
  5. Round 7(2 sc, 1 dec) x 3. (9)
  6. Rounds 8–129 sc. (9)
  7. Round 13Crochet 2 more sc, fold the piece in half and crochet 5 sc through both sides; cut the yarn.

Body

Made with pink yarn.

  1. Round 16 sc in KA.
  2. Round 26 inc. (12)
  3. Round 3(1 sc, 1 inc) x 6. (18)
  4. Round 4(2 sc, 1 inc) x 6. (24)
  5. Round 5(3 sc, 1 inc) x 6. (30)
  6. Round 6(4 sc, 1 inc) x 6. (36)
  7. Round 7(5 sc, 1 inc) x 6. (42)
  8. Round 87 sc, attach one leg with 6 sc, 15 sc, attach the other leg with 6 sc, 8 sc. (42)
  9. Round 942 sc. (42)
  10. Round 1035 sc, 1 dec, 2 sc, 1 dec, 1 sc. (40)
  11. Round 111 sc, 1 dec, 2 sc, 1 dec, 6 sc, (1 dec, 2 sc) x 4, 11 sc. (34)
  12. Round 1234 sc. (34)
  13. Round 1311 sc, (1 dec, 1 sc) x 4, 11 sc. (30)
  14. Round 1430 sc. (30)
  15. Round 15(3 sc, 1 dec) x 6. (24)
  16. Round 1624 sc. (24)
  17. Round 174 sc, attach one arm with 5 sc, 7 sc, attach the other arm with 5 sc, 3 sc. (24)

Chest

Made with YarnArt Mink yarn, worked in turning rows.

  1. Round 1Chain of 4 ch, from the second chain: 3 sc. (3)
  2. Round 21 inc, 1 sc, 1 inc. (5)
  3. Round 35 sc. (5)
  4. Round 41 inc, 3 sc, 1 inc. (7)
  5. Round 57 sc. (7)
  6. Round 61 inc, 5 sc, 1 inc. (9)
  7. Rounds 7–89 sc. (9)
  8. Round 91 inc, 7 sc, 1 inc. (11)
  9. Round 10Without turning the work, crochet around the entire piece with single crochet; cut and hide the yarn.

Tail

Made with YarnArt Mink yarn, worked in turning rows.

  1. Round 1Chain of 3 ch, from the second chain: 2 sc. (2)
  2. Round 21 inc, 1 sc, 1 inc. (4)
  3. Round 34 sc. (4)
  4. Round 41 inc, 2 sc, 1 inc. (6)
  5. Rounds 5–66 sc. (6)
  6. Round 71 dec, 2 sc, 1 dec. (4)
  7. Round 8Without turning the work, crochet around the entire piece with single crochet; cut and hide the yarn.

Putting it together

Step 1

Take one cream ear piece and place its wrong side against the right side of the matching pink ear piece; crochet them together with single crochet around.

Step 2

Sew the ears to the head at rows 11-12.

Step 3

Cut the yarn, leaving a long tail, and sew the head to the body.

Step 4

Sew the chest to the body.

Step 5

Sew the tail to the body.

Marlene's notes

Note 01

Work with a 4 mm hook throughout and keep your tension snug rather than loose, since amigurumi pieces need a tight enough fabric that stuffing doesn't peek through the stitches.

Note 02

The inner and outer ears are both crocheted in turning rows with a chain at the end of each row rather than in continuous rounds, so don't join them into a circle by mistake.

Note 03

Stuff the head and body firmly but in small handfuls as you go, checking the shape holds round rather than lumpy before you close each piece.

Note 04

Difficulty level: Medium

Note 05

Finished toy size — about 23 cm (29 cm with ears).

Note 06

Any plush yarn is suitable for the body (Himalaya Dolphin Baby, YarnArt Dolce, and others); the main color yarn usage is about 1 skein, and you can choose your own colors for the bunny.

Before you sit down

  • Read through the Head's round 5 and round 6 shaping ahead of time, since that's where the eye placement math happens and it's easier to follow before your hands are full of stitches.
  • Place a stitch marker at the start of round 1 on the head and body, since both are worked in continuous rounds and it's easy to lose your place once increases start stacking up.
  • Set aside your 16 mm eyes and 15×13 mm nose where you can reach them mid-project, since they go in between rounds 2-3 and 5-6 of the head, not after stuffing.

How the hours go

Head
about 90 minutes, because 14 rounds with a color change and precise eye placement between rounds 2-6 slow you down
Body and limbs
about 2 hours, because the body's 17 rounds plus two legs and two arms add up even though the shaping itself is straightforward
Ears, tail, and assembly
about 90 minutes, because joining inner and outer ear pieces with sc and sewing six parts together takes patience, not just stitch count

Looking after it

  • Hand wash gently in cool water if needed — the Himalaya Dolphin Baby and YarnArt Mink yarns are soft acrylic-type fibers that don't love hot water or wringing, so press excess water out in a towel instead.
  • Lay the bunny flat to air dry away from direct heat, and reshape the ears and head by hand while damp so they dry sitting the way you want them stored or displayed.
FAQs

Asked on the glider

the ones that come up on the glider

How do I know exactly where to place the eyes?

Insert them between rounds 5 and 6, using the four increase stitches made in round 6 as your landmarks — count three stitches from each side of an increase and that's your spot. Doing both eyes the same way keeps them level.

Can I make the inner and outer ears in one piece instead of two?

The pattern joins two separately crocheted pieces (cream inner, pink outer) with sc around the edge, which is what gives the ear its clean two-tone finish and slight structure. Working them as one piece would lose that contrast and the firmer edge.

Why are the ears worked in turning rows instead of continuous rounds?

Both ear pieces are flat, so they're crocheted back and forth with a chain at the end of each row rather than joined into a tube. This gives you a flat panel shaped for sewing together, not a 3D piece.

What's the strong thread for if I already have sewing thread?

It's specifically for tightening the muzzle and for embroidering the eyebrows, both of which need more pull-strength than standard sewing thread offers. Regular thread is more likely to snap or stretch under that tension.

How long will the whole bunny actually take me?

Plan on roughly 4 to 6 hours total across the head, body, limbs, ears, tail, and final assembly. Working it over two or three sessions rather than one long sitting makes the stuffing and sewing steps feel less rushed.