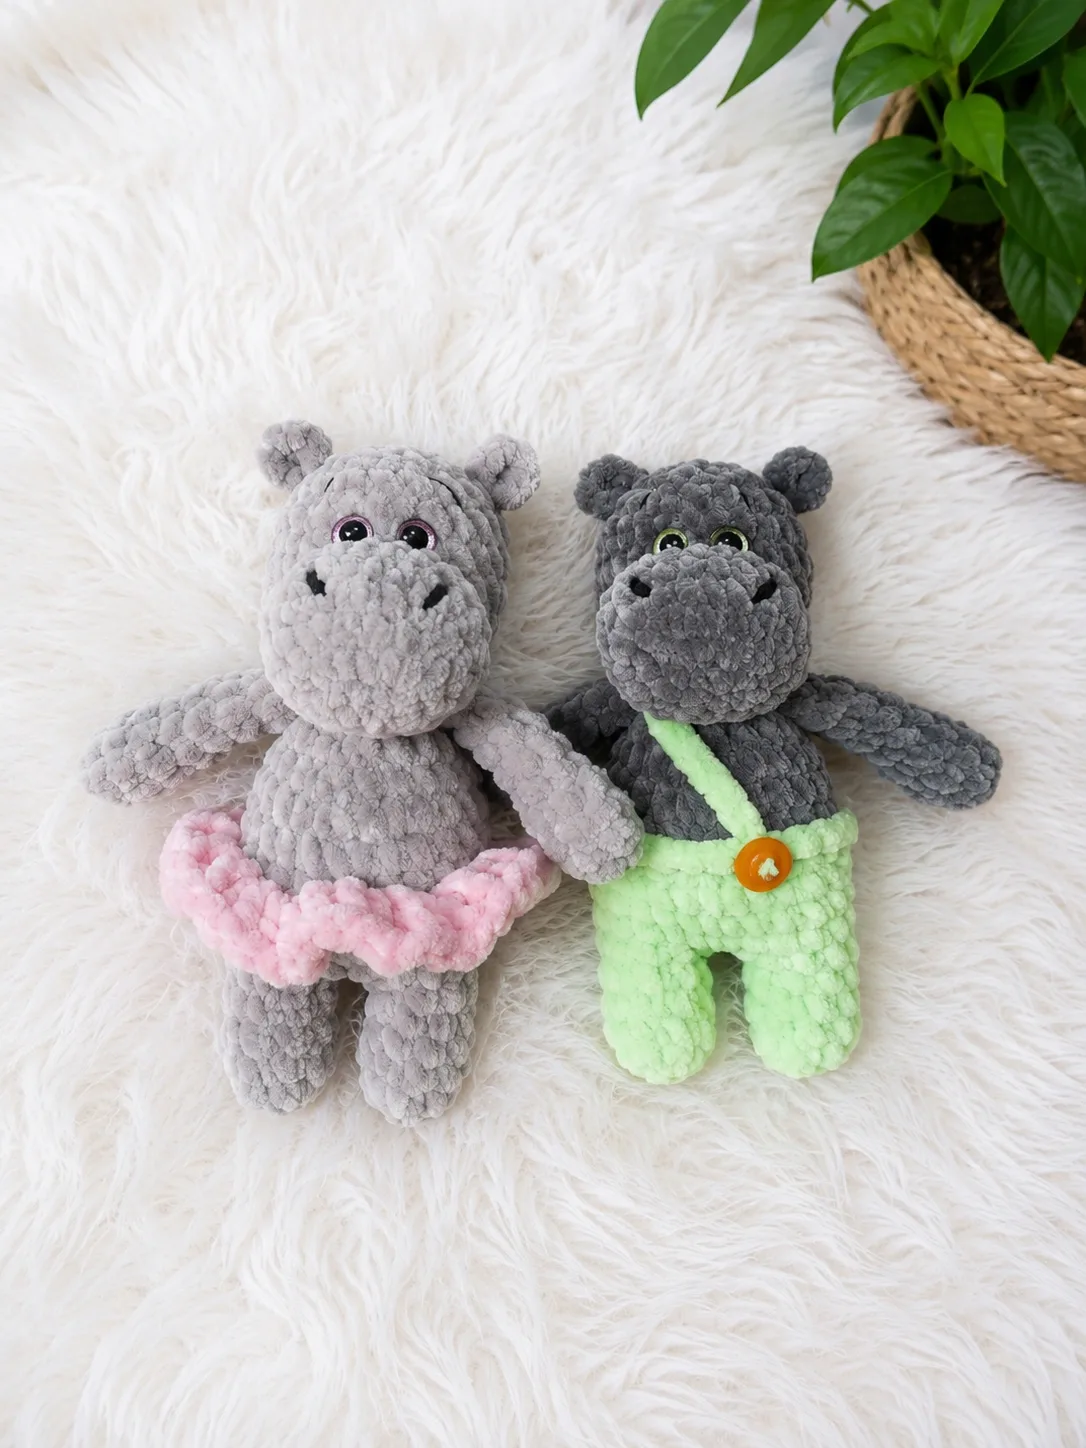
Intermediate 4-6 Hours Bulky yarn

Worked on the glider, counted out loud —

Amigurumi Baby Hippo Pattern – Chubby & Huggable

Crochet an adorable amigurumi baby hippo with chubby cheeks, tiny ears, and a soft muzzle. A cozy bulky-yarn pattern perfect for gifting or keeping.

Jump to the rounds

Before you sit down

Crochet both legs separately first, working them up from a magic ring into small stuffed cylinders.

Without cutting yarn after the second leg, chain across to link the two legs and start the body as one piece.

Continue the body and head in one continuous spiral, increasing and decreasing to shape the classic round hippo silhouette.

Set the body aside partway through and crochet the two arms separately, stuffing each lightly as you finish them.

During body assembly, crochet the finished arms directly into the body stitches instead of sewing them on afterward.

Make the small ears and short tail separately, then attach them once the head and body are complete.

Crochet the contrasting muzzle in the lighter sport or DK weight yarn and stuff it gently before attaching to the face.

Insert and secure the safety eyes, check spacing and expression, then close up any remaining seams for a finished hippo.

What this one is

This amigurumi baby hippo is the kind of project that makes you want to squeeze your hook harder just looking at it. Worked up in soft bulky yarn, it has that classic round-bellied, stubby-limbed hippo shape with a contrasting muzzle that gives it real personality on the shelf. It's perfect for crocheters who love making sweet little animal friends for nurseries, baby showers, or anyone who needs a chubby, huggable companion that doesn't take a month to finish.

You'll work through magic rings, single crochet increases and decreases, and a continuous spiral for the body, legs, and head — no slip-stitch joins to fuss over once you get going. The arms are made separately and then crocheted directly into the body during assembly, a built-in join technique that's a fun step up from basic sewn-on limbs. Expect an intermediate-friendly project, comfortable for anyone who's made a round or two of amigurumi before, taking roughly 4-6 hours from first stitch to final tail.

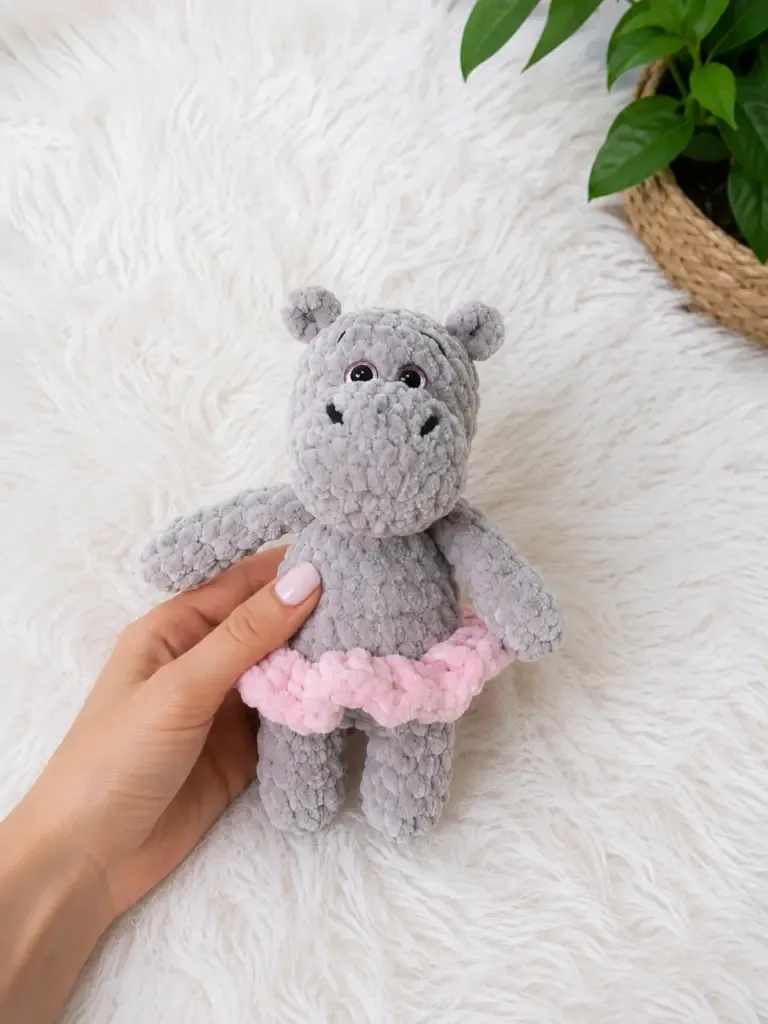
The finished hippo comes out plump, round, and satisfyingly dense thanks to the bulky yarn and firm fiberfill stuffing, with small ears, safety eyes, and that signature light-colored muzzle giving it an unmistakable hippo face. It sits sturdily on its own thanks to the chunky legs, making it a great little shelf-sitter or crib buddy. The finished hippo measures approximately 18 cm (7 inches) tall when worked with the recommended hook size. Whether you keep it or wrap it up for a baby shower, it's the kind of gift that gets an audible 'aww' the moment it's unwrapped.
Variations

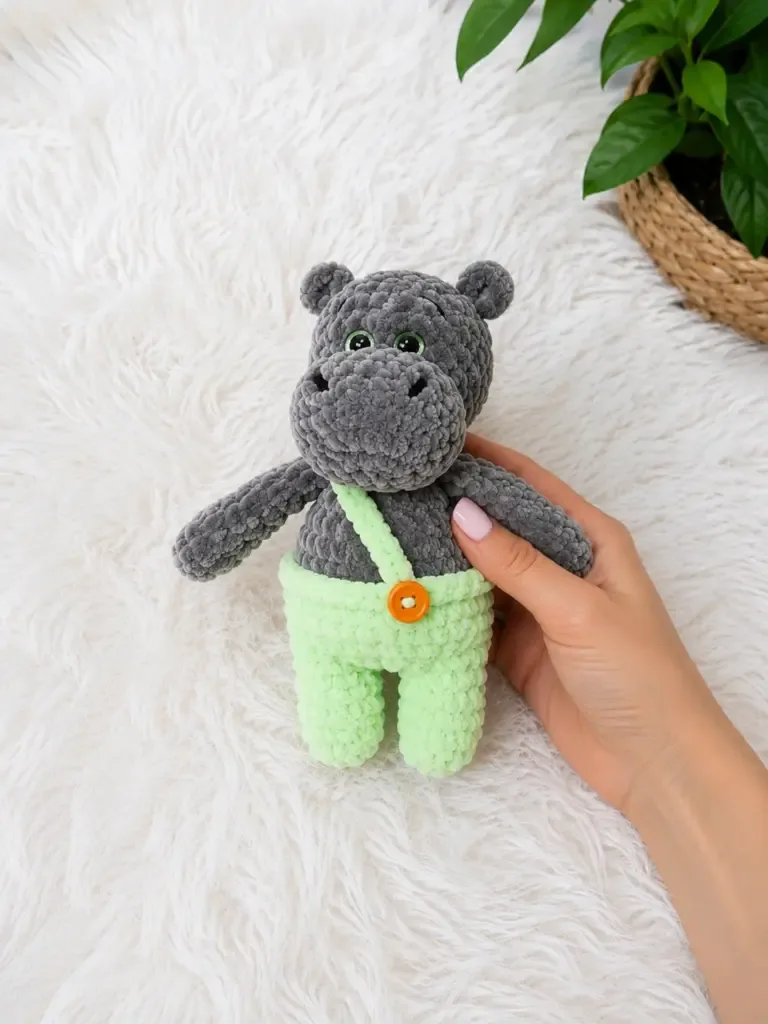
The classic gray or lavender-gray hippo is lovely, but this pattern begs for color play. Try a soft blush pink body with a cream muzzle for a girly nursery vibe, or a deep teal with a pale yellow muzzle for something bold and modern — Himalaya Dolphin Baby and Baby Alpaca Blend both come in gorgeous pastel and jewel-tone options that work beautifully at this bulky weight. For a totally different mood, go with a soft sage green body and ivory muzzle for a gender-neutral gift that fits any nursery palette. If you want a bigger cuddle buddy, size up to a G-6 (4.0mm) or even H-8 (5.0mm) hook with the same bulky yarn — your stitch counts stay the same but the fabric loosens slightly, giving you a noticeably larger, squishier finished hippo, so just add a bit more fiberfill to keep it firm. For a mini desk-companion version, drop down to a worsted weight yarn with an E-4 (3.5mm) hook, which will shrink the whole hippo down to pocket size — perfect for keychains or bag charms if you skip the safety eyes in favor of embroidered ones for littles under 3. Don't skip the shorts variation buried in the assembly notes — swap in bright striped cotton yarn and add two mismatched buttons for a playful, dressed-up look, or make a simple crochet bow instead for a girl hippo. You can also experiment with the muzzle yarn: a fuzzy eyelash yarn in a tiny amount gives a whimsical, textured snout instead of the smooth classic look, while a metallic-blend sport yarn adds a subtle shimmer for a special-occasion gift.

Common mistakes

  • Losing track of the spiralSince this pattern is worked in a continuous spiral, never slip stitch to close a round unless the instructions specifically say to. Keep a stitch marker in the first stitch of every round and move it up each time you complete a round so you always know exactly where you are.
  • Cutting the yarn after finishingThe pattern notes specifically call out not to cut yarn after the second leg because the legs are joined with chains to begin the body — cutting here will leave you with two separate leg pieces and no way to continue in one piece. Read the transition from legs into body carefully before you finish leg two.
  • Attaching the arms with a whip stitchThis pattern uses a built-in join for the arms, meaning you crochet directly into the arm stitches as part of the body round rather than sewing them on afterward. Pre-stuff each arm lightly before this round so it's ready to be incorporated without extra fumbling.
  • Under-stuffing the head and bodyBulky yarn amigurumi needs firm, even stuffing to hold its round shape — add fiberfill in small pinches as you go rather than stuffing everything at the very end, and press gently to check for soft spots before closing up each piece.
  • Placing the safety eyesOnce safety eye backs are attached they're permanent, so insert both eyes first, use a stitch marker or pin to hold them, and step back to check symmetry and expression before securing anything.

The rounds, in full

Written out, round by round

Intermediate4-6 Hours3.5 mmBulky

Materials

Everything this one takes, in the order you will reach for it.

  • Yarn (main color): Bulky / chunky weight yarn — approx. 40 m (e.g., Himalaya Dolphin Baby or equivalent soft bulky yarn), in your chosen hippo color
  • Yarn (muzzle): Sport or DK weight yarn for the muzzle detail (e.g., a smooth, light-toned yarn for contrast)

Hook size

  • E-4 (3.5 mm) or G-6 (4.0 mm)

Safety eyes

  • 9–12 mm, 1 pair

Stuffing

  • Polyester fiberfill — approx. 14 g
  • Stitch markers: 2
  • Yarn needle / tapestry needle
  • Scissors

Optional

  • Buttons (for the shorts variation)

keep this to hand

Abbreviations

US crochet terms, as used in this pattern.

  1. chChain
  2. dcDouble Crochet
  3. decDecrease (invisible decrease recommended)
  4. hdcHalf Double Crochet
  5. incIncrease (2 sc in the same stitch)
  6. MRMagic Ring
  7. scSingle Crochet
  8. sl stSlip Stitch
  9. st / stsStitch / Stitches
  10. BLOBack Loop Only

Arms (make 2)

  1. Round 16 sc in MR. (6)
  2. Round 22 sc, inc repeat 2 times around. (8)
  3. Round 3sc in each st around. (8)
  4. Round 42 sc, dec repeat 2 times around. (6) Stuff lightly.(6)
  5. Round 5sc in each st around. (6)
  6. Round 6sc in each st around. (6)
  7. Round 7sc in each st around. (6)
  8. Round 8sc in each st around. (6)
  9. Round 9sc in each st around. (6) Fold the arm flat and sc across the opening with 3 sc to close. Fasten off, leaving a short tail to weave in. Do not stuff the upper arm — it needs to stay flat for the built-in join.(6)

Legs (make 2)

  1. Round 16 sc in MR. (6)
  2. Round 22 sc, inc repeat 2 times around. (8)
  3. Round 3sc in each st around. (8)
  4. Round 4sc in each st around. (8)
  5. Round 5sc in each st around. (8) For the first leg, fasten off and set aside. For the second leg, do NOT cut the yarn — continue directly into the Body.(8)

Body and Head

Begin from the second leg with yarn still attached.

  1. Round 6ch 3, sc 8 across the first leg, sc 3 across the chain, sc 8 across the second leg, sc 3 across the opposite side of the chain. (22)
  2. Round 7sc 20, inc, sc 1. (23)
  3. Round 8sc 3, inc, sc 11, inc, sc 5, inc, sc 1. (26)
  4. Round 9sc in each st around. (26)
  5. Round 10sc in each st around. (26) If making the skirt variation, work this round in BLO — see the Optional Clothing section below.(26)
  6. Round 11sc in each st around. (26) If making the shorts variation, work this round in BLO — see the Optional Clothing section below.(26)
  7. Round 12sc 10, dec, sc 11, dec, sc 1. (24)
  8. Round 134 sc, dec repeat 4 times around. (20)
  9. Round 148 sc, dec repeat 2 times around. (18)
  10. Round 151 sc, dec repeat 6 times around. (12)
  11. Round 16sc 2, sc 3 across first arm (joining it into the body), sc 3, sc 3 across second arm (joining it into the body), sc 1. (12) Check symmetry as you join the arms — adjust by 1 stitch either way if needed to keep the arms centered.(12)
  12. Round 171 sc, inc repeat 6 times around. (18)
  13. Round 182 sc, inc repeat 6 times around. (24)
  14. Round 19sc in each st around. (24)
  15. Round 20sc in each st around. (24)
  16. Round 21sc in each st around. (24) Insert safety eyes between this round and round 22. Position them symmetrically, approximately 6–7 stitches apart.(24)
  17. Round 22sc in each st around. (24)
  18. Round 232 sc, dec repeat 6 times around. (18)
  19. Round 241 sc, dec repeat 6 times around. (12) Stuff the head and body firmly now.(12)
  20. Round 25dec 6 times around. (6) Pull the opening closed, fasten off, and weave in the end.(6)

Ears (make 2)

  1. Round 16 sc in MR. (6) Fasten off, leaving a long tail for sewing. Do not stuff.(6)

Tail (make 1)

  1. Row 1ch 4. Starting from the 2nd chain from the hook: sc 2, hdc 1. Fasten off, leaving a tail for sewing.

Muzzle (make 1)

Foundation chain: ch 5. Starting from the 2nd chain from the hook:

  1. Round 1inc, sc 2, 3 sc in the last st, then continue along the opposite side of the foundation chain: sc 3. (10)
  2. Round 2inc 2 times, sc 2, inc 3 times, sc 2, inc 1 time. (16)
  3. Round 31 sc, inc 2 times, sc 2, inc 1 time, 1 sc, inc 2 times, sc 4, inc 1 time. (22)
  4. Round 4sc in each st around. (22)
  5. Round 5sc in each st around. (22)
  6. Round 6dec, sc 1, dec, sc 5, dec, sc 1, dec, sc 7. Fasten off, leaving a long yarn tail for sewing.

Skirt Variation

Work round 10 of the Body in BLO. Then, working into the remaining front loops of round 10:

  1. Round 1ch 2, dc inc in each st around. (52 dc)
  2. Round 2ch 2, dc inc in each st around. (104 dc) Fasten off and weave in ends.

Shorts Variation

Work round 11 of the Body in BLO. Then, working into the remaining front loops of round 11:

  1. Round 1sc in each st around. (26) Do not fasten off — chain the necessary number of chains to create a strap, drape it over the shoulder, and sew a button to secure.(26)

Assembly

Step 1

Attach the ears: Sew one ear to each side of the head, approximately at round 20–21, using the long yarn tails and a whipstitch. Flatten each ear slightly before sewing for a natural look.

Step 2

Attach the muzzle: Center the muzzle on the lower front of the head, roughly over rounds 18–22. Use the long yarn tail to sew it on with a whipstitch, tucking in light stuffing behind it as you go to give it a slight 3D lift.

Step 3

Attach the tail: Sew the tail to the back center of the body at round 8–9, using the yarn tail.

Step 4

Embroider facial details (optional): Use a darker yarn and your tapestry needle to add nostrils, a smile, or any other features to the muzzle.

Step 5

Weave in all remaining ends securely.

Important notes

Note 01

💡 Use an E-4 (3.5mm) hook with bulky yarn for a tighter, more solid fabric that keeps fiberfill from peeking through — size up to G-6 (4.0mm) only if you want a slightly looser, softer finished texture.

Note 02

💡 Keep two stitch markers on hand at all times — one for tracking the beginning of each spiral round and one to hold your place if you need to set the project down mid-round.

Note 03

💡 Pre-stuff the arms and legs before joining them to the body, since it's much harder to add fiberfill evenly once a piece is crocheted into a larger, closed structure.

Note 04

💡 Don't cut your yarn after the second leg — the legs are joined with chains to begin the body, so keep that working yarn attached and ready to continue straight into round one of the body.

Note 05

💡 Space out your 9-12mm safety eyes generously since the finished head will be quite round and plump — eyes placed too close together can look cross-eyed once the head is fully stuffed.

Note 06

💡 Gauge isn't critical for this project, but tighter tension gives a firmer, cleaner amigurumi finish — if your stitches feel loose and you can see the stuffing through them, move down a hook size.

Note 07

💡 The finished hippo measures approximately 18 cm (7 inches) tall when worked with the recommended hook size.

Note 08

💡 This pattern is written in US crochet terminology.

More photos

FAQs

Asked on the glider

the ones that come up on the glider

Why does the muzzle use a different yarn weight than the rest of the hippo?

The lighter sport or DK weight yarn creates a smoother, more refined muzzle that contrasts nicely against the chunkier bulky-yarn body. It also lets you use a smaller amount of a second color without buying a whole skein of bulky yarn just for the face.

Is this pattern safe for a baby's crib or nursery?

Because it uses standard safety eyes and small fiberfill-stuffed parts, this hippo is best kept as a display piece or supervised toy rather than an unsupervised crib companion for infants. If gifting to a very young baby, consider embroidering the eyes with yarn instead of using safety eyes.

How much yarn do I actually need to finish the whole hippo?

You'll need approximately 40 meters of bulky main-color yarn plus a smaller amount of sport or DK weight yarn for the muzzle detail. It's worth buying a touch extra of your main color in case gauge or stuffing preferences use more than expected.

What does the built-in arm join actually involve?

Instead of crocheting the arms separately and sewing them on at the end, you crochet the last round of each arm directly into the stitches of the body during assembly round 16. This creates a seamless, sturdy attachment that won't loosen or need reinforcement later.