Beginner 1-2 hours Aran yarn

Worked on the glider, counted out loud —

Soft sole crochet baby shoes for chubby little toes

A soft-sole baby shoe worked in rounds with aran yarn, sized by hook from newborn to twelve months. Done in under an hour.

Jump to the rounds

What this one is

These little soles are made for the evening you finally sit down with that skein of aran weight yarn and decide the newest set of toes in the house needs something soft to stand on. Whether you are stitching for a brand new arrival or a wriggly six month old who is already testing out standing, the three hook sizes here mean you can match the shoe to the exact foot in front of you, chubby little toes and all.

Your hands spend most of the time building a simple oval, working double crochets around a starting chain of ten until you have a ring of twenty-two stitches joined with a slip stitch. There is no counting chart to juggle, just steady rounds and two clusters of increases at the ends to curve the toe and heel. Once the sole is shaped, sewing on a button and tucking in ends takes another few quiet minutes, so you can realistically finish one pair within an hour or so of sitting time.

Try it another way

The easiest way to change these up is to work through all three hook sizes, 3 mm, 3.5 mm and 4 mm, and keep a drawer of soles ready for whichever age group needs them next. The stitch count stays at 22 no matter which hook you use, so sizing is really just a matter of swapping metal or plastic for a slightly bigger or smaller one and letting the gauge do the work. For color, try working the two increase sections, the toe and the heel, in a contrast shade so the shaping shows rather than blends in, or keep the whole sole in one color and let the button do the talking. Buttons themselves are an easy swap: a plain two-hole button reads classic, while something with more texture gives each pair a bit more personality. If you are not making these for feet at all, a finished sole or two makes a sweet little ornament or a soft coaster once blocked flat with the stuffing, since the shape holds nicely on its own.

What I like about this little sole is how much shape comes from so few moves. You chain ten, slip into the third chain from the hook, and from there it is just double crochet after double crochet, with two deliberate bursts of six double crochets worked into single stitches at each end to curve the toe and heel into place. Closing the round with a slip stitch instead of fussing over a seam means the whole oval comes together without you ever picking up a sewing needle until the button stage. It is the kind of small, repeatable project where you can see the shape emerge after only a few rounds, which makes it satisfying even for someone newer to crochet.

The rounds, in full

Written out, round by round

Beginner1-2 hours3 mmAran

Bring to the porch

Everything this one takes, in the order you will reach for it.

  • Aran weight (4) yarn

Crochet hook

  • 0–3 months: 3 mm (C or 11)
  • 3–6 months: 3.5 mm (E or 9)
  • 6–12 months: 4 mm (G or 7)
  • Blunt-ended needle
  • Pointy-ended needle

Tools

  • Scissors
  • Buttons
  • Needle and thread (for sewing buttons)
  • Stuffing (e.g., old cushion stuffing) for blocking

Crochet hook

0–3 months: 3 mm (C or 11)

3–6 months: 3.5 mm (E or 9)

6–12 months: 4 mm (G or 7)

Blunt-ended needle Pointy-ended needle Scissors Buttons Needle and thread (for sewing buttons)

Stuffing (e.g., old cushion stuffing) for blocking Gauge / Tension Measure the sole after finishing it.

If the size is off due to tension, adjust hook size accordingly (go smaller or larger).

Sole Section To Begin Make a slip knot.

Chain 10.

  1. Round 1Forming the Sole Into the third chain from the hook, make 2 double crochets (DC).Make 1 DC in each of the next 6 chains.Into the final chain, make 6 DC.Work along the other side of the foundation chain: Make 1 DC in each of the next 6 chains.

Into the same stitch where the first 2 DC were made, make 2 DC.

You should now have 22 stitches.

Slip stitch at the top of the first stitch to join. Do not count the starting chain.

  1. Round 2Increasing the Sole Chain 2. Make 2 DC in each of the first 2 stitches. Make 1 DC in each of the next 5 stitches.Make 2 DC in each of the next 8 stitches.Make 1 DC in each of the next 5 stitches.Make 2 DC in each of the final 2 stitches.

You should now have 34 stitches.

Slip stitch at the top of the first stitch to join.

Body of the Shoe

  1. Round 3Back Loop Only Chain 1. Make 1 single crochet (SC) in the back loop only of each stitch around.Slip stitch to join. Stitch count remains 34.
  2. Round 4Both Loops Chain 1. Make 1 SC in each stitch around, working through.Slip stitch to join. Stitch count remains 34.For Round 5: Shaping the Foot (Back Loops Only)(Optional) Change color at the start of this round.Chain 2.Make 1 DC in the back loop only of each of the first 6 stitches.Make 1 SC in the back loop only of the next 5 stitches.Make 6 double crochet decreases (DC dec) in the back loops only.Make 1 SC in the back loop only of the next 5 stitches.Make 1 DC in the back loop only of the final 6 stitches.

You should now have 28 stitches.

Slip stitch to join.

Cut off the old color (if changed) and sew in the ends.

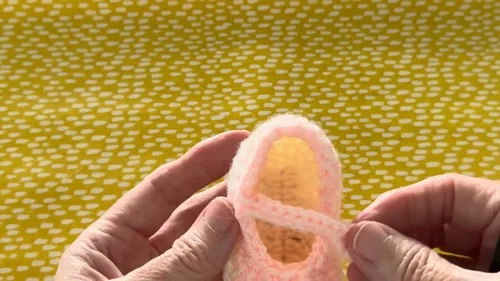
Final Round: Adding the Strap For the Right Shoe Chain 1.

Make 1 half double crochet (HDC) in each of the first 5 stitches.

Make 1 SC in the next stitch.

Chain 16.

Slip stitch into the sixth chain from the hook.

Slip stitch into each of the next 10 chains back to the body of the shoe.

Make 1 SC in the next stitch of the shoe.

Make 4 SC.

Make 3 double crochet decreases (DC dec).

Make 6 SC.

Make 1 HDC in each of the final 5 stitches.

For the Left Shoe Chain 1.

Make 1 HDC in each of the first 5 stitches.

Make 6 SC.

Make 3 DC decreases.

Make 4 SC.

Make 1 SC in the next stitch.

Chain 16.

Slip stitch into the sixth chain from the hook.

Slip stitch in each of the next 10 chains.

Make 1 SC in the next stitch on the shoe.

Make 1 HDC in each of the last 5 stitches.

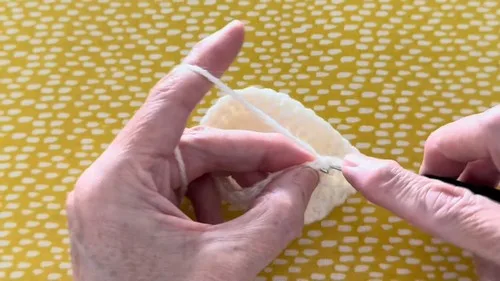
Finishing Securing the Yarn Cut the yarn, leaving a long tail.

Pull the tail through the last loop to fasten off.

Using a blunt-ended needle: Insert needle under the top loops of the second stitch.

Pull through, then insert into the back loop of the last stitch.

Pull through and adjust for a neat finish.

With a pointy-ended needle: Sew in all yarn ends, weaving in multiple directions.

Snip off excess.

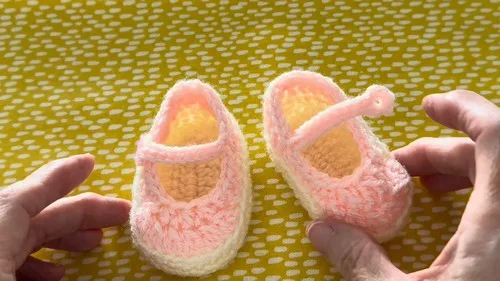
Attaching Buttons Test the strap to find the best placement for the button.

Use needle and thread to securely sew the button in place.

Blocking (Optional)

Lightly mist the shoes with water.

Stuff firmly with cushion filling or similar.

Allow to dry completely to help shoes hold their shape.
Marlene's notes

Note 01

If your finished sole comes out smaller or larger than the baby's actual foot, swap to the next hook size up or down rather than changing the stitch count.

Note 02

Measure the sole against the baby's foot once you have joined the round with the slip stitch, before you move on to anything else.

Note 03

The stuffing listed in the materials is there to help you block the sole into shape once it is finished, not to pad the shoe for wear.

Porch photos

Before you sit down

  • Check you have enough aran weight yarn on hand for the size you are making, plus a small offcut for sewing on the button later.
  • Pick the hook that matches your chosen age group, 3 mm, 3.5 mm or 4 mm, before you make the slip knot.
  • Read through the full round once before you start it, especially the increase stitches at each end, so you know where the 2 DC and 6 DC clusters land.
  • Have your buttons, needle and thread ready nearby, since you will want to attach them as soon as the sole is finished and still easy to handle.

How the hours go

Foundation chain and first round
about 15 to 20 minutes because the chain of 10 and the increase clusters at each end need a bit of care to keep the stitch count at 22
Buttons and finishing ends
about 10 to 15 minutes because sewing a button on by hand and weaving in ends is slow going even on a small piece
Blocking with stuffing
about an hour or overnight because the stuffing needs time to hold the sole's shape once it is damp or freshly blocked

Looking after it

  • Because this is worked in aran weight yarn, hand wash gently in cool water if it needs cleaning, and avoid wringing or twisting the fibers.
  • Lay the finished sole flat to dry away from direct heat, and use the stuffing again to reshape it if it loses its curve in storage.
FAQs

Asked on the glider

the ones that come up on the glider

Which hook size do I need for my baby's age?

Use 3 mm (C or 11) for 0 to 3 months, 3.5 mm (E or 9) for 3 to 6 months, and 4 mm (G or 7) for 6 to 12 months. Measure the sole after your first round to confirm it matches the foot you are sewing for.

What if my stitch count does not come out to 22?

Go back and recount the 2 DC and 6 DC increase clusters at each end of the oval, since those are the easiest spots to miscount. The two sides worked along the foundation chain should each have 6 DC between the increases.

Why does the materials list ask for stuffing?

The stuffing is there purely for blocking, to hold the sole in its finished curved shape while it sets. It is not meant to stay inside the shoe for wear.

Are the buttons safe for a baby to wear?

Buttons sewn on with needle and thread are a styling choice here, and small parts like these are only appropriate once you have checked current safety guidance for the baby's age. Many people use these soles as soft nursery pieces rather than everyday footwear for very young babies.

How long does one sole actually take to finish?

Between the foundation chain, the rounds, and sewing on a button, you are looking at roughly an hour of hands-on time per sole, plus blocking time with the stuffing. A pair across one quiet sitting is realistic once you know the shaping.