Intermediate 15-21 hours DK yarn

Worked on the glider, counted out loud —

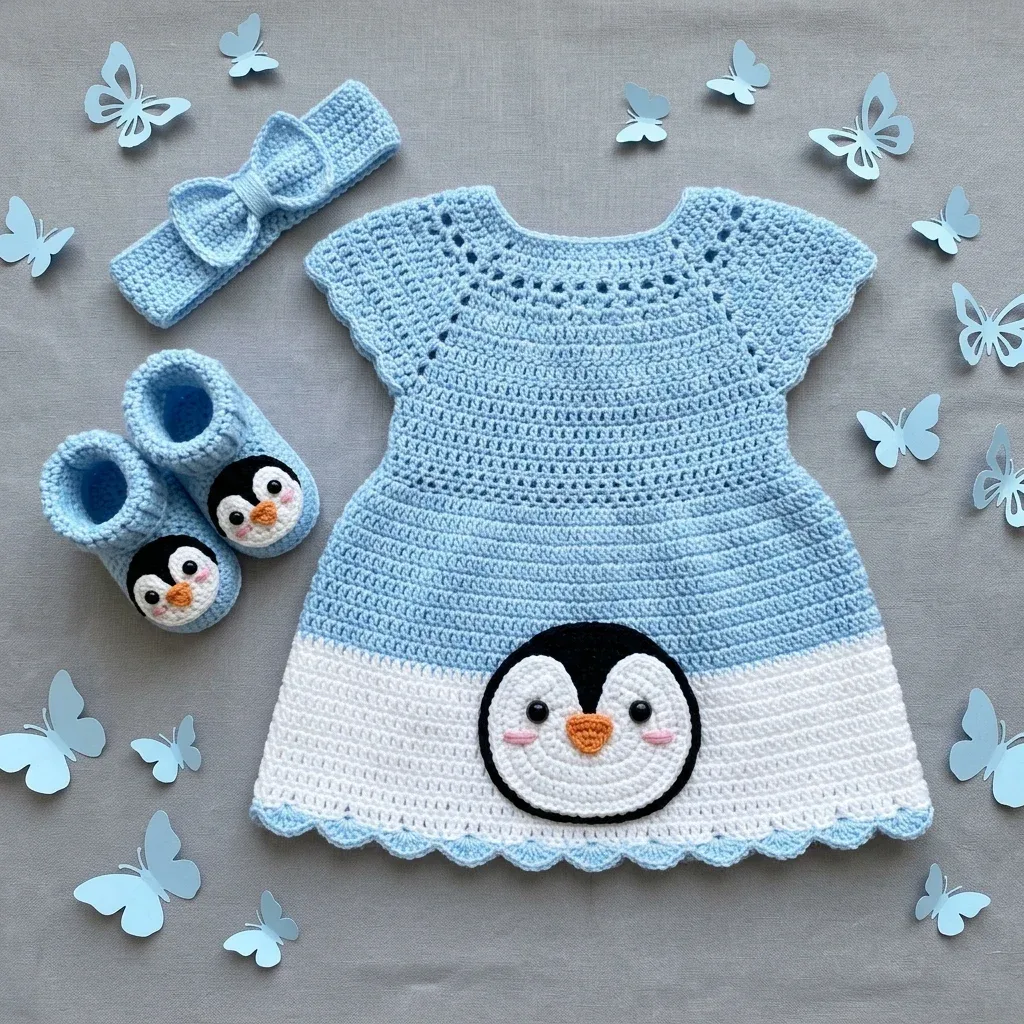
Penguin baby dress set with booties and headband

A top-down baby dress with penguin appliqué, matching booties, and bow headband — about 15 to 21 hours for the whole set.

Jump to the rounds

What this one is

I designed this whole set with one quiet evening in mind, the kind where you're sitting with a new baby asleep in your lap and you want your hands busy with something soft. This dress and bootie set is for the baby in your life who's somewhere between three and six months old, with a chest around 17 inches. It's also for you, if you've made a baby garment before and you're ready to work raglan increases and a color change without much hand-holding.

Your hands spend most of their time working in the round, since the dress starts at the neckline and grows downward through raglan shaping with almost no seaming required. Between the fifteen yoke rounds, the color change to white, the scallop hem, and the penguin appliqué stitched on last, plan for ten to fourteen hours on the dress alone. Add the booties, the bow headband, and the appliqué pieces, and the whole set runs about fifteen to twenty-one hours from first chain to last woven end.

Try it another way

If you need this for a bigger baby, size up to 6 to 12 months by adding 6 foundation chains (3 per shoulder) at the neckline, working 2 additional yoke increase rounds, adding 4 sc rounds between the color change and the hem, and working 2 additional skirt increase rounds. The booties can grow to match — just add 2 extra sc rounds after the sole shaping to extend the foot length. For yarn, you've got real choice here: Paintbox Simply DK in Powder Blue and Slate Grey White gives a soft matte finish, Drops Safran cotton gives the appliqué crisper stitch definition, and Baby Soft is the budget-friendly pick, with one skein each of Baby Blue and White covering the entire set. You can swap the pink cheek blush for embroidery floss in a different shade, back the appliqué with felt for extra stability, or leave the penguin off entirely for a plainer dress that still has that pretty scallop hem and bow headband to carry the set.

There's real satisfaction in watching a dress take shape from one ring of chains — you cast on at the neckline, join in the round, and let four points of raglan increase do the shaping through fifteen yoke rounds, no pieces to sew together after. The color change from Powder Blue to white leaves a clean canvas exactly where the penguin appliqué belongs, and building that penguin from an eight-round outer circle down through the eyes and beak is its own small, absorbing project. Even the hem gets a moment: the scallop edging's skip-two, five-dc, skip-two rhythm turns a plain lower edge into something that ripples. Blocking it flat and pinning those scallops open at the end feels like the finishing touch on something you built with intention.
The rounds, in full

Written out, round by round

Intermediate15-21 hours4.0 mmDK

Bring to the porch

Everything this one takes, in the order you will reach for it.

  • Paintbox Yarns Simply DK (100% acrylic, 137 yards per 50 g ball) works beautifully. Try Powder Blue for Yarn A and Slate Grey White for Yarn B. You will need 2 balls of Yarn A and 1 ball of Yarn B.
  • Drops Safran (100% cotton, 175 yards per 50 g ball) gives excellent stitch definition and feels lovely against baby skin.
  • Lion Brand Baby Soft (60% acrylic, 40% nylon, 459 yards per 170 g skein) is budget friendly and ultra soft. One skein each of Baby Blue and White covers the entire set.
  • Choose any DK weight yarn that achieves the stated gauge. Look for soft, machine washable fibers suitable for baby skin.

Yarn

  • Yarn A (light blue): DK weight, approximately 200 yards (183 m)
  • Yarn B (white): DK weight, approximately 80 yards (73 m)
  • Yarn C (black): DK weight or sport weight, approximately 15 yards (14 m) for the penguin applique
  • Yarn D (orange): DK weight or sport weight, approximately 5 yards (4.5 m) for the penguin beak
  • Small amount of pink yarn or pink embroidery floss for the penguin cheek blush

Hook

  • US size G-6 / 4.0 mm crochet hook

Notions

  • Tapestry needle
  • 4 to 6 removable stitch markers
  • Scissors
  • Small piece of black felt (optional, for applique backing)
  • Sewing needle and thread (if using felt backing)

Neckline Setup

Using Yarn A and US G-6 hook, ch 64. Taking care not to twist the chain, join with a sl st to the first chain to form a ring.

Step by step: Using Yarn B (white) and US G-6 hook, make a magic ring.

  1. Round 1Ch 1, sc in each ch around. Join. (64 sc)
  2. Round 2Ch 1, sc in each st around. Join. (64 sc)

Outer Circle (Black)

Using Yarn C (black) and US G-6 hook, make a magic ring.

  1. Round 1Ch 1, 6 sc into ring. Pull ring closed. Join. (6 sc)
  2. Round 2Ch 1, inc in each st around. Join. (12 sc)
  3. Round 3Ch 1, sc in next st, inc; rep from around. Join. (18 sc)
  4. Round 4Ch 1, sc in next 2 sts, inc; rep from around. Join. (24 sc)
  5. Round 5Ch 1, sc in next 3 sts, inc; rep from around. Join. (30 sc)
  6. Round 6Ch 1, sc in next 4 sts, inc; rep from around. Join. (36 sc)
  7. Round 7Ch 1, sc in next 5 sts, inc; rep from around. Join. (42 sc)
  8. Round 8Ch 1, sc in next 6 sts, inc; rep from around. Join. (48 sc) Fasten off, leaving a long tail for sewing.

Penguin Eyes

Using Yarn C (black) and a 2.5 mm or 3.0 mm hook, make a magic ring.

  1. Round 1Ch 1, 6 sc into ring. Pull ring closed. Join. Fasten off. Make 2. Note: Safety eyes are not recommended for babies under 3 years.

Penguin Beak

Using Yarn D (orange) and US G-6 hook, ch 3.

  1. Round 1Sc in 2nd ch from hook, sc in next ch. Turn. (2 sc)
  2. Round 2Ch 1, inc in first st, sc in last st. Turn. (3 sc)
  3. Round 3Ch 1, sc in each st across. Fasten off. (3 sc)

Sole

Using Yarn A and US G-6 hook, ch 9.

  1. Round 1Starting in 2nd ch from hook, sc in next 7 chs, 3 sc in last ch (toe end). Rotating to work along opposite side of foundation chain: sc in next 6 chs, 2 sc in last ch (heel end). Join. (18 sc)
  2. Round 2Ch 1, inc in first st, sc in next 6 sts, inc in next 3 sts (toe), sc in next 6 sts, inc in next 2 sts (heel). Join. (24 sc)
  3. Round 3Ch 1, sc in next st, inc, sc in next 6 sts, (sc, inc) 3 times (toe), sc in next 6 sts, (sc, inc) 2 times (heel). Join. (30 sc)

Headband Bow

Using Yarn A, ch 22.

  1. Round 1Sc in 2nd ch from hook and in each ch across. Turn. (21 sc)
  2. Round 2to 6: Ch 1, sc in each st across. Turn. (21 sc each row) Fasten off, leaving a tail.Pinch the bow rectangle at its center and wrap Yarn A tightly 8 to 10 times around the middle to cinch. Secure with a knot and weave in ends.

Main Pattern

  1. Round 1Sc in 2nd ch from hook and in each ch across. Turn. (61 sc)
  2. Round 2to 5: Ch 1, sc in each st across. Turn. (61 sc each row) Fasten off, leaving a 12 inch (30 cm) tail for seaming.

Yoke with Raglan Increases

Place stitch markers at positions 1, 17, 33, and 49 to mark the 4 raglan increase points. These markers divide the round into 4 sections: 2 front/back panels of 16 sts and 2 sleeve panels of 16 sts.

  1. Round 3Increase round Ch 1, sc to 1 st before marker, inc, sc in marked st, inc; rep from 3 more times, sc to end. Join. (72 sc)
  2. Round 4Ch 1, sc in each st around. Join. (72 sc)
  3. Round 5Increase round Rep Round 3 pattern. (80 sc)Ch 1, sc in next 4 sts, inc; rep from around. Join. (36 sc) Fasten off, leaving a long tail for sewing.
  4. Round 6Ch 1, sc in each st around. Join. (80 sc)
  5. Round 7Increase round Rep Round 3 pattern. (88 sc)
  6. Round 8Ch 1, sc in each st around. Join. (88 sc)
  7. Round 9Increase round Rep Round 3 pattern. (96 sc)
  8. Round 10Ch 1, sc in each st around. Join. (96 sc)
  9. Round 11Increase round Rep Round 3 pattern. (104 sc)
  10. Round 12Ch 1, sc in each st around. Join. (104 sc)
  11. Round 13Eyelet round, optional decorative row Ch 3 (counts as dc), sk 1 st, (dc, ch 1, dc) in next st, sk 1 st, sc in next st, sk 1 st; rep from around, ending last rep with sl st to top of ch-3. (Approx 17 shell repeats, adjust if needed to close round evenly.) Join.
  12. Round 14Ch 1, sc in each st and ch-1 sp around. Join. (104 sc)
  13. Round 15Increase round Rep Round 3 pattern. (112 sc)
  14. Round 16Ch 1, sc in each st around. Join. (112 sc)
  15. Round 17Increase round Rep Round 3 pattern. (120 sc) CHECKPOINT: After Round 17, count your stitches. You should have 120 sc total. The yoke should measure approximately 3.5 inches (9 cm) from the foundation chain.

Sides and Upper

  1. Round 4Ch 1, working in BLO, sc in each st around. Join. (30 sc) This BLO round creates the sharp fold between sole and sides.
  2. Round 5to 6: Ch 1, sc in each st around. Join. (30 sc each round)(30)

Toe Shaping

  1. Round 7Toe reduction Ch 1, sc in first 8 sts, dec 4 times across center front (toe), sc in rem sts to end. Join. (26 sc)
  2. Round 8Ch 1, sc in first 7 sts, dec 3 times across center front, sc in rem sts. Join. (23 sc)
  3. Round 9Ch 1, sc in each st around. Join. (23 sc)

Cuff

  1. Round 10Ch 1, sc in each st around. Join. (23 sc) Adjust count to 24 sc by working 1 inc in this round. (24 sc)
  2. Round 11Ch 1, sc in each st around. Join. (24 sc)
  3. Round 12Ch 1, sc in each st around. Join. (24 sc)

Cuff Edging

  1. Round 13Skip 2 sts, 5 dc in next st, skip 2 sts, sl st in next st; rep from around. Join. Fasten off. (4 scallops = 24 sts)

Armhole Separation

The 120 sts are now divided as follows: Front body panel (30 sts), Back body panel (30 sts), Left sleeve (30 sts), Right sleeve (30 sts).

  1. Round 18Separation round Ch 1, sc across 30 front sts, ch 4 (underarm bridge), skip 30 sleeve sts, sc across 30 back sts, ch 4, skip 30 sleeve sts. Join to first sc. (60 sc + 8 ch = 68 working sts in body)
  2. Round 19Ch 1, sc in each sc and each ch across the round. Join. (68 sc)

Dress Body

Continue working on the 68 st body.

  1. Round 20to 22: Ch 1, sc in each st around. Join. (68 sc each round)(68)
  2. Round 23Increase round Ch 1, sc in next 16 sts, inc; rep from 3 more times. Join. (72 sc)
  3. Round 24to 26: Ch 1, sc in each st around. Join. (72 sc each round)(72)
  4. Round 27Increase round Ch 1, sc in next 17 sts, inc; rep from 3 more times. Join. (76 sc)
  5. Round 28to 30: Ch 1, sc in each st around. Join. (76 sc each round)(76)
  6. Round 31Increase round Ch 1, sc in next 18 sts, inc; rep from 3 more times. Join. (80 sc)
  7. Round 32to 34: Ch 1, sc in each st around. Join. (80 sc each round)(80)
  8. Round 35Increase round Ch 1, sc in next 19 sts, inc; rep from 3 more times. Join. (84 sc)
  9. Round 36to 38: Ch 1, sc in each st around. Join. (84 sc) CHECKPOINT: After Round 38, the dress body should measure approximately 7 to 7.5 inches (18 to 19 cm) from the neckline. The skirt should flare gently from the underarm.

Color Change to Yarn B (White Lower Panel)

At the end of Round 38, complete the final sl st join with Yarn B. Fasten off Yarn A, leaving a 6 inch (15 cm) tail to weave in.

  1. Round 39With Yarn B, ch 1, sc in each st around. Join. (84 sc)
  2. Round 40Increase round Ch 1, sc in next 20 sts, inc; rep from 3 more times. Join. (88 sc)
  3. Round 41to 43: Ch 1, sc in each st around. Join. (88 sc each round)(88)
  4. Round 44Increase round Ch 1, sc in next 21 sts, inc; rep from 3 more times. Join. (92 sc)
  5. Round 45to 46: Ch 1, sc in each st around. Join. (92 sc each round)(92)

Hem Preparation

  1. Round 47At the end of Round 46, change back to Yarn A by completing the final sl st with Yarn A. Fasten off Yarn B.With Yarn A, ch 1, sc in each st around. Join. (92 sc)

Hem Scallop Edging

  1. Round 48Skip 2 sts, 5 dc in next st, skip 2 sts, sl st in next st; rep from around. Join. Fasten off. (16 scallops)Weave in all yarn ends. Block lightly.

CHECKPOINT: Completed dress should measure approximately 11 inches (28 cm) from neckline to hem tip and approximately 17 inches (43 cm) in chest circumference.

Cheeks

Using pink yarn or pink embroidery floss, embroider a small oval blush circle on each side of the beak using a satin stitch. Alternatively, make a tiny 6 sc magic ring circle in pink yarn and sew flat to the face.

Bootie Penguin Face

Make one mini penguin applique per bootie using the same method as the dress applique but working only to Round 5 for the outer black circle (30 sc) and Round 4 for the inner white circle (24 sc). Add tiny eyes and beak as described above. Sew to the toe cap of each bootie, centered on the front upper.

Putting it together

Step 1

Weave in all yarn ends securely using a tapestry needle. Pass each tail through at least 4 to 5 stitches in different directions to prevent unraveling.

Step 2

Wet block the dress by submerging it in cool water, gently squeezing out excess water, reshaping on a blocking mat, and pinning the hem scallops open with blocking pins. Allow to dry completely before removing pins.

Step 3

Block the applique flat before sewing it to the dress so it lies neatly without curling.

Step 4

Block the booties by stuffing gently with a small cloth or plastic bag and pinning the cuff scallops open.

Step 5

The headband does not require pinning but can be lightly steamed if using acrylic yarn. Do not steam or press acrylic with a hot iron directly.

Marlene's notes

Note 01

The main hook is a US G-6 / 4.0 mm, but the penguin eyes call for a smaller 2.5 mm or 3.0 mm hook, so keep both on hand rather than swapping mid-round.

Note 02

This pattern is written for a baby 3 to 6 months old; safety eyes aren't recommended for babies under 3, so the crocheted eye rounds here are the safer choice, not a substitute you can skip.

Note 03

Keep an eye on tension through the color change to Yarn B and the hem scallop round, since both depend on the stitch count from the round before matching exactly, including the multiple-of-6 requirement for the scallop edging.

Before you sit down

  • Weigh out your yarn before you start: you'll need about 200 yards of Yarn A, 80 yards of Yarn B, 15 yards of black for the appliqué, and 5 yards of orange for the beak, so there's no color-change surprise halfway through the yoke.
  • Set out 4 to 6 removable stitch markers now — you'll want them ready for the four raglan increase points in the yoke and for tracking rounds once the stitch count climbs.
  • Work a quick swatch with your US G-6 (4.0 mm) hook before casting on the neckline chain, since the dress is worked top-down and a loose or tight gauge changes the chest circumference from the start.
  • Read through the Yoke with Raglan Increases section once before you begin — all fifteen rounds hinge on tracking the same four increase points, and it helps to know where you're headed.

How the hours go

Yoke with Raglan Increases
about 3 to 4 hours because fifteen rounds of shaping have to track four raglan points accurately.
Dress Body through Hem Scallop Edging
about 5 to 6 hours because of the color change to Yarn B partway through and the fiddly skip-two, five-dc scallop repeat at the multiple-of-6 hem.
Booties and Headband Bow
about 4 to 5 hours because the pair of penguin booties takes 3 to 4 hours on their own and the bow headband adds roughly 1 more hour.

Looking after it

  • If you worked the set in an acrylic or acrylic-nylon blend like Paintbox Simply DK or Baby Soft, machine wash it cool on a gentle cycle and lay it flat to dry — both hold their shape well without much fuss.
  • If you chose Drops Safran cotton instead, hand wash in cool water and reshape the yoke and skirt while damp, pinning the hem scallops open the same way you did for blocking, then store the finished set flat rather than folded on a hanger.
FAQs

Asked on the glider

the ones that come up on the glider

Can I make this for a bigger baby?

Yes — for 6 to 12 months, add 6 foundation chains (3 per shoulder) to the neckline, work 2 additional increase rounds in the yoke, add 4 sc rounds between the color change and the hem, and work 2 additional skirt increase rounds.

Do I need safety eyes for the penguin appliqué?

No, and you shouldn't use them — safety eyes aren't recommended for babies under 3, so this pattern has you crochet the eyes as small black rounds instead, which is both safer and true to the pattern.

What if I don't want to make the whole set?

The dress, booties, and headband are each written as their own section, so you can make just the dress with its appliqué, or the booties and headband on their own, and skip the rest.

Why does the hem edging need a multiple of 6 stitches?

The scallop repeat works in blocks of skip 2, 5 dc into the next stitch, skip 2, sl st, so the stitch count has to divide evenly by 6 before you start or the scallops won't come out even around.

Can I use a different DK yarn?

Yes — any DK weight yarn that meets gauge works, as long as it's soft and machine washable for baby skin; the pattern lists Paintbox Simply DK, Drops Safran, and Baby Soft as tested options.

How do I make the booties longer?

Add 2 extra sc rounds after the sole shaping to extend the foot length, the same adjustment noted for sizing the booties up alongside the larger dress.