Intermediate 4-6 hours Worsted yarn

Worked on the glider, counted out loud —

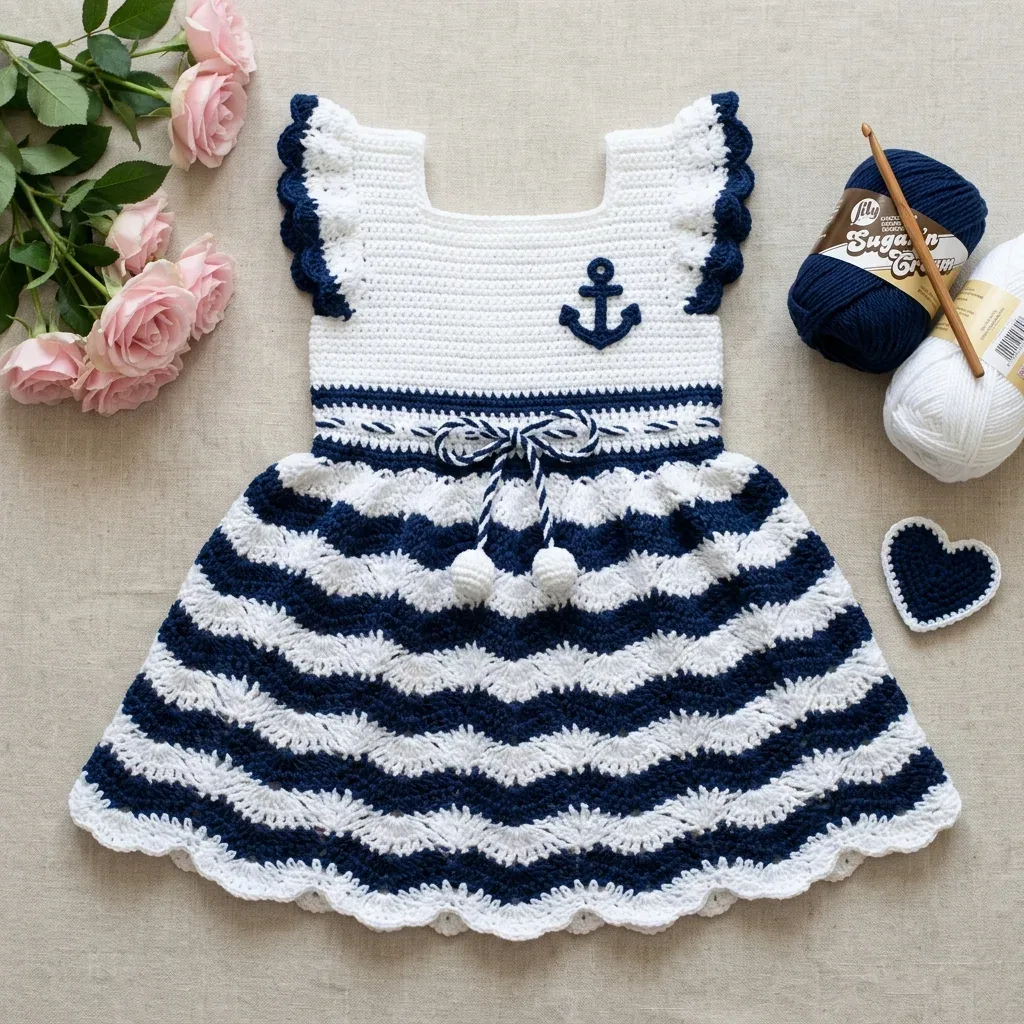
Nautical stripe baby dress crochet pattern with picot trim

An intermediate crochet dress for 12-18 months in navy and white cotton, roughly 4-6 hours from bodice to hem.

Jump to the rounds

What this one is

You know that dress you pull out for the one photo everyone will ask to see later, the christening, the first birthday, the visit from grandparents who live too far away. This is that dress. Navy and white always reads dressed-up without trying, and on a 12 to 18 month size it turns a baby into someone with real presence, flutter sleeves and all.

Your hands spend most of the time in plain single crochet rows, building the back and front bodice panels flat before any shaping starts. Then you slow down for the neckline's picot ruffle, the eyelet waistband, and the pom poms at the end. Between the two panels, the edgings, and the skirt, plan on a few sittings rather than one long stretch.

Try it another way

The stripe pattern here is really just a placement choice, so you can swap which panels get Yarn A and which get Yarn B, or make the whole bodice navy and save the white for just the neckline picot trim and pom poms. If you want a different color story altogether, the pattern already calls for a worsted cotton or cotton blend, so any two contrasting shades in Lily Sugar'n Cream, 24/7 Cotton, or Paintbox Yarns Simply DK held double will behave the same way. The eyelet waistband row is built for a ribbon or a crocheted chain drawstring, so thread through whichever cord matches your color scheme, or skip the tie entirely and let the eyelets sit as a decorative row. For the flutter sleeves, working both to match is the written plan, but there is nothing stopping you from making one a touch fuller by adding a round if you want more movement. And since finished chest circumference sits at approximately 20 inches for the 12 to 18 month size, keep an eye on your gauge swatch if you are hoping to size the dress up or down from there, since the whole bodice count of 46 sc depends on holding that 18 sc by 20 rows tension.

There is real satisfaction in a project that teaches you to read your own rows without hand-holding, and this dress does exactly that. You start with straightforward single crochet panels, then the pattern asks you to shape both underarms with sl st and sc2tog decreases on the same rows, so you watch the bodice narrow stitch by stitch under your hook. The neckline's picot ruffle is the reward section, three single crochets and a chained picot repeated around the whole opening, worked in the contrast navy. Add an eyelet waistband row for a drawstring or ribbon later, plus a chevron-stitch skirt and hand-tied pom poms, and you get a piece where every part uses a different skill instead of repeating the last one.
The rounds, in full

Written out, round by round

Intermediate4-6 hours4.0 mmWorsted

Bring to the porch

Everything this one takes, in the order you will reach for it.

Yarn

  • Yarn A (White): Worsted weight cotton or cotton blend, approximately 250 yards (229 meters)
  • Yarn B (Navy): Worsted weight cotton or cotton blend, approximately 200 yards (183 meters)

Recommended Yarn

  • Lily Sugar’n Cream 100% Cotton in White and Indigo works beautifully for this project. Lion Brand 24/7 Cotton or Paintbox Yarns Simply DK held double are excellent alternatives.

Hook

  • US size G-6 / 4.0 mm crochet hook, or size needed to obtain gauge

Notions

  • Tapestry needle for seaming and weaving ends
  • At least 4 stitch markers
  • Scissors
  • Small amount of white cotton yarn for pom poms
  • Straight pins for blocking

Bodice Back Panel

At the end of Row 14, your panel measures approximately 2.75 inches (7 cm) tall.

After Row 22, the bodice back measures approximately 4.5 inches (11.5 cm) tall from the foundation chain.

  1. Round 1(RS): Sc in second ch from hook and in each ch across. Turn. (46 sc)
  2. Round 2Ch 1, sc in each st across. Turn. (46 sc)
  3. Round 3through 14: Repeat Row 2. (46 sc each row)(46)
  4. Round 15(RS): Ch 1, sl st across first 3 sts, ch 1, sc in next 40 sts, leave last 3 sts unworked. Turn. (40 sc)
  5. Round 16Ch 1, sc2tog, sc across to last 2 sts, sc2tog. Turn. (38 sc)
  6. Round 17Ch 1, sc2tog, sc across to last 2 sts, sc2tog. Turn. (36 sc)
  7. Round 18Ch 1, sc in each st across. Turn. (36 sc)
  8. Round 19through 22: Repeat Row 18. (36 sc each row)(36)
  9. Round 23Left Shoulder Ch 1, sc in first 10 sts. Turn. Leave remaining sts on hold. (10 sc)
  10. Round 24Left Shoulder Ch 1, sc in each st across. Turn. (10 sc)
  11. Round 25Left Shoulder Ch 1, sc in each st across. Turn. (10 sc); Fasten off. Leave a long tail for seaming.
  12. Round 23Right Shoulder With RS facing, skip center 16 sts (back neck), rejoin Yarn A to next st; Ch 1, sc in last 10 sts. Turn. (10 sc)
  13. Round 24Right Shoulder Ch 1, sc in each st across. Turn. (10 sc)
  14. Round 25Right Shoulder Ch 1, sc in each st across. Turn. (10 sc); Fasten off. Leave a long tail for seaming.

Bodice Front Panel

  1. Round 1(RS): Sc in second ch from hook and in each ch across. Turn. (46 sc)
  2. Round 2through 14: Ch 1, sc in each st across. Turn. (46 sc each row)(46)
  3. Round 15(RS): Ch 1, sl st across first 3 sts, ch 1, sc in next 40 sts, leave last 3 sts unworked. Turn. (40 sc)
  4. Round 16Ch 1, sc2tog, sc across to last 2 sts, sc2tog. Turn. (38 sc)
  5. Round 17Ch 1, sc2tog, sc across to last 2 sts, sc2tog. Turn. (36 sc)
  6. Round 18Ch 1, sc in each st across. Turn. (36 sc)
  7. Round 19through 20: Repeat Row 18. (36 sc each row)(36)
  8. Round 21(RS): Ch 1, sc in first 12 sts. Turn. (12 sc); Leave remaining sts on hold.
  9. Round 22Left Front Shoulder Ch 1, sc2tog, sc in each st across. Turn. (11 sc)
  10. Round 23Left Front Shoulder Ch 1, sc in each st to last 2 sts, sc2tog. Turn. (10 sc)
  11. Round 24Left Front Shoulder Ch 1, sc in each st across. Turn. (10 sc)
  12. Round 25Left Front Shoulder Ch 1, sc in each st across. Turn. (10 sc); Fasten off. Leave a long tail for seaming.
  13. Round 21Right Front Shoulder With RS facing, skip center 12 sts (front neck), rejoin Yarn A to next st; Ch 1, sc in last 12 sts. Turn. (12 sc)
  14. Round 22Right Front Shoulder Ch 1, sc in each st to last 2 sts, sc2tog. Turn. (11 sc)
  15. Round 23Right Front Shoulder Ch 1, sc2tog, sc in each st across. Turn. (10 sc)
  16. Round 24Right Front Shoulder Ch 1, sc in each st across. Turn. (10 sc)
  17. Round 25Right Front Shoulder Ch 1, sc in each st across. Turn. (10 sc); Fasten off. Leave a long tail for seaming.

Neckline Edging

Join Yarn B at any point along the neckline opening with RS facing.

  1. Round 1Ch 1, work 1 sc evenly in each st and row end around the entire neckline edge. Sl st to first sc to join. (approximately 48 sc)
  2. Round 2Ch 1, work picot ruffle edging around: work 3 sc in next st, ch 3, sl st in first ch made (picot). Repeat from beginning around, sl st to first sc. Fasten off Yarn B.

Flutter Sleeve Edging

Make 2

Join Yarn A at the underarm point of one armhole with RS facing.

Repeat for the second armhole.

  1. Round 1Ch 1, work 1 sc in each available st and row end evenly around the armhole opening. Sl st to first sc to join. (approximately 32 sc)
  2. Round 2Join Yarn B. Ch 1, work picot ruffle edging around: work 3 sc in next st, ch 3, sl st in first ch made. Repeat from beginning around. Sl st to join. Fasten off Yarn B.

Waistband Eyelet Row

With RS facing, join Yarn B at the right side seam of the bodice, at the bottom edge.

  1. Round 1Navy Ch 1, sc in each st around, working sc2tog once at each side seam point. Sl st to join. (90 sc)
  2. Round 2Eyelet row, Yarn B Ch 3 (counts as dc), dc in next st, (ch 1, sk 1 st, dc in next 2 sts) 29 times, ch 1, sk 1 st, sl st to top of ch-3. (60 dc + 30 ch-1 sp = 90 sts)
  3. Round 3Yarn B Ch 1, sc in each dc and each ch-sp around. Sl st to join. (90 sc)

Skirt

Place increases at approximately sts 8, 23, 38, 53, 68, and 83.

The skirt uses 8 repeats of the 12-stitch chevron pattern.

Chevron Ripple Stitch (one 12-stitch repeat): dc in next 3 sts; 3 dc in next st (peak, adds 2 sts); dc in next 3 sts; dc3tog over next 3 sts (valley, removes 2 sts); dc in next 2 sts. The increases at the peaks and decreases at the valleys cancel each other out, keeping stitch count stable.

Scallop Edging: Skip 2 sts, work 5 dc in next st, skip 2 sts, sl st in next st. Repeat around.

Source text is incomplete beyond this point; the remainder of the Skirt Chevron Section instructions were not available.

  1. Round 4Yarn B Ch 1, sc around, working 1 inc (2 sc in 1 st) evenly 6 times around (approximately every 15 sts). Sl st to join. (96 sc)

Putting it together

Step 1

Pin the front and back bodice panels together with right sides facing.

Step 2

Using the tapestry needle and the long yarn tails, seam the left shoulder and right shoulder using whipstitch or mattress stitch through the 10 matching shoulder stitches on each side.

Step 3

Seam the side seams from underarm down to the bottom edge of the bodice (Row 1) using mattress stitch, matching rows evenly. Leave armhole openings and neckline open.

Step 4

Checkpoint: After seaming, your bodice should measure approximately 6 inches (15 cm) from shoulder to lower edge, and approximately 10 inches (25.5 cm) in circumference at the lower edge.

Marlene's notes

Note 01

Work the whole piece on a US G-6 / 4.0 mm hook, or size down slightly if your gauge swatch runs loose, since the fitted bodice relies on the stated stitch count.

Note 02

Keep your stitch markers on hand for the shoulder and side seam matching, especially the 10 matching shoulder stitches referenced in assembly, so seaming goes quickly.

Note 03

Cotton has little give, so keep your tension even and slightly relaxed through the sc2tog decrease rows on the bodice, rather than pulling tight, to avoid a stiff, puckered underarm.

Note 04

Skill Level: Intermediate.

Note 05

Finished Measurements - Size: 12 to 18 months; Chest circumference: approximately 20 inches (51 cm); Total dress length from shoulder to hem: approximately 16 inches (40.5 cm); Bodice length from shoulder to waist: approximately 6 inches (15 cm); Skirt length from waist to hem: approximately 10 inches (25.5 cm).

Note 06

Gauge: 18 sc x 20 rows = 4 inches (10 cm) in single crochet worked flat with Yarn A; 16 stitches (one full chevron repeat) x 10 rows = 4 inches (10 cm) in chevron ripple pattern worked in the round. Gauge matters for garment fit. Please make a swatch before beginning.

Before you sit down

  • Confirm you have close to 250 yards of Yarn A (white) and 200 yards of Yarn B (navy) in worsted weight cotton before you start the first chain.
  • Swatch in single crochet with Yarn A and check you are getting 18 sc by 20 rows to 4 inches, since the bodice fit depends on this gauge.
  • Set out at least 4 stitch markers so you are ready to flag the shoulder and side seam points on the bodice panels as you shape them.
  • Read through Row 15 of both bodice panels before you begin, since that is where the sl st and sc2tog shaping starts and it helps to know it is coming.

How the hours go

Bodice back and front panels
about 2 to 2.5 hours because together they run 31 rows of single crochet plus the underarm shaping
Neckline and flutter sleeve edgings
about 45 minutes to an hour because the picot ruffle and two sleeve edgings are worked stitch by stitch around curves
Waistband eyelet row and skirt
about 1.5 to 2 hours because the skirt is worked in one long round after the eyelet transition and takes the most yarn

Looking after it

  • Hand wash the finished dress in cool water since it is worked entirely in cotton, then lay it flat on a towel to dry rather than hanging it, so the weight of the wet skirt does not stretch the bodice.
  • Pin the neckline picot edging and skirt hem into shape while damp using straight pins, and once fully dry, fold rather than hang the dress for storage to keep the flutter sleeves from losing their shape.
FAQs

Asked on the glider

the ones that come up on the glider

Can I use a different cotton yarn than the ones listed?

Yes, any worsted weight cotton or cotton blend will work as long as you match the gauge of 18 sc by 20 rows to 4 inches. The pattern names Lily Sugar'n Cream, 24/7 Cotton, and Paintbox Yarns Simply DK held double as tested options.

Why does the bodice have two separate decrease rows at Row 15 and 16?

Row 15 sets aside the outer shoulder stitches with a slip stitch pass before you keep working the center, and Row 16 begins the sc2tog underarm shaping on the remaining stitches. Working them in that order is what shapes the armhole opening cleanly.

How many stitch markers do I actually need?

The materials list calls for at least 4, which is enough to mark both shoulder points and both side seam matching points on the bodice panels. Extra markers are handy if you also want to flag the eyelet row placement on the waistband.

What if my finished bodice does not match the stated measurements?

Check your swatch tension first, since the whole fit is built from that 18 sc by 20 rows to 4 inches gauge in single crochet. If your panel came out taller or shorter than the approximately 2.75 inches noted after Row 14, adjust your hook size and re-swatch before continuing.

Do I need to change colors mid-round anywhere besides the neckline?

The neckline edging is the clearest color change point, where you join Yarn B at any point along the opening with the right side facing. Beyond that, follow the panel and edging instructions in order and the color joins will fall at natural round or row breaks.

Is this a good first fitted-garment project?

It suits someone who already feels comfortable with basic single crochet and simple decreases, since the underarm shaping and picot ruffle both ask for a bit of confidence reading rows. If you have made a few flat panels before but never shaped an armhole, this is a reasonable next step up.