Intermediate 4-6 hours Worsted yarn

Worked on the glider, counted out loud —

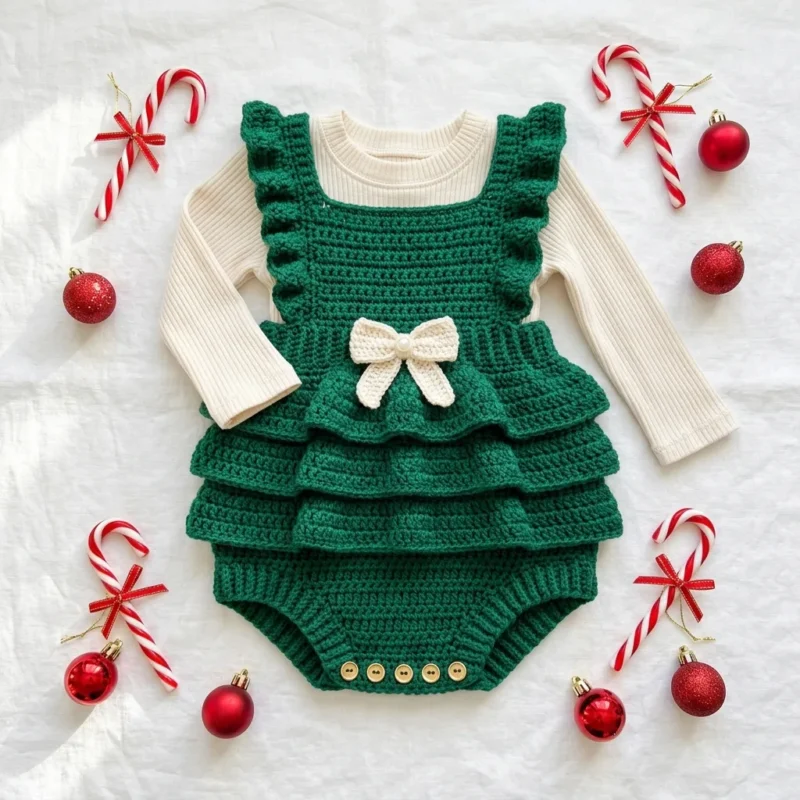
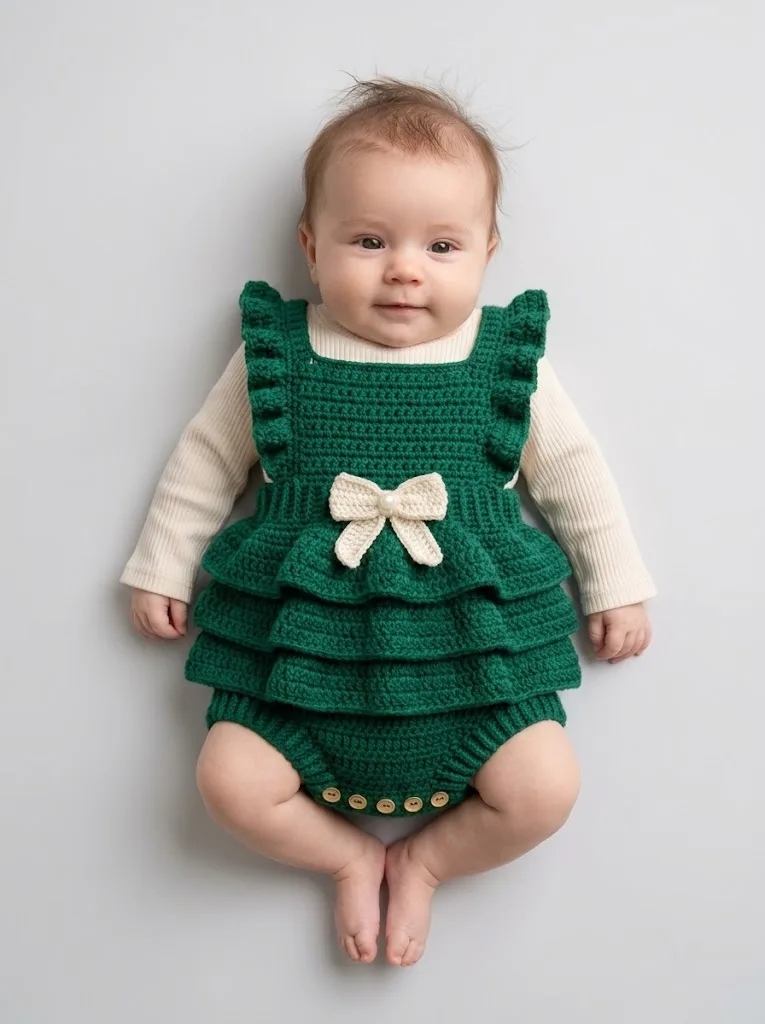
Emerald ruffle baby romper with bow and buttons

An intermediate romper for 6-12 months with ruffle straps and a tiered skirt. Plan for several evenings of hooking.

Jump to the rounds

What this one is

You know the kind of evening I mean: the baby's finally down, the house has gone quiet, and you want your hands on something that feels like a gift in progress. This romper is for that stretch of time, and for the baby who'll wear it to be passed around and admired. It's sized for 6 to 12 months, with a cream bow at the center that makes it feel finished rather than merely functional.

Your hands will spend most of their time on hdc rows across the two bodice panels, then shift to rounds of increasing for the ruffle straps and the tiered skirt, where the stitch count climbs fast and the fabric starts to flare. Between the bodice, waistband, diaper cover, straps, and bow, you're looking at several focused sittings rather than one long one. A gauge swatch first will save you from a romper that fits like a rumor.

Try it another way

If you need a different size, adjust your starting chain by multiples of 2 and recheck gauge before you commit, since this one is written specifically for 18 inches of chest circumference and a 14-inch shoulder-to-crotch length. You could swap the emerald for a soft cream body and keep the bow in a contrasting color instead, which would flip the whole balance of the piece. The 4 buttons down the front ribbing don't have to be cream or wood: a set of brass or painted buttons in a matching green would read dressier, while mismatched vintage buttons would lean more homespun. If the ruffle straps feel like too much frill for your taste, you could work fewer increase rounds there, though that will change the final stitch count and the fit at the armhole, so test it on a swatch first. For a layette gift, this romper also works well made up entirely in the cream shade with just the bow and buttons in emerald, swapping which yarn plays the lead.

There's real satisfaction in the contrast this pattern builds in: the bodice panels are calm, steady hdc rows, then the ruffle straps take off with aggressive increasing, doubling stitches round by round until the armhole edge frills up on its own. The tiered ruffle skirt echoes that same trick lower down, so you get two moments where the fabric seems to grow itself. Shaping the armholes by leaving stitches unworked, then picking the second shoulder back up past a neckline gap, is the kind of small construction puzzle that makes a flat piece of hdc start to look like an actual garment. Finishing with four buttons and a cream bow turns a simple worsted-weight piece into something with real presence.

The rounds, in full

Written out, round by round

Intermediate4-6 hours5.0 mmWorsted

Bring to the porch

Everything this one takes, in the order you will reach for it.

Yarn

  • 200g worsted weight yarn in emerald green (approximately 400 yards)
  • 25g worsted weight yarn in cream or off-white (approximately 50 yards for the bow)

Hook

  • 5.0mm (H/8) crochet hook for main body
  • 4.5mm (G/6) crochet hook for ribbing sections

Notions

  • 4 wooden or cream buttons, 12mm diameter
  • Yarn needle for weaving ends
  • Stitch markers
  • Measuring tape
  • Scissors

Gauge

  • 14 stitches and 16 rows = 4 inches in half double crochet with 5.0mm hook

Bodice Front Panel

Front panel should measure approximately 9 inches wide and 4.5 inches tall after Row 18.

Fasten off first shoulder strap section.

Join yarn to the opposite side of Row 24, leaving center 9 stitches unworked for neckline, to begin the second shoulder.

Fasten off.

  1. Round 1Ch 33. Hdc in 3rd ch from hook and in each ch across. Turn. (31 sts)
  2. Round 2Ch 2 (does not count as stitch here and throughout), hdc in each st across. Turn. (31 sts)
  3. Round 3through 18: Repeat Row 2. (31 sts each row)(31)
  4. Round 19Shape armholes Ch 2, sk first 3 sts, hdc in next 25 sts, leave last 3 sts unworked. Turn. (25 sts)
  5. Round 20Ch 2, hdc in each st across. Turn. (25 sts)
  6. Round 21through 24: Repeat Row 20. (25 sts)
  7. Round 25Shape neckline, first shoulder Ch 2, hdc in first 8 sts. Turn. Leave remaining stitches unworked for now. (8 sts)
  8. Round 26First shoulder Ch 2, sk first st, hdc in remaining 7 sts. Turn. (7 sts)
  9. Round 27First shoulder Ch 2, hdc in first 6 sts, sk last st. Turn. (6 sts)
  10. Round 28and 29 (First shoulder): Ch 2, hdc in each st across. (6 sts)
  11. Round 25Second shoulder Ch 2, hdc in last 8 sts. Turn. (8 sts)
  12. Round 26Second shoulder Ch 2, hdc in first 7 sts, sk last st. Turn. (7 sts)
  13. Round 27Second shoulder Ch 2, sk first st, hdc in remaining 6 sts. Turn. (6 sts)
  14. Round 28and 29 (Second shoulder): Ch 2, hdc in each st across. (6 sts)

Ruffle Straps

Make 2

Worked along the armhole edge with RS facing.

This aggressive increasing creates the ruffly, frilly edge of the design.

Fasten off. Repeat for second armhole.

  1. Round 1Join emerald yarn at underarm seam. Ch 1, sc evenly around entire armhole opening, placing approximately 36 sc total. Sl st to first sc to join. (36 sts)
  2. Round 2Ch 3 (counts as dc), dc in same st, 2 dc in each st around. Sl st to top of ch-3. (72 sts)
  3. Round 3Ch 3, dc in same st, 2 dc in each st around. Sl st to join. (144 sts)

Ribbed Waistband

Switch to 4.5mm hook for this section, which creates a slightly tighter, stretchier ribbing. The waistband is worked separately and attached.

Your ribbed strip should stretch comfortably around the bodice bottom edge.

  1. Round 1Ch 8. Sc in 2nd ch from hook and in each ch across. Turn. (7 sts)
  2. Round 2Ch 1, sc in BLO of each st across. Turn. (7 sts)
  3. Round 3through 60: Repeat Row 2. (7 sts)

Tiered Ruffle Skirt

Working from the bottom of the waistband, with RS facing, join yarn to waistband bottom edge to begin Tier 1.

Fasten off Tier 1.

Tier 2: Count up 3 rounds from bottom of Tier 1. Join yarn to any stitch in Round 6.

Fasten off Tier 2.

Tier 3: Join yarn directly to the waistband bottom edge at any point.

Fasten off.

The three tiers should cascade beautifully, overlapping each other.

  1. Round 1(Tier 1, bottom): Ch 1, sc evenly around waistband bottom, placing 60 sc total. Sl st to join. (60 sts)
  2. Round 2(Tier 1): Ch 2, hdc in each st around. Sl st to join. (60 sts)
  3. Round 3through 8 (Tier 1): Repeat Round 2. (60 sts)
  4. Round 9(Tier 1, ruffle edge): Ch 3, dc in same st, 2 dc in each st around. Sl st to join. (120 sts)
  5. Round 10(Tier 1): Ch 3, dc in each st around. Sl st to join. (120 sts)
  6. Round 1(Tier 2, middle): Ch 1, working in front loops only, sc in each st around. Sl st to join. (60 sts)
  7. Round 2through 5 (Tier 2): Ch 2, hdc in each st around. Sl st to join. (60 sts)
  8. Round 6(Tier 2, ruffle edge): Ch 3, dc in same st, 2 dc in each st around. Sl st to join. (120 sts)
  9. Round 7(Tier 2): Ch 3, dc in each st around. Sl st to join. (120 sts)
  10. Round 1(Tier 3, top, attached to waistband): Ch 1, sc in each waistband st around. Sl st to join. (60 sts)
  11. Round 2through 4 (Tier 3): Ch 2, hdc in each st around. Sl st to join. (60 sts)
  12. Round 5(Tier 3, ruffle edge): Ch 3, dc in same st, 2 dc in each st around. Sl st to join. (120 sts)
  13. Round 6(Tier 3): Ch 3, dc in each st around. Sl st to join. (120 sts)

Diaper Cover Bottom

This is worked from the front of the skirt, across the bottom opening.

Do not fasten off before starting the bottom ribbing.

Switch to 4.5mm hook for the bottom ribbing.

Continue attaching ribbing across entire bottom edge of diaper cover, then continue around the back opening, connecting to the back of the skirt bottom tier.

  1. Round 1With WS of skirt facing, join yarn at center front of bottom tier. Ch 1, sc across 30 sts of the front. Turn. (30 sts)
  2. Round 2Ch 2, hdc in each st across. Turn. (30 sts)
  3. Round 3through 12: Repeat Row 2. (30 sts)
  4. Round 13Crotch shaping Ch 2, sk first st, hdc in next 28 sts, sk last st. Turn. (28 sts)
  5. Round 14Ch 2, sk first st, hdc in next 26 sts, sk last st. Turn. (26 sts)
  6. Round 15through 18: Repeat Row 14 decrease pattern. (18 sts after Row 18)
  7. Round 19through 24: Ch 2, hdc in each st across. Turn. (18 sts)
  8. Round 1Bottom ribbing Ch 7. Sc in 2nd ch from hook and in each ch across. Sl st to first st of diaper cover edge. Turn. (6 sts in ribbing)(6)
  9. Round 2Bottom ribbing Sk the sl st, sc in BLO of each ribbing st. Turn. (6 sts)
  10. Round 3Bottom ribbing Ch 1, sc in BLO of each st. Sl st to next st of diaper cover edge. Turn. (6 sts)

Cream Bow

Using cream yarn and 5.0mm hook.

Bow center: Fasten off. This creates a small rectangle.

  1. Round 1Bow center Ch 6. Hdc in 3rd ch from hook and in each ch across. Turn. (4 sts)
  2. Round 2through 6 (Bow center): Ch 2, hdc in each st across. Turn. (4 sts)
  3. Round 1Bow loops Ch 16. Hdc in 3rd ch from hook and in each ch across. Turn. (14 sts)
  4. Round 2through 8 (Bow loops)

Bodice Back Panel

Work exactly as Front Panel through Row 24.

For the back, skip the deep neckline shaping. The back sits higher.

Fasten off first shoulder.

Skip center 9 stitches, then join yarn to work second shoulder.

Fasten off.

  1. Round 25First shoulder Ch 2, hdc in first 8 sts. Turn. (8 sts)
  2. Round 26through 29 (First shoulder): Ch 2, hdc in each st across. (8 sts)
  3. Round 25Second shoulder Ch 2, hdc in last 8 sts. Turn. (8 sts)
  4. Round 26through 29 (Second shoulder): Ch 2, hdc in each st across. (8 sts)
Putting it together

Step 1

Place front and back panels with right sides together. Whip stitch or slip stitch shoulder seams closed.

Step 2

Whip stitch side seams from bottom of armhole down to bottom edge.

Step 3

Sew short ends of the ribbed waistband together to form a loop, then whip stitch the waistband to the bottom of the bodice, easing fullness evenly. The ribbing sits at baby's natural waist.

Step 4

Along the front bottom ribbing, mark placement for 4 buttons, evenly spaced. Sew buttons securely using yarn needle and matching thread or yarn.

Step 5

On the back panel of the diaper cover, create button loops: at each corresponding position, ch 4, sl st to same stitch to create a loop. These loops should fit snugly over your buttons.

Marlene's notes

Note 01

The ruffle straps increase hard and fast, from 36 to 72 to 144 stitches over three rounds, so work those loosely or your armhole edge will cup instead of lying flat.

Note 02

Place a marker at the start of each round on the Tiered Ruffle Skirt and Diaper Cover Bottom, since both run long enough that losing your round start is an easy way to lose your place.

Note 03

Skill level: intermediate crocheters comfortable with basic stitches in rows and garment construction.

Note 04

This pattern is written for 6 to 12 month size.

Note 05

Finished measurements: Chest circumference 18 inches; Length from shoulder to crotch 14 inches; Waist 17 inches with stretch.

Note 06

smaller or larger sizes, adjust your starting chain count by multiples of 2.

Note 07

Gauge: 14 stitches and 16 rows = 4 inches in half double crochet with 5.0mm hook. Please check your gauge for proper baby garment fit.

Porch photos

Before you sit down

  • Check that you have the full 400 yards of emerald green on hand, since the bodice, skirt, and diaper cover all draw from that same ball.
  • Swatch in hdc with your 5.0mm hook and confirm you're hitting 14 stitches and 16 rows over 4 inches before committing to the foundation chain.
  • Set a stitch marker at the center 9 stitches you'll leave unworked for the neckline, so you don't have to recount Row 24 under lamp light.
  • Read through the armhole shaping in Row 19 once before you get there, since skipping 3 stitches and leaving 3 unworked at the ends changes your rhythm mid-row.

How the hours go

Bodice front and back panels
about 90 minutes, because the front runs 14 rounds with armhole and neckline shaping that asks you to slow down and count
Ruffle straps and ribbed waistband
about 45 minutes, because the straps are short at 3 rounds each but the rapid increasing needs attention to stay even
Tiered skirt, diaper cover, and bow
about 2 to 3 hours, because the skirt alone runs 13 rounds and the diaper cover another 10 before the bow and button assembly

Looking after it

  • Hand wash the finished romper in cool water with a gentle wool or baby-safe detergent, since worsted weight yarn holds its shape best without the agitation of a machine cycle.
  • Lay it flat to dry on a towel, easing the ruffle straps and tiered skirt back into shape with your fingers while damp, then store folded rather than hung so the shoulders don't stretch.
FAQs

Asked on the glider

the ones that come up on the glider

What size does this romper fit?

It's written for 6 to 12 months, with a finished chest circumference of 18 inches and a shoulder-to-crotch length of 14 inches. The waist measures 17 inches with stretch, so there's some give built in.

Can I make this bigger or smaller?

Yes, adjust your starting chain count by multiples of 2 for other sizes. Just recheck your gauge swatch first, since the fit depends on hitting 14 stitches and 16 rows per 4 inches in hdc.

Why does the pattern use two different hook sizes?

The 5.0mm hook works the main body so the fabric has enough drape for a garment, while the smaller 4.5mm hook tightens up the ribbed waistband sections. That size difference is what makes the waistband sit snugger at baby's natural waist.

Why do the ruffle straps increase so quickly?

Each round doubles the previous stitch count, going from 36 up to 72 and then 144, which is exactly what pushes the fabric into that frilly, gathered edge. It's an aggressive increase on purpose, not a typo.

How do the front and back panels differ?

The front panel runs 14 rounds and includes armhole shaping plus a deep neckline gap, leaving the center 9 stitches unworked. The back panel is worked the same way through the shared rows but skips that deep neckline shaping, since the back sits higher.

What yarn weight and amount do I need?

You'll need about 400 yards of worsted weight yarn in emerald green for the body, plus about 50 yards of cream or off-white for the bow. Pair that with a 5.0mm hook for the main pieces and a 4.5mm hook for the ribbing.