Intermediate 1-2 Hours Worsted yarn

Worked on the glider, counted out loud —

Modern Crochet AirPods Cover Pattern for Everyday Use

Crochet a modern AirPods cover with this granny-square-inspired pattern using magic rings, double crochets, and a two-tone color change technique.

Jump to the rounds

Before you sit down

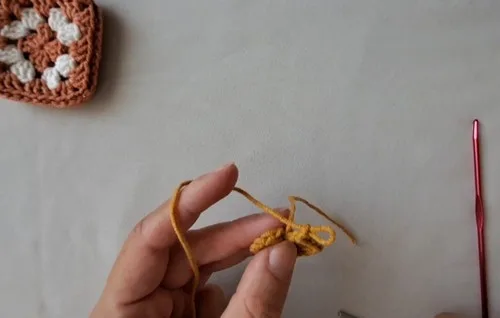
Start with a magic ring and work your first cluster of double crochets to form the center of the square.

Build out four corner groups separated by chain-2 spaces, creating the classic granny-square silhouette in your main color.

Join the round with a slip stitch, chain one, then cut yarn and fasten off to finish the first color section neatly.

Attach a fresh strand of white yarn into any corner chain-2 space to begin your contrasting border round.

Work new double crochet clusters into that same corner space, continuing the pattern around all four corners.

Repeat the corner-and-chain sequence for the remaining rounds to build up the finished size of the square.

Weave in all yarn ends securely so the piece looks clean on both the front and back.

Fold and seam the edges together, leaving one side open, to transform your flat square into a usable cover.

What this one is

This modern crochet AirPods cover takes the classic granny square concept and shrinks it down into a functional, pocket-sized accessory that protects your earbuds case in style. Built from a magic ring and worked in rounds of double crochets separated by corner chain-2 spaces, it has that instantly recognizable granny-square texture everyone loves, just miniaturized. It's perfect for crocheters who want a fast, satisfying project that actually gets used every single day, not tucked away on a shelf.

The techniques here are approachable but keep things interesting: a tidy magic ring start, corner chain-2 spaces that build the classic square shape, and a crisp color change from your first shade into white to define the edges. If you've made a granny square before, this will feel familiar, and if you haven't, it's a wonderful low-stakes way to learn the technique on a small scale. Expect to finish in about an hour, making it ideal for a single sitting.

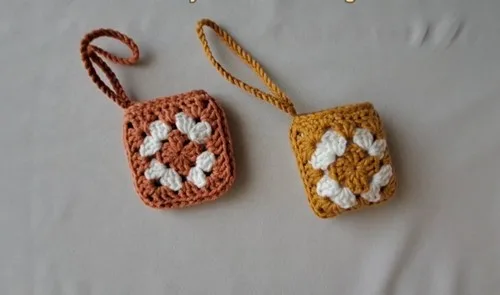
The finished piece is a compact, sturdy square with a scalloped granny-stitch texture and a clean white border framing your main color, whether that's sunny yellow, warm orange, or any combo you love. It feels substantial in the hand thanks to the doubled-up stitch density, and the two-tone look gives it a polished, boutique feel rather than a homemade one. Stitch it into a little pouch and it becomes a genuinely giftable, useful accessory for anyone who's always misplacing their earbuds case.

Variations

The color possibilities here are endless since this pattern is essentially a mini granny square. Try classic yellow-and-white for a sunny look, or swap in orange-and-white for an autumn vibe using something like Vanna's Choice in 'Mustard' and 'White.' For a moodier palette, go with a deep teal main color and cream border using Super Saver, or try dusty rose with white for a softer, feminine finish. You could also skip the color change entirely and work the whole thing in one variegated yarn like Caron Cakes for a painterly, ombre effect without any ends to weave in mid-project. If you want a slightly larger cover to fit an over-ear case or a bulkier AirPods Pro case, add one more repeat round before the border, working an extra round of (3 dc, ch 2) in each corner space to increase the overall size by roughly half an inch per side. Conversely, for a snugger fit on standard AirPods, you could work the border round with half double crochets instead of double crochets to create a tighter, more compact edge. Seasonal riffs are fun too: try white and pastel blue for a wintry feel, or green and white for a fresh spring look. For yarn substitutions, any worsted weight cotton or cotton-blend, like Lily Sugar'n Cream, will give you a sturdier, more structured cover than acrylic, which is great since this piece needs to hold its shape to protect your earbuds. If you're making these as gifts, consider working the main color rounds in each recipient's favorite color and keeping the white border consistent for a coordinated set that still feels personalized.

I love this pattern because it takes something I already adore, the classic granny square, and turns it into something genuinely useful I reach for constantly. Starting with a magic ring keeps that center perfectly closed with no gap, which always feels like a small win. Working the chain-3 as your first double crochet and building out those three-dc groups separated by chain-2 corner spaces is so satisfying, you can watch the square shape emerge round by round. Then that moment when you attach the white yarn into the corner space and start the border? Instant transformation. It's such a quick, meditative color-change technique that makes the whole piece pop. This is the kind of project I keep in my bag for waiting rooms or car rides because each round is short and clearly defined, so I never lose my place. Plus, since it only takes an hour or so, I can finish one before I even think about starting my next Netflix episode. It's proof that small projects can still teach and reinforce real technique.
Common mistakes

  • The magic ring stays loosePull the tail firmly after completing all stitches into the ring, then give it a second tug once you've worked a stitch or two into the next round to fully cinch it closed.
  • Losing track of which stitchPlace a stitch marker in the top of the chain-3 right after you make it so you always know exactly where to join at the end of the round.
  • Corner chain-2 spaces get workedAlways insert your hook into the actual space created by the chain-2, not into the chain stitches themselves, when working the 3 dc, ch 2 corner groups.
  • The color change from your main colorCut the first color leaving a 4-6 inch tail, then attach white with a slip knot directly into the corner chain-2 space and snug it up before starting your chain-3, weaving both tails in neatly at the end.
  • Joining slip stitch lands in the wrongAlways join into the 3rd chain of your starting chain-3, counting carefully from the base of the chain up, not into a random loop nearby.
  • The piece comes out lopsidedAfter each round, count your four corner groups of 3 dc before moving on, and recount your ch-2 spaces to confirm all four sides match before starting the next round.

The rounds, in full

Written out, round by round

Intermediate1-2 HoursWorsted

Materials

Everything this one takes, in the order you will reach for it.

  • Yarn in two colors (e.g., yellow and white, or orange and white)
  • Crochet hook suitable for your yarn
  • Scissors
  • Yarn needle

keep this to hand

Abbreviations

US crochet terms, as used in this pattern.

  1. chchain
  2. ststitch
  3. sl stslip stitch
  4. scsingle crochet
  5. dcdouble crochet

Main Pattern

  1. Round 1Base Color (Yellow) Create a magic ring. Chain 3 (counts as first double crochet).Work 2 double crochets into the ring.Chain 2.Repeat (3 double crochets, chain 2) three more times into the ring.Join with a slip stitch into the 3rd chain of the starting chain.Chain 1, cut yarn, and fasten off.
  2. Round 2Second Color (White) Attach white yarn into any corner chain-2 space. Chain 3 (counts as first double crochet).Work 2 double crochets into the same corner space.Chain 2.Work 3 double crochets into the same space.In each remaining corner chain-2 space, work: 3 double crochets, chain 2, 3 double crochets.Join with a slip stitch into the 3rd chain of the starting chain.Chain 1, cut yarn, and fasten off.
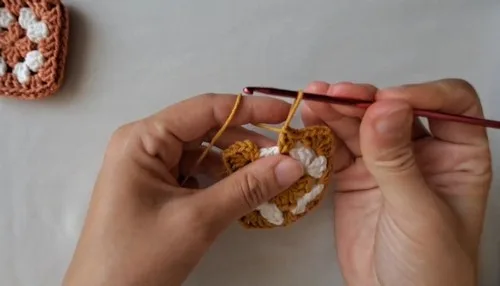
  3. Round 3First Color Again (Yellow) Attach yellow yarn into any corner chain-2 space. Chain 3 (counts as first double crochet).Work 2 double crochets into the same space.Chain 2.Work 3 double crochets into the same space.In each side space (between two 3-double crochet groups), work 3 double crochets.In each corner space, repeat: 3 double crochets, chain 2, 3 double crochets.Join with a slip stitch into the 3rd chain of the starting chain.Chain 1, cut yarn, and fasten off.Assemble the Cover Make Two Squares Repeat the steps above to make a second identical square.Join the Squares Place the two squares together with the right sides facing out.Using a single crochet stitch, join the squares together along three edges .Leave one edge open — this will be the opening of your AirPods cover.

Finishing the Top Edge

  1. Round 5Single Crochet Border Work a round of single crochet stitches evenly around the top opening.

This gives a clean, finished edge.

  1. Round 6Slip Stitch Border Work a round of slip stitches on top of the single crochets around the opening.Attach the StrapUse a slip stitch to attach one end of the strap securely to one of the top corners of the AirPods cover.

This reinforces the edge for durability.

Optional Strap Make the Strap Chain 40 (adjust number of chains based on your desired strap length).

Important notes

Note 01

💡 Use a hook one size smaller than the yarn label recommends to keep your stitches tight and dense, which helps the cover hold its shape and better protect your AirPods case.

Note 02

💡 Keep a stitch marker clipped into the very first stitch of each round so you never accidentally overshoot or undershoot your join, especially in the corner-heavy rounds.

Note 03

💡 When you cut yarn and fasten off after round one, leave enough of a tail (about 5 inches) to weave in securely later rather than trimming it too short.

Note 04

💡 Attach your white yarn into whichever corner chain-2 space is most convenient, there's no wrong corner to start from since the piece is worked in the round.

Note 05

💡 Block your finished square lightly with a warm iron or steam before assembling into a cover, this flattens the granny texture just enough for clean, even seams.

Note 06

💡 If using two colors, weave in ends as you go rather than waiting until the end, it keeps the small piece from becoming tangled or hard to manage.

More photos

FAQs

Asked on the glider

the ones that come up on the glider

What yarn weight works best for this AirPods cover?

A worsted weight (medium, category 4) yarn works beautifully for this pattern since it gives enough structure to protect your earbuds case. Cotton or cotton-blend yarns are especially nice because they hold their shape better than pure acrylic.

Can I make this pattern in just one color instead of two?

Absolutely, you can skip the color change entirely and continue with your original yarn straight through the border round. It will still show the beautiful granny-square texture, just without the contrasting edge.

How do I turn this flat square into an actual case?

Once you've completed the pattern, fold your finished square and single crochet or whip stitch the edges together, leaving one side open as the opening for your AirPods case. A yarn needle makes quick work of seaming the sides neatly.

Will this pattern fit both regular AirPods and AirPods Pro?

The base pattern is sized for a standard AirPods case, but you can easily size up by adding an extra round of corner repeats before the border. This adds roughly half an inch per side, enough to comfortably fit a Pro case.

What's the best way to prevent the color change from looking sloppy?

Always attach your new color directly into a corner chain-2 space and pull it snug before working your first chain-3. Weaving in tails as you finish each color section, rather than leaving it all for the end, keeps everything tidy.