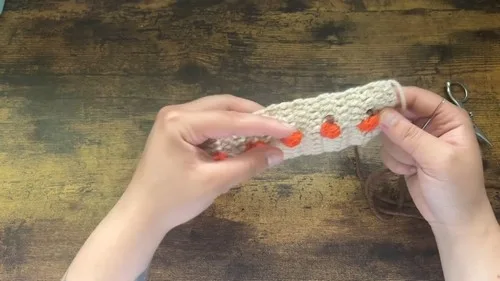
Intermediate 4-6 hours Worsted yarn

Worked on the glider, counted out loud —

Crochet pumpkin strap covers for your Crocs

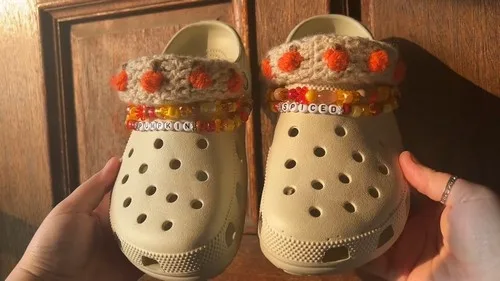
A simple bobble-stitch pumpkin strap cover for Crocs, sized 6-9. About 2-3 hours per pair for an evening project.

Jump to the rounds

What this one is

You know those shoes sitting by the door that could use a little personality? This one's for them. It's a quick strap cover that turns a plain pair of Crocs into something with a bit of charm, the kind of small project you reach for when you want to make something finished in one sitting rather than something that eats up a whole week.

Your hands are mostly doing double crochet here, back and forth across ten stitches, with a little detour into a six-stitch bobble for each pumpkin and a color change mid-stitch to make it happen cleanly. Add the brown stem sewn on after, and you're looking at a couple of hours per strap, start to finish, including the weaving in.

Try it another way

The base pattern is just ten double crochet stitches across, so it's easy to play with color without touching the stitch count. Try two pumpkins close together instead of spacing them, or swap the orange for a deep red or mustard yarn if you want a less literal pumpkin and more of a general fall accent. The brown stem can go curved instead of straight by angling your needle passes slightly, giving each pumpkin a bit more personality. If you're making a pair for a child's Crocs, the same 2.5mm hook and 10-stitch width should still fit smaller sizes; just check the strap length against the actual shoe before you sew it on. You could also skip the bobble's color change trick and work the whole strap in one color with just the stem added for a quieter, single-color look. For gifting, consider working one strap with a single centered pumpkin and leaving the rest of the yardage as background, which keeps the piece simple without losing the charm. Whatever you change, remember the sewing step goes around the strap itself, not directly into the Crocs material.

There's something genuinely satisfying about that mid-stitch color change on round four, the moment you drop the orange yarn and finish the loop with your background color without a seam showing. It's a small trick, but it teaches your hands something they'll use again. Then there's the bobble itself: six unfinished half-double crochets piled into one stitch before you pull everything through together, which gives you a rounded little pumpkin shape instead of a flat shape. Add a hand-sewn brown stem on top and you've got dimension from just yarn and a hook, no stuffing, no extra notions. It's a project that rewards paying attention for about ten rounds and then hands you a finished, wearable result.
The rounds, in full

Written out, round by round

Intermediate4-6 hours0.5 mmWorsted

Bring to the porch

Everything this one takes, in the order you will reach for it.

  • A pair of Crocs (Pattern works for woman size 6 to size 9. For larger sizes, increase hook size by 0.5mm)
  • Crochet hook size 2.5mm
  • Tapestry needle
  • Scissors

Yarn colors

  • Beige or cream for the background
  • Orange for the pumpkin
  • Brown for the stem

Main Pattern

Use the background (beige/cream) yarn for the main double crochet rows.

  1. Round 1Starting Chain Make a slip knot, then chain 11.
  2. Round 2(Row 1 - Double Crochet Row): Start in the second chain from the hook and make a double crochet; make a total of 10 double crochets in this row; chain one, then turn your work. (10 dc)
  3. Round 3(Row 2): Double crochet across the row starting from the very first stitch to ensure you have 10 double crochets in total; chain one and turn your work. (10 dc)Change to orange yarn mid-stitch on the fourth double crochet of the pumpkin row to begin each pumpkin bobble.Drop the orange yarn after completing the six unfinished half-double crochets and finish the bobble by pulling through all loops with the background color yarn.
  4. Round 4(Row 3 - Adding Color for Pumpkin): Double crochet in the first four stitches; on the fourth double crochet, start the stitch but before finishing it, change to orange yarn to start the pumpkin design; work the Pumpkin Bobble Stitch (six half-double crochet bobble) as follows: yarn over, insert the hook into the same stitch, pull up a loop, and yarn over pulling through two loops, repeat this step five more times into the same stitch so you have six unfinished half-double crochets; drop the orange yarn and pull through all loops on the hook with your background color yarn to finish the bobble; continue with five double crochets in the cream/beige yarn to finish the row.
  5. Round 5Following Row Double crochet across the row for a total of 10 double crochets; chain one and turn your work. (10 dc)
  6. Round 6Following Row Double crochet across the row for a total of 10 double crochets; chain one and turn your work. (10 dc)
  7. Round 7(Repeat Pumpkin Rows): Repeat the pattern of creating the pumpkin bobble stitch (as in Round 4) followed by two rows of 10 double crochets each (as in Rounds 5-6) until you have a total of five pumpkins on the strap.
  8. Round 8Finishing the Strap After your last set of double crochets following the fifth pumpkin, chain one, pull up a loop, and fasten off.

Putting it together

Step 1

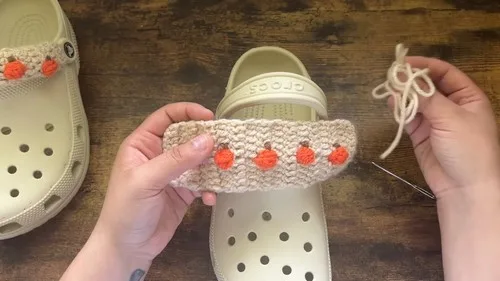
Stem Creation: Using brown yarn, sew a small stem on top of each pumpkin bobble, starting from the back to keep the work tidy, and moving the needle through just the top layers of yarn to form a small stem.

Step 2

End Weaving: Weave in all ends on the backside of your strap to hide them neatly (simply tying knots is sometimes preferred for personal projects, for the sake of efficiency).

Step 3

Sewing onto Crocs: Do not sew the strap directly to the Crocs; instead sew it together around one of the Crocs' bands to secure it, ensuring your pumpkins are right-side-up if you tend to wear your straps flipped forward. Use a matching piece of yarn to sew the strap's ends around the Crocs' existing strap, ensuring a snug fit.

Step 4

Final Touches: Adjust the strap placement and fix any uneven areas by gently tugging the yarn into place. Optionally, add beads or small charms for additional decoration.

Marlene's notes

Note 01

The 2.5mm hook keeps this strap snug and structured; sizing up to compensate for a larger shoe will loosen the fabric slightly, so expect a touch more stretch in those versions.

Note 02

The color change on the pumpkin row happens mid-stitch, not at the start of a new stitch, so keep your tension even on that last yarn-over or the bobble will sit unevenly.

Note 03

Weaving in ends properly on the backside matters more here than usual since the strap sits directly against your foot; loose knots can be felt while walking even if they look fine from outside.

Porch photos

Before you sit down

  • Check you have your three yarn colors sorted and within reach before you start the pumpkin row, since the color change happens mid-stitch and fumbling for yarn then is annoying.
  • Read through Round 4 once before you get there, since the mid-stitch color change and the six-stitch bobble are the trickiest part of the whole pattern.
  • Confirm your Croc size falls in the 6 to 9 range for the standard 2.5mm hook, or plan to size up by 0.5mm if you're working for a larger foot.
  • Work a small practice swatch of the bobble stitch on scrap yarn if you've never dropped and picked up a color mid-stitch before, just so Round 4 doesn't catch you off guard.

How the hours go

Starting chain and first two double crochet rows
about 15-20 minutes because it's straightforward ten-stitch double crochet with no shaping yet
Pumpkin bobble row and following rows
about 45-60 minutes because the mid-stitch color change and six-stitch bobble take a careful hand
Stem embroidery, end weaving, and sewing onto the Crocs
about 30-45 minutes because the brown stem is hand-sewn separately and the strap needs to be secured well before wear

Looking after it

  • Hand wash the finished strap cover in cool water if your yarn is a natural fiber like cotton or wool blend, then lay it flat to dry so the double crochet rows don't stretch out of shape.
  • Store the covers away from direct sun when not in use, since the orange and brown yarns can fade over time, and reshape the bobbles gently with your fingers if they get flattened in storage.
FAQs

Asked on the glider

the ones that come up on the glider

Can I make this for a size 10 or larger Croc?

The pattern as written covers women's size 6 to 9. For anything larger, increase your hook size by 0.5mm as noted in the materials, which will give you a slightly bigger, looser fabric to match.

Do I need stuffing for the pumpkin bobbles?

No, the six-stitch bobble gets its rounded shape just from piling up six unfinished half-double crochets in one spot and pulling through together. There's no stuffing involved anywhere in this pattern.

How do I attach the finished strap without sewing straight into the Croc?

The assembly step has you sew the strap together around one of the existing straps rather than piercing the shoe itself. This keeps the Crocs intact and makes the cover removable if you want to swap it later.

Can I use a different yarn weight than what's listed?

You can, but you'll want to adjust your hook size to match and test your chain of 11 stitches to see if it still gives you a strap width that fits your Crocs. The listed 2.5mm hook is tuned for the yarn weight in the materials list.

How many pumpkins does one strap have?

Each strap has a total of five pumpkin bobbles. The first one is worked on Round 4, then the pattern repeats the bobble stitch followed by two plain rows of 10 double crochets each until all five pumpkins are complete, after which you fasten off.