Intermediate 4-6 hours Worsted yarn

Worked on the glider, counted out loud —

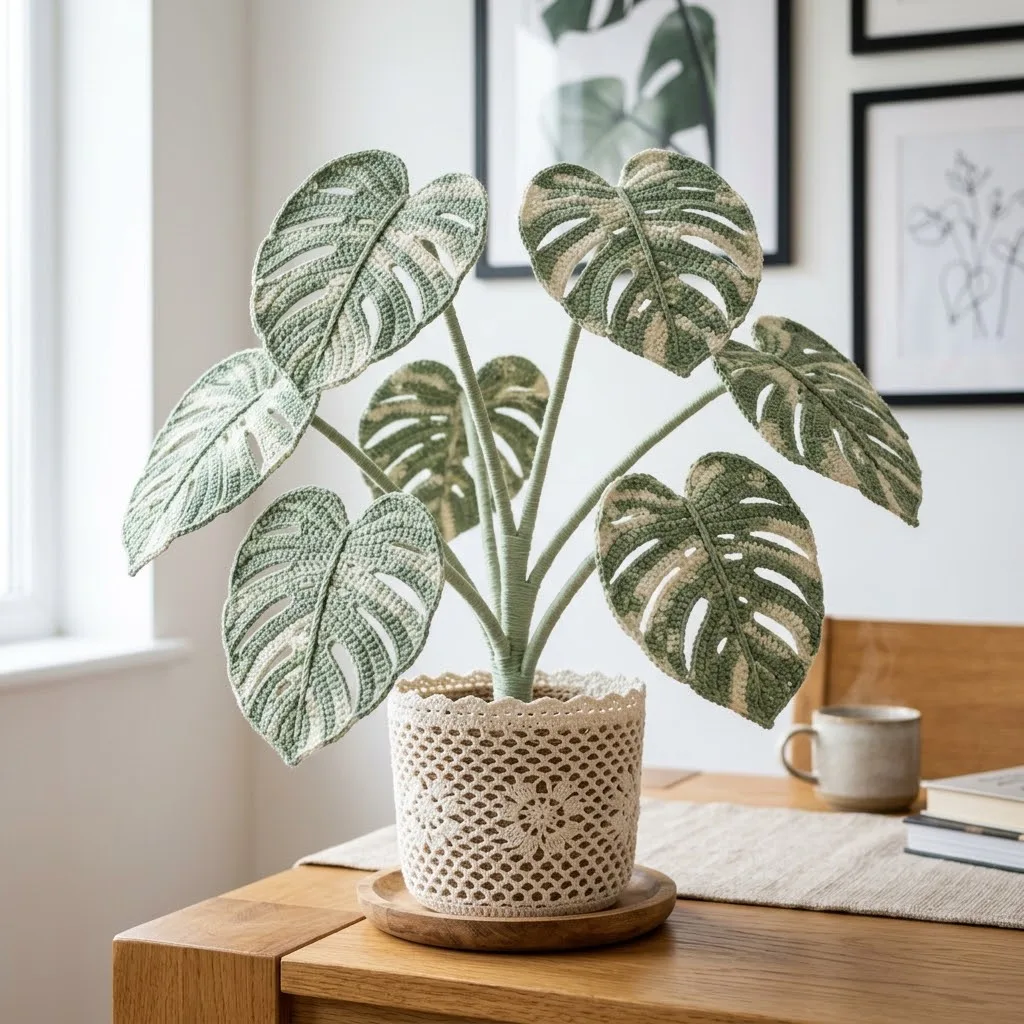
Minimal monstera crochet plant in white and sage

confident crocheters: a wired sage monstera plant, worked in cotton, taking about 4 to 6 hours.

Jump to the rounds

What this one is

This one's for whoever's been eyeing a real monstera and sighing at the thought of watering schedules and finicky light. I made it for the plant lover who wants that split-leaf silhouette on a shelf or windowsill without worrying about brown edges, and for the friend who needs a housewarming gift that won't wilt by Tuesday. It's the kind of project you start on a quiet evening and keep coming back to, a few leaves at a time.

Your hands spend most of their time on two shades of sage plus a cream accent, building leaf shapes that get wired on the inside so they hold a gentle curve instead of flopping. There's shaping at the split edge of each leaf, decreasing down to a single stitch at the tip, and a bit of fiddly work twisting floral wire into stems before you tape and arrange them in a pot. All told, plan on about 4 to 6 hours from first stitch to finished arrangement.

Try it another way

You can scale this a lot of different directions. For a fuller plant, just make more leaves than the pattern calls for and vary their size slightly by stopping the decrease rows a round or two early on some, so you end up with a mix instead of identical twins. Swap the fiber if you like: a cotton blend will give you that crisp, sculptural edge the sample photos show, while acrylic softens the leaves a bit and might suit a nursery or playroom better than a sharp-edged houseplant look. Play with the color placement too — reverse which side gets the sage green and which gets the light sage or mint, or skip the second shade altogether and work the whole leaf in one sage with just the cream for contrast at the center. If you've got the dark green on hand, use it for the leaf veins on every leaf instead of leaving it optional, which pushes the whole piece a little further toward realism. And think about scale of use beyond a single pot — a few extra leaves tucked into a vase with real stems, or one oversized leaf mounted on its own as wall art, both work well with the same Left Side and Right Side shaping.

What's satisfying here is the split-leaf shaping itself — working the Left Side down to 7 stitches, then decreasing at the split edge every row until you're down to a single stitch at Row 23, and mirroring the whole thing on the Right Side starting from the 11th stitch of Row 16. It's the kind of shaping that looks complicated in a photo and makes complete sense once your hook is in your hand. Add in the layered color work, sage against light sage against cream, and the moment you slide floral wire inside each leaf and watch it hold a real curve, and you've got a piece that feels more like sculpture than a stitch count. Cotton yarn especially rewards every one of those edges with crisp definition.
The rounds, in full

Written out, round by round

Intermediate4-6 hours4.0 mmWorsted

Bring to the porch

Everything this one takes, in the order you will reach for it.

Yarn

  • Worsted weight yarn (medium weight, category 4) in sage green, approximately 200 yards
  • Worsted weight yarn in light sage or mint green, approximately 150 yards
  • Worsted weight yarn in cream or off-white, approximately 100 yards
  • Small amount of dark green for leaf veins, optional

Hook

  • 4.0mm (G/6) crochet hook for leaves
  • 3.5mm (E/4) crochet hook for stems, optional for tighter tension

Notions

  • Floral wire, 18 gauge, cut to 8 to 12 inch lengths
  • Green floral tape
  • Yarn needle for weaving ends
  • Scissors
  • Stitch markers
  • Decorative pot or pot cover
  • Floral foam or stuffing for pot base
  • Hot glue gun, optional for assembly

Large Monstera Leaf (Make 3 to 4)

This leaf has the most dramatic fenestrations. You'll make two identical pieces per leaf. Using sage green yarn and 4.0mm hook.

  1. Row 1Ch 4, sc in 2nd ch from hook, sc in next 2 ch, turn. (3 sts)
  2. Row 2Ch 1, 2 sc in first st (inc), sc in next st, 2 sc in last st, turn. (5 sts)
  3. Row 3Ch 1, 2 sc in first st, sc across to last st, 2 sc in last st, turn. (7 sts)
  4. Rows 4–8Rows 4 through 8: Repeat Row 3, increasing at both ends each row. (17 sts after Row 8)(17)
  5. Row 9Ch 1, sc in first 4 sts, ch 3, sk 3 sts (this creates first fenestration), sc in next 3 sts, ch 3, sk 3 sts, sc in last 4 sts, turn. (11 sc, 2 ch-3 spaces)(11)
  6. Row 10Ch 1, sc in first 4 sts, 3 sc in ch-3 space, sc in next 3 sts, 3 sc in ch-3 space, sc in last 4 sts, turn. (17 sts)
  7. Rows 11–14Rows 11 through 14: Ch 1, sc across, turn. (17 sts)
  8. Row 15Ch 1, sc in first 3 sts, ch 4, sk 4 sts, sc in next 3 sts, ch 4, sk 4 sts, sc in last 3 sts, turn. (9 sc, 2 ch-4 spaces)(9)
  9. Row 16Ch 1, sc in first 3 sts, 4 sc in ch-4 space, sc in next 3 sts, 4 sc in ch-4 space, sc in last 3 sts, turn. (17 sts)Creating the Split (Row 17 onward): from here the leaf divides into a Left Side and a Right Side, each worked separately to form the two lobes.

Left Side

  1. Row 17Ch 1, sc in first 7 sts only, turn. Leave remaining sts unworked. (7 sts)
  2. Row 18Ch 1, sc dec over first 2 sts, sc to end, turn. (6 sts)
  3. Rows 19–22Rows 19 through 22: Continue decreasing at the split edge every row. (2 sts after Row 22)(2)
  4. Row 23Ch 1, sc dec, fasten off. (1 st)

Right Side

With right side facing, rejoin yarn to the 11th stitch of Row 16 (skip 3 center stitches to create the split).

  1. Row 17Ch 1, sc in same st and next 6 sts, turn. (7 sts)
  2. Rows 18–23Rows 18 through 23: Mirror the left side, decreasing at the split edge. Fasten off.

Adding Variegation

Using cream or light sage yarn, surface crochet or embroider accent lines following the natural vein pattern of a monstera leaf. Work from the center stem outward toward each lobe. This creates that gorgeous variegated effect.

Medium Monstera Leaf (Make 2-3)

  1. Medium LeafWork the same as the large leaf but stop increasing at Row 6 (13 sts) and reduce the number of fenestration rows. Create only one ch-3 fenestration on each side.(13)

Small Monstera Leaf (Make 2)

These juvenile leaves have no splits or holes, just like real young monstera leaves.

  1. Row 1Ch 4, sc in 2nd ch from hook, sc across, turn. (3 sts)
  2. Rows 2–6Rows 2 through 6: Inc at both ends each row. (13 sts)
  3. Rows 7–10Rows 7 through 10: Sc across evenly. (13 sts)
  4. Rows 11–15Rows 11 through 15: Dec at both ends each row. (3 sts)
  5. Row 16Ch 1, sc3tog, fasten off. (1 st)

Assembling Each Leaf

Step by step Step by step: Block both leaf pieces gently with steam or wet blocking. Cut floral wire 2 inches longer than your leaf. Wrap wire with floral tape for a cleaner finish. Place wire between both leaf pieces, aligned with the center. Using matching yarn and yarn needle, whip stitch around the entire perimeter, encasing the wire. The wire should extend beyond the leaf base to become part of the stem.

Stem Pattern

Stems give your monstera that realistic upright posture. You'll work these in continuous rounds around floral wire. Using sage green yarn and 3.5mm hook.

  1. Round 1Make a magic ring, 6 sc in ring. Do not join. (6 sts)
  2. Round 2 onwardSc in each st around continuously.Work until the stem reaches your desired length, typically 4 to 8 inches depending on the leaf size. Larger leaves look best on longer stems.

To close the stem

Step by step Step by step: Insert floral wire through the tube. Attach the wire extending from your leaf. Wrap the connection point with floral tape. Continue crocheting around the joined wires if needed for a smooth transition.

Alternatively, you can skip crocheted stems and simply wrap yarn tightly around wire-taped stems. Both methods work beautifully.

Main Stem and Base

Create a thicker central stem by crocheting a larger tube (start with 8 to 10 sc in your magic ring) or by bundling several wire stems together and wrapping them as one.

Final Assembly

Step by step Step by step: Arrange your leaves from tallest in back to shortest in front. Bundle all stems together at the base. Secure with floral tape, wrapping tightly. Trim stems to even length at the bottom. Insert the bundled stems into floral foam inside your pot. Use hot glue to secure if needed. Gently bend and pose each leaf for the most natural arrangement.

Marlene's notes

Note 01

Keep both hooks on hand — the 4.0mm (G/6) for the leaves and the 3.5mm (E/4) for stems if you want a tighter, less floppy stem.

Note 02

Use a stitch marker at the split point on Row 16 so the 11th stitch is easy to find again if you set the piece down partway through.

Note 03

The dark green for leaf veins is optional, so don't feel obliged to buy a fourth color if your sage and cream already read as monstera enough to you.

Note 04

Intermediate. You should be comfortable with basic stitches, increasing and decreasing, and working in continuous rounds for the stems. The leaf shaping requires following the pattern carefully, but nothing here is technically difficult.

Note 05

Complete plant height: Approximately 14 to 16 inches tall. Large leaf span: Approximately 6 to 7 inches wide. Medium leaf span: Approximately 4 to 5 inches wide. Small leaf span: Approximately 3 inches wide.

Note 06

Gauge isn't critical for this decorative project, but aim for approximately 16 sc and 18 rows = 4 inches in single crochet. If your leaves seem too floppy, try going down a hook size.

Before you sit down

  • Check that you've got your three yarns sorted by role before you start — about 200 yards of sage green, 150 yards of light sage or mint, and 100 yards of cream, so you're not hunting for a fourth skein halfway through a leaf.
  • Set a stitch marker in the 11th stitch of Row 16 before you rejoin yarn for the Right Side, so you don't lose count of the 3 center stitches you're skipping to create the split.
  • Swatch a few rows in your chosen yarn first — cotton gives the crisp, sculptural edge shown in the photos, while acrylic will look a little softer, and it's worth knowing which effect you're getting before you commit to a whole leaf.
  • Read through the Left Side and Right Side instructions together before your first stitch, since the Right Side mirrors the Left Side's decreases and it helps to see both sides of the split laid out side by side.
  • Leaves are worked flat in rows, then shaped with a wire spine: each leaf needs two identical pieces that get joined together with a wire sandwiched between them. Stems are crocheted tubes worked around floral wire, so you'll be moving between flat and tube crochet on this project.
  • Work loosely enough that your fabric drapes naturally but tightly enough to maintain shape, since the splits and holes in each leaf are created by skipping stitches and working separate sections, not by a looser gauge.

How the hours go

Left Side
about 45 minutes, because the split-edge decreases from Row 17 through Row 23 need close attention so the shaping stays even
Right Side
about 45 minutes, because mirroring the Left Side's decreases from the 11th stitch of Row 16 takes the same careful counting in reverse
Wiring, stems, and assembly
about 1 to 2 hours, because cutting floral wire to length, taping stems, and arranging the finished leaves in a pot is fiddly, unhurried work

Looking after it

  • If you worked this in cotton or a cotton blend, hand wash gently in cool water if it ever needs freshening, then reshape each leaf while damp and let it air dry flat so the wire inside keeps its curve.
  • Store the finished plant somewhere it won't get crushed, since the floral wire holds its shape nicely but can bend out of true if something heavy sits on the leaves — a light dusting now and then is all the upkeep it really needs.
FAQs

Asked on the glider

the ones that come up on the glider

Can I use acrylic yarn instead of cotton?

Yes, acrylic works fine and the materials list even calls it out as an option. The leaves will come out a touch softer and less sculptural than the cotton version in the photos, but the wire still gives them plenty of structure.

Do I really need floral wire, or can I skip it?

The wire is what lets the leaves hold their monstera-like curve and stand up on their own, so I'd recommend keeping it in. Without it the leaves will lie flat, which changes the whole look of the piece.

What's the dark green yarn actually for?

It's listed as optional and it's meant for stitching in the leaf veins once a leaf is finished. Skip it if you'd rather keep things simple with just the two sage shades and cream.

Why does the Right Side start at the 11th stitch of Row 16 instead of continuing straight across?

That's where you skip 3 center stitches to create the split between the Left Side and Right Side, which is what gives the leaf its separated, lobed shape. Rejoining yarn there after working the Left Side keeps the two halves mirrored.

Which hook do I use where?

The 4.0mm (G/6) hook is for the leaves themselves, and the 3.5mm (E/4) hook is there if you want a tighter, firmer stem. If you're happy with a slightly looser stem, you can use the 4.0mm throughout.

How many leaves should I make for one pot?

That's really up to you and the size of pot or pot cover you're using, so there's no fixed number in the pattern. I'd suggest starting with a handful and adding more leaves until the arrangement looks full enough to you.