Beginner 3-4 hours Worsted yarn

Worked on the glider, counted out loud —

Crochet Sunflower Pattern With Picot Petals and Stuffed Center

A cheerful crocheted sunflower for beginners and beyond, with picot petals and a stuffed center. About 3-4 hours.

Jump to the rounds

What this one is

I think of this one as a quiet evening project, the kind you pick up when you want something cheerful to show for your hour on the couch. It's for the beginner who's ready to try a picot stitch for the first time, and just as much for the experienced hand who wants a fast, satisfying make. Whether it ends up on a windowsill or wrapped up for someone else, it carries that handmade warmth that a bought decoration never quite manages.

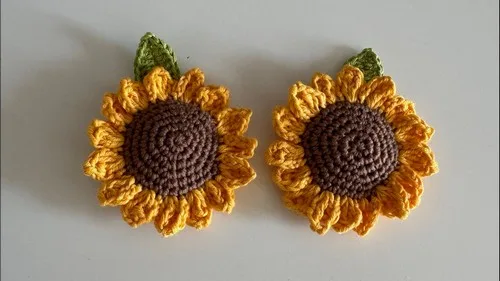
Your hands spend most of the time on the center, working two colors of yarn into matching circles that get stitched back-to-back before a single petal goes on. Then it's petals worked directly into that joined edge, each one a little arch of stitches finished with a picot point, all thirty of them going around before you tuck in stuffing and close the last few. Start to finish, counting the optional leaf, you're looking at a few focused hours rather than a whole weekend.

Try it another way

The easiest change is color: swap the saffron and yellow for any two shades you like and you've got a completely different flower using the same structure, no stitch counts changed. You could also work the center circles in a single matching color instead of brown and green if you want a more solid look rather than the two-tone back-to-back effect. Since the increases run 6, 12, 18, and 24 stitches through the first four rounds, you can genuinely feel the size building as you go, which makes it easy to judge whether you want to stop the center a round earlier for a smaller flower, since the last three rounds add more circumference before the petals ever start. The petal round itself is fixed at thirty stitches around, so if you want a fuller-looking bloom, try a slightly thicker yarn on the same 2.5 mm hook rather than adding petals. The optional leaf is worth making in multiples, two or three tucked behind the same flower reads very differently from just one. And because the finished piece is stuffed rather than flat, it works equally well pinned to a bag, sewn onto a headband, or left as a stand-alone decoration on a shelf.

There's real satisfaction in the construction here, not just the finished flower. You build two separate circles in different colors, watch them grow round by round, then join them back-to-back with a simple SC seam that turns two flat pieces into one dimensional center in a single move. From there the petals aren't just single or double crochet repeated blindly; each one is a tiny worked shape (DC, TR, picot, TR, DC) that asks you to actually watch your stitch placement, and thirty of them in a row builds real rhythm. Stuffing the center just before closing gives the whole piece a bit of weight and shape rather than leaving it flat, so what you end up holding feels finished and dimensional, not paper-thin.
The rounds, in full

Written out, round by round

Beginner3-4 hours2.5 mmWorsted

Bring to the porch

Everything this one takes, in the order you will reach for it.

  • Saffron yarn
  • Brown and green yarn for center pieces
  • Yellow yarn for petals
  • 2.5 mm crochet hook
  • Stuffing
  • Needle and scissors

The Center (Brown Front and Green Back)

Make a magic circle

  1. Round 16 SC into the ring, pull tight, place marker
  2. Round 22 SC in each stitch around (12)
  3. Round 31 SC, 2 SC in next repeat around (18)
  4. Round 42 SC, 2 SC in next repeat around (24)
  5. Round 53 SC, 2 SC in next repeat around (30)
  6. Round 6SC in each stitch around (30)Slip stitch to finish, cut yarn, weave ends Repeat to make a second circle

The Petals

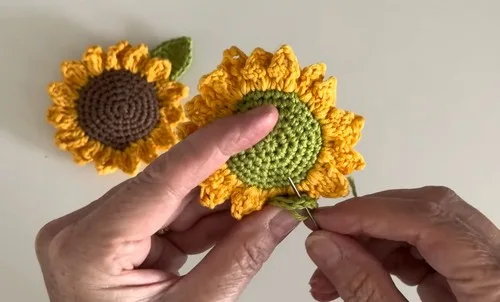
Place brown and green circles back-to-back

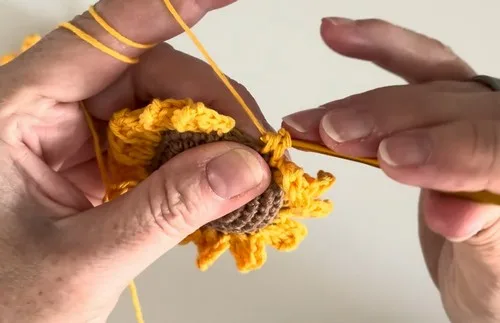
  1. Petal RoundJoin yellow yarn through both layers with SC. Ch 2, DC, TR, Ch 2 picot, TR, DC, Ch 2, SS in next stitch. Repeat around all 30 stitches to form petalsAdd stuffing before finishing the last petals Slip stitch to close, cut yarn, weave ends(30)

Optional Leaf

With green yarn, chain 10

  1. Row 1SS in 2nd ch, SC in next, DC in next 5, 2 DC in next, 4 DC in last Work along the other side: 2 DC in next, DC in next 5, SC in next, SS to finishCut yarn, leave a tail for sewing Attach leaf to the back of sunflower

Marlene's notes

Note 01

Work the center pieces on a 2.5 mm hook and keep your tension fairly firm and even, since a loose gauge here will show once the two circles are joined back-to-back.

Note 02

Keep a stitch marker moving through every round of the center, especially through the increase rounds, so your final stitch count around the joined edge lines up for all thirty petals.

Note 03

Add the stuffing gradually as you approach the last two or three petals rather than all at once, so you can still close the seam with the slip stitch without fighting a too-full center.

Porch photos

Before you sit down

  • Set aside brown, green, and yellow yarn plus a contrasting saffron shade, since the center and petals are worked in different colors that need to stay separate as you go.
  • Read through the petal round once before starting it: each petal is its own little sequence (ch 2, DC, TR, picot, TR, DC, ch 2, slip stitch) repeated thirty times, and it helps to know the shape before your hook is already in the stitch.
  • Place a stitch marker at the start of round 1 on the center pieces and move it up each round, since the increases from 6 to 12 to 18 to 24 stitches are easy to lose track of otherwise.
  • Have your stuffing within reach before you start the petal round, since it goes in before you finish the last few petals rather than through a separate opening afterward.

How the hours go

The Center (brown and green circles)
about 1.5 hours because you're working two matching 6-round circles before you can even join them
Petals and joining
about 1.5 to 2 hours because each of the 30 petals has its own DC-TR-picot-TR-DC sequence, plus timing the stuffing before the last few
Optional leaf
about 15 minutes because it's a single 10-chain row worked up one side and down the other

Looking after it

  • Hand wash gently in cool water if the flower needs freshening up, then reshape the petals with your fingers while damp and lay it flat to dry so the stuffing settles evenly.
  • Store it away from heavy pressure so the picot points on the petals keep their shape, and a shallow box or basket works better than a stuffed drawer.
FAQs

Asked on the glider

the ones that come up on the glider

Do I need to stuff the center before I start the petals?

No, the stuffing goes in as you work the petal round, added before you finish the last couple of petals rather than through a separate hole. This way the opening closes naturally with the final slip stitch.

Why are the brown and green circles worked separately?

Each color forms its own 6-round circle, and they're joined back-to-back with a single crochet seam once both are complete. This gives the center two visible colors, brown on the front and green on the back, without any color changes mid-round.

How do I keep track of all 30 petals?

A stitch marker at your starting point helps, along with counting the joined edge stitches before you begin. Each petal uses one repeat of the ch 2, DC, TR, picot sequence, so miscounting early can throw off the last few.

Is the leaf really optional?

Yes, it's a single extra piece worked from a 10-chain and attached to the back of the finished flower. Skip it if you want a simpler flower, or make more than one if you'd like a fuller look.

What hook size does this pattern use?

A 2.5 mm hook is used throughout, for both the center pieces and the petal round. Keeping consistent tension on that hook size matters most where the two center circles join.

Can beginners really manage the picot stitch here?

Yes, the picot only appears once per petal, right in the middle of the TR, ch 2, TR sequence, so you get thirty chances to practice the same small motion. By the last few petals it becomes pretty automatic.