Beginner 1-2 Hours Worsted yarn

Worked on the glider, counted out loud —

Crochet Scented Sachet Bag Pattern – Perfect for Gifting

Learn to crochet a scented sachet bag with lavender buds. A quick, beginner-friendly pattern using simple rounds—perfect handmade gifts for any occasion.

Jump to the rounds

What this one is

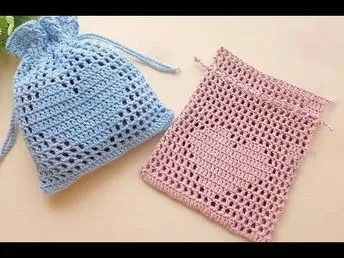
This crochet scented sachet bag is a delightfully simple little project that turns a handful of yarn into a fragrant, functional accessory. Fill it with lavender buds or your favorite dried herbs, and it becomes the perfect addition to a drawer, closet, or car for a subtle, lasting scent. It's ideal for crafters who want a fast, satisfying project that doubles as a thoughtful handmade gift for friends, family, or yourself.

Worked in just a few rounds, this pattern uses only basic crochet techniques—rounds worked from a base, simple body shaping, and a closure to seal in the fragrance. It's a wonderfully approachable project for beginners still building confidence with working in the round, and experienced crocheters will appreciate how quickly it stitches up, often in under two hours depending on yarn weight and hook size.

The finished sachet is small, soft, and pillowy, with just enough structure to hold its shape while remaining squeezable enough to release its scent. It looks charming tucked into a linen closet or hung from a doorknob, and because it's handmade, it carries a warmth that store-bought sachets simply can't match. Wrapped in tissue or tied with ribbon, it makes a lovely little gift for birthdays, housewarmings, or just because.

Variations

I adore this pattern because it proves that small projects can be just as satisfying as big ones. Starting with a simple base worked in the round and building up the body in just one round of stitches, you get to watch a little fabric pouch take shape almost instantly. The closure round is my favorite part—it's so simple, yet it transforms a flat piece into a functional, fillable bag. There's something deeply calming about scooping in lavender buds and cinching the top closed, knowing you've created something that will bring comfort every time someone opens their drawer. I love that this pattern doesn't require fancy stitches or hours of concentration; it's the kind of project you can finish during a lunch break or while catching up on a podcast. And because it works up so quickly, it's perfect for batch-making when you need several thoughtful gifts at once. Whether you're new to crochet or a seasoned maker looking for a palate cleanser between bigger projects, this sachet delivers a big payoff for a small time investment.

Common mistakes

  • Overfilling the sachet with lavenderFill only about two-thirds full, leaving room for the buds to shift and release fragrance when the sachet is squeezed or moved.
  • Using a hook size that doesn't matchMatch your hook to your yarn weight (typically 4.0mm-5.0mm for worsted weight) and check gauge with a small swatch before starting your base round.
  • Losing track of stitch countUse a stitch marker at the start of each round and count your stitches before moving to the next round to keep the base flat and even.
  • Rushing the closure round and leavingWork the closure stitches snugly and pull your yarn tail through securely, weaving in ends multiple times through the closure for extra reinforcement.
  • Not weaving in ends thoroughly, leavingUse a tapestry needle to weave each end through several stitches in different directions, then trim close to the fabric so nothing peeks out.
  • Choosing a yarn that's too bulkyStick with smooth, soft worsted-weight cotton or acrylic yarn for the best combination of structure and softness.

The rounds, in full

Written out, round by round

Beginner1-2 Hours4.0 mmWorsted

Materials

Everything this one takes, in the order you will reach for it.

Yarn

  • Choose a soft cotton or acrylic yarn in a color of your choice. Natural fibers are preferred for their breathability.

Crochet Hook

  • Use a hook appropriate for your yarn (commonly 4.0mm to 5.0mm).

Scented Filling

  • This can include dried herbs, essential oils, or scented potpourri. Some popular choices are lavender, chamomile, or cedarwood.

Scissors

  • For cutting yarn.

Yarn Needle

  • For weaving in ends and closing the sachet.

Stitch Markers

  • Optional, but helpful for keeping track of your rounds.

keep this to hand

Abbreviations

US crochet terms, as used in this pattern.

  1. Chain (ch)The foundation for most crochet projects.
  2. Single Crochet (sc)A basic stitch that creates a tight fabric.
  3. Double Crochet (dc)Adds height and is useful for creating texture.
  4. Slip Stitch (sl st)Used for joining rounds or finishing off.

Step 1: Create the Base of the Sachet

Start with a Magic Ring : Create a magic ring and secure it with a slip knot.

  1. Round 1Ch 2 (this counts as your first dc), and work 11 dc into the ring. Pull the ring tight to close. (12 dc)
  2. Round 2Ch 2, 2 dc in each stitch around . Join with a sl st to the top of the starting ch 2. (24 dc)
  3. Round 3Ch 2, dc in the first stitch, 2 dc in the next stitch . Repeat around. Join with a sl st. (36 dc)

Step 2: Create the Body of the Sachet

  1. Round 4-8Ch 1, sc in each stitch around for 5 rounds. This will create a cylindrical shape for your sachet.

Step 3: Create the Closure

  1. Round 9Ch 1, sc in the first 3 stitches, then sc2tog (single crochet two together) . Repeat around to decrease the size. Join with a sl st.
  2. Round 10Repeat the previous round to tighten the top of the sachet.

Assembly

Step 1

Cut the Yarn :

Step 2

Leave a long tail and pull it through the last stitch to secure.

Step 3

Weave in Ends :

Step 4

Use a yarn needle to weave in any loose ends for a clean finish.

Step 5

Add Scented Filling :

Step 6

Choose your desired scented filling (such as dried lavender or essential oils) and fill the sachet until it reaches your preferred level of fullness.

Step 7

Close the Sachet :

Step 8

Gather the top of the sachet and tie it closed with a decorative ribbon or string to secure the filling.

Important notes

Note 01

💡 Use a 4.0mm to 5.0mm hook depending on your yarn weight—too small a hook makes stitches tight and hard to work, while too large leaves gaps that let filling escape.

Note 02

💡 Place a stitch marker at the beginning of each round, especially during the base rounds, so you don't lose track of your stitch count as the bag takes shape.

Note 03

💡 Choose natural fiber yarn like cotton when possible—it breathes better and allows the lavender scent to pass through more effectively than synthetic yarns.

Note 04

💡 Don't overfill your sachet—leave about a third of the bag empty so the lavender buds can move freely and release fragrance whenever the sachet is handled.

Note 05

💡 When working the closure round, pull your stitches slightly tighter than usual to ensure the opening seals securely and the filling stays contained.

Note 06

💡 Weave in your yarn tails through the closure area multiple times for extra reinforcement, since this is the spot most likely to experience stress from handling.

FAQs

Asked on the glider

the ones that come up on the glider

How long does it take to crochet this scented sachet bag?

Most crocheters finish this project in about 1 to 2 hours, since it only involves a few rounds for the base, body, and closure. It's a perfect quick project for an evening or a rainy afternoon.

What's the best filling besides lavender buds?

You can use any dried herbs or flowers you love, such as rose petals, dried cinnamon, cloves, or even cedar chips for a closet-freshening scent. Just make sure whatever you choose is dry and won't stain the yarn.

Can I make this sachet bigger for a larger drawer or car?

Yes! Simply add 6-8 extra stitches to your base round and include one additional round in the body before starting the closure. This creates a roomier pouch while keeping the same overall shape.

What yarn works best for this pattern?

A soft, smooth worsted-weight cotton or acrylic yarn works beautifully, as it holds its shape while remaining breathable enough for the fragrance to escape. Cotton is especially nice since it's a natural fiber with good airflow.

How do I keep the lavender buds from falling out?

Work your closure round with slightly tighter stitches than usual and weave in your yarn tail securely through multiple stitches. This reinforces the opening and keeps the filling safely contained inside.