Beginner-Intermediate 3-5 Hours Worsted yarn

Worked on the glider, counted out loud —

Crochet Rainbow Rope Basket Pattern

Learn to crochet a sturdy rainbow rope basket with a magic ring base, colorful sc stripes, and handles. Fun, functional, and beginner friendly!

Jump to the rounds

Before you sit down

Begin with a magic ring and work the base rounds, increasing evenly so the circle lies completely flat.

Keep checking your stitch count each round to make sure the base grows without rippling or cupping.

Once the base reaches your desired width, stop all increases entirely before moving on.

Continue plain single crochet rounds upward, changing colors every one to two rounds to build rainbow stripes.

Keep stacking side rounds until the basket reaches the height you want for your storage or tote needs.

Optionally add sturdy handles in a round near the top so the basket can be carried like a tote.

Weave in all your color-change ends neatly and give the rim a final firm round to finish the edge.

What this one is

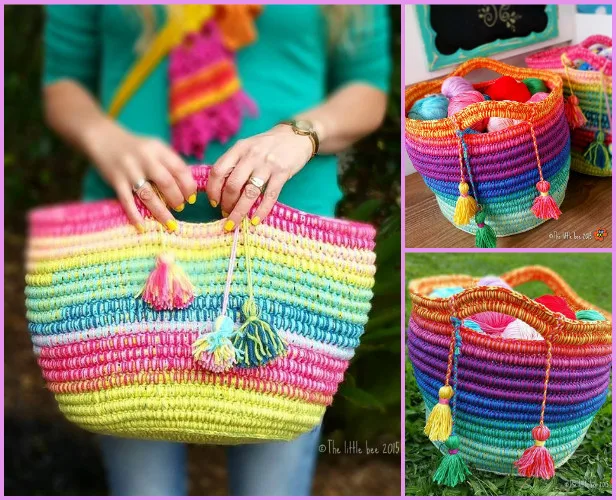
This Crochet Rainbow Rope Basket starts humbly with a magic ring and blossoms into a sturdy, colorful vessel perfect for organizing yarn, toys, plants, or produce. What makes it special is the rope-like density created by working single crochet in a spiral, giving the walls enough structure to hold their shape without wire or stiffener. It's an ideal project for beginners who want to practice increases and color changes, while seasoned crocheters will enjoy the meditative rhythm of round after round of rainbow stripes.

The core techniques here are simple but satisfying: a magic ring start, evenly spaced increases to flatten the base, and straight single crochet rounds to build the sides. Skill-wise, this sits comfortably between beginner and intermediate—easy enough for your first basket project, but the color-change rhythm keeps it from feeling boring. Expect to spend anywhere from a few focused hours to a couple of relaxed evenings, depending on your desired height and how many stripes you add.

The finished basket has a firm, rope-like texture with a wide, flat base and straight sides that hold their shape beautifully once filled. Depending on your yarn and hook choice, you can size it up into a hefty storage bin or keep it compact as a desktop catchall. With its rainbow stripes and optional tote-style handles, it makes a fabulous handmade gift for a friend who loves color, function, and a little handmade cheer in their space.

Common mistakes

  • Starting the magic ring too looselyPull the tail firmly after your first round of single crochet, not just after making the ring, and give it a second tug once a few stitches are worked into it to fully close the gap.
  • Forgetting to stop increasingDouble-check your stitch count matches your last base round exactly before beginning Side Round 1, which should be one plain sc in each stitch with zero increases.
  • Working stripes so thin (one round)Stick to changing colors every 1-2 rounds as the pattern suggests, and hold your work up periodically to check that the stripe proportions still read as a rainbow from a few feet away.
  • Adding handles without reinforcingWork handles into a round near the top using a firmer stitch or double up your working yarn strand at the attachment points so the handles can bear real weight when the basket is used as a tote.

The rounds, in full

Written out, round by round

Beginner-Intermediate3-5 HoursWorsted

Materials

Everything this one takes, in the order you will reach for it.

  • Yarn in multiple colors (for the rainbow stripes)
  • Crochet hook (size to suit your yarn)
  • Scissors (to cut yarn when fastening off)

keep this to hand

Abbreviations

US crochet terms, as used in this pattern.

  1. scsingle crochet

1. Start with a Magic Ring and Create the Base

Begin by crocheting the basket’s base. A sturdy foundation ensures the basket can hold various items without collapsing.

Magic Ring : Start with a magic ring using your first color.

  1. Round 1Work 6 single crochet (sc) stitches into the ring and pull it tight. Slip stitch to join the round.
  2. Round 2Change to your next color if you’re switching frequently. Work 2 sc stitches in each stitch around for a total of 12 stitches.
  3. Round 3Continue increasing by doing 1 sc in the next stitch, 2 sc in the following stitch, and repeating around. Change colors every few rounds to create stripes.Pro Tip: Keep the rope in the center of each stitch to maintain even tension and structure.

2. Build the Sides of the Basket

Once the base reaches your desired diameter, it’s time to stop increasing and start crocheting upward to build the basket’s sides.

  1. Side Round 1Side Round 1: In your next color, work 1 sc in each stitch around without increasing. This will create a flat wall for the sides.
  2. Side Rounds 2-10Side Rounds 2-10 (or desired height): Continue crocheting 1 sc in each stitch for each round, changing colors every couple of rounds to form rainbow stripes.Creative Tip: For a playful look, vary the thickness of your stripes by changing colors every 1-2 rounds.

3. Add Handles (Optional)

Handles make your basket more functional and easy to carry. They’re simple to add and can be done in any row near the top.

  1. Handle RoundHandle Round: Crochet around until you reach the spot where you’d like the first handle. Chain 6 (or more for larger handles), skip the same number of stitches, and continue crocheting in the round. Repeat on the opposite side for the second handle.
  2. Next RoundNext Round: Crochet into each stitch, including those in the chain, to reinforce the handles.

Tip : For a sturdier basket, use two rounds for the handles. Alternatively, use a contrasting color to make the handles stand out.

4. Finish with a Decorative Border

Adding a border to the top of your basket gives it a polished finish.

  1. Border RoundBorder Round: Work one round of slip stitches or single crochet along the top edge for a neat, finished look.
  2. Fasten OffFasten Off: Cut the yarn and secure the end by weaving it through the last few stitches.

Important notes

Note 01

💡 Use a hook one size smaller than the yarn label recommends—this tightens your stitches and gives the basket that firm, rope-like structure it needs to hold its shape unsupported.

Note 02

💡 Keep a small notepad or note on your phone to track exactly how many rounds you've worked in each color, since it's easy to lose count once you're several stripes deep.

Note 03

💡 When changing colors, don't cut your yarn if you plan to use that color again soon—simply carry it loosely up the inside of the basket to avoid extra ends to weave in later.

Note 04

💡 Place a locking stitch marker at the beginning of every round throughout the entire project, not just the base, since straight sc rounds can drift into a spiral without one.

Note 05

💡 If your basket feels floppy after finishing the sides, don't panic—working a round of slip stitch or single crochet through the back loops only at the very top edge adds a firm, defined rim.

Note 06

💡 Block your finished basket by lightly steaming it or misting it with water and shaping it by hand over a bowl or box, which helps cotton and acrylic yarns hold their basket shape permanently.

FAQs

Asked on the glider

the ones that come up on the glider

What yarn works best for this rainbow rope basket?

A sturdy worsted weight cotton or cotton-blend yarn works beautifully since it holds its shape without stuffing or wire. Acrylic worsted weight yarn is a great budget-friendly substitute, though the basket may be slightly less rigid.

How do I know when to stop increasing the base?

Stop increasing once your base reaches the diameter you want for the bottom of your basket, then begin Side Round 1 with plain single crochet and no increases. A larger base diameter means a wider, more spacious finished basket.

Can I make this basket without handles?

Absolutely, the handles are an optional functional addition and the basket looks lovely as a simple striped storage bowl without them. If you skip them, just finish your last side round and fasten off cleanly.

How many colors do I need for the rainbow effect?

You can use anywhere from three to seven or more colors depending on how full a rainbow look you want. Changing colors every 1-2 rounds as suggested gives you plenty of stripes even with a smaller color collection.

Why is my basket curving inward or flaring outward on the sides?

This usually means your stitch count changed accidentally during the side rounds, either through accidental increases or decreases. Recount your stitches at the start of each side round and use a stitch marker to keep your spiral rounds honest.