Beginner-Friendly 2-3 Hours Worsted yarn

Worked on the glider, counted out loud —

Crochet Mesh Headband Pattern: Easy Breezy Boho Style

Make a stylish crochet mesh headband with simple HDC and DC stitches. A quick, breathable boho accessory perfect for beginners to intermediate crocheters.

Jump to the rounds

Before you sit down

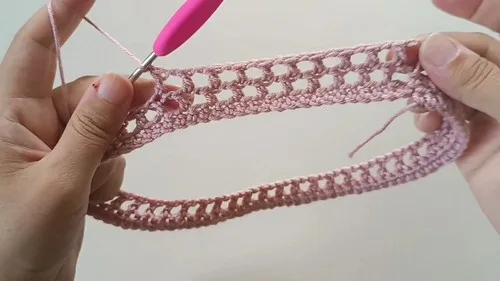
Start with a long foundation chain that will become the circumference of your headband.

Work a foundation row of half double crochet across the chain for a sturdy base edge.

Join the two short ends together with a slip stitch to form the headband into a ring shape.

Build the open mesh body by repeating double crochet and chain-1 spaces around the ring.

Stack multiple mesh rounds on top of each other until the band reaches your desired finished height.

Work a final smoothing round of half double crochet around the top edge to close things off neatly.

Weave in all loose ends with a yarn needle so the mesh stays secure and tidy.

Give the finished headband a light steam or block to even out the lattice pattern before wearing.

What this one is

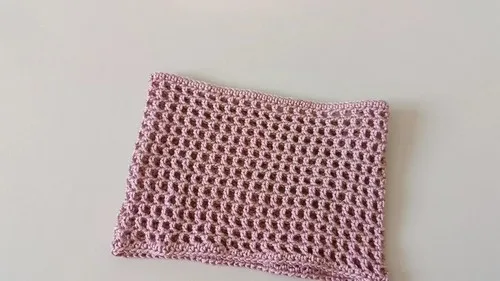
This crochet mesh headband is the kind of project that feels like a little style upgrade in disguise. It's a soft, stretchy band built entirely from an open mesh stitch pattern that gives it texture and movement without any bulk. Perfect for warm-weather styling, taming flyaway hair, or adding a handmade touch to an everyday outfit, this headband strikes a great balance between simple construction and eye-catching results — ideal for anyone who wants a fast, satisfying makeable win.

The technique here centers on a repeating DC and chain-1 mesh, bookended by rows of half double crochet for structure and a clean finished edge. If you're comfortable with basic chains, half double crochet, and double crochet stitches, you'll pick up the mesh rhythm within the first couple of rows. This is a great confidence-building project for newer crocheters ready to try their first mesh pattern, and a fast, relaxing make for more experienced stitchers. Most crocheters finish in a single sitting or two, roughly 2-3 hours total.

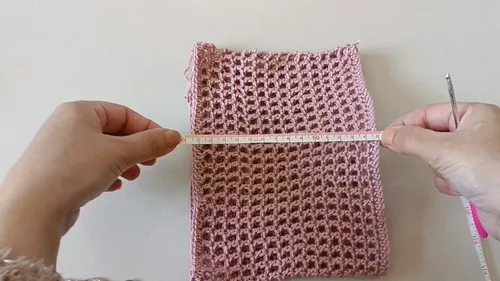
Once joined into its ring shape and finished off, this headband measures approximately 15 cm in height, giving it enough width to comfortably cover the crown of the head with a soft, lacy drape. The mesh texture gives it a lightweight, almost woven look that pairs beautifully with both casual and dressed-up outfits. It stitches up quickly enough to make several in an afternoon, making it a lovely handmade gift for friends, sisters, or anyone who appreciates a small, thoughtful accessory.

Variations

One of my favorite things about this headband is how easily it adapts to your personal style. For a bold statement piece, try a variegated or self-striping acrylic yarn — the mesh pattern shows off color changes beautifully because of all that open space between stitches. For something more subdued and office-appropriate, stick with a single neutral like oatmeal, dove gray, or soft blush. Want a cozy autumn version? Swap in a warm rust, mustard, or forest green to match the season, or go monochrome-chic with black or cream for a piece that pairs with everything in your closet. Sizing is simple to adjust too. If you want a snugger fit for a smaller head or a child, reduce your starting chain count in increments of roughly 8-10 stitches (keeping an even number for the mesh repeat to line up), and correspondingly work fewer mesh rows if you want a shorter finished height. For an oversized, more dramatic wrap-style headband, add extra chains to your foundation and work a few additional mesh rows for more coverage. Yarn substitution is another easy way to change the whole feel — swap the acrylic for a cotton-blend for a crisper, more structured drape that's lovely for warmer months, or try a brushed or mohair-blend yarn for a softer, fuzzier halo effect. You could also experiment with a slightly larger hook, like a 4.0 mm, if you want a looser, lacier mesh with more drape, or size down to a 3.0 mm for a denser, firmer fabric. Adding a decorative button, a small crochet flower appliqué, or even a twist before joining the ring are all simple ways to make this headband uniquely yours.

I adore this headband because it proves you don't need a complicated stitch dictionary to make something that looks genuinely polished. The open DC mesh has this lovely rhythm — DC, chain 1, skip a stitch, repeat — that becomes almost meditative once you find your groove, and it's incredibly forgiving if you're still building confidence with double crochet. What really gets me is how the mesh rows stack up into this airy, lattice-like fabric that looks so much more intricate than the actual effort required. Joining the foundation chain into a ring with a simple slip stitch feels like a magic trick the first time you do it — suddenly you've got a headband taking shape in your hands instead of a flat strip. And finishing with a clean round of half double crochet around both edges gives it that professional, ready-to-wear polish without any fussy border work. It's fast, it's wearable literally the same day you finish it, and it's endlessly customizable with color and yarn choice. Honestly, this is the kind of pattern I keep coming back to whenever I want a quick creative win.
Common mistakes

  • Losing count of the foundation chainCount your chains in groups of 10 as you go, and double-check the total before starting Round 2 — the DC/chain-1 mesh needs an even stitch count to repeat cleanly.
  • Twisting the foundation chain before joining it into a ring.Lay the chain flat on a table and smooth it out fully before inserting your hook into the first stitch to slip stitch it closed — a twist here will show up in every mesh row.
  • Skipping the wrong stitch in the DCKeep a steady rhythm and use a stitch marker on your first DC of each round if you tend to lose your place, especially in dim lighting.
  • Working too tightly, which makesRelax your tension throughout, especially on the chain-1 spaces — they should sit open and even to create that airy mesh look.
  • Forgetting the turning chains at the start of each mesh row.Always begin each mesh round with the chain-4 called for in the pattern before skipping the first stitch — this chain acts as your first double crochet and sets the height for the row.
  • Miscounting rows and ending upKeep a tally as you go — a tick mark on paper or a row counter app helps you hit the full mesh repeat count before moving to the finishing round.

The rounds, in full

Written out, round by round

Beginner-Friendly2-3 Hours3.5 mmWorsted

Materials

Everything this one takes, in the order you will reach for it.

  • 3.5 mm crochet hook
  • 3.5 mm acrylic yarn
  • Scissors
  • Yarn needle (for weaving in ends)

keep this to hand

Abbreviations

US crochet terms, as used in this pattern.

  1. chchain
  2. HDChalf double crochet
  3. DCdouble crochet
  4. sl stslip stitch

Main Pattern

  1. Round 1Make a slip knot. Chain 90 (approx. 50 cm for a large size). Add 3 extra chains for turning.
  2. Round 2Skip 3 chains. Make 1 half double crochet (HDC) in the 4th chain. Continue making 1 HDC in each stitch across. In the last stitch, make 1 HDC. Join both ends by inserting your hook into the first stitch and making a slip stitch to form a ring.
  3. Round 3-16Chain 4. Skip the first stitch. Make 1 double crochet (DC) in the next stitch. Chain 1, skip 1 stitch, DC in the next stitch. Repeat the 'DC, ch 1, skip 1' pattern around the ring. Slip stitch into the 3rd chain of the starting ch-4 to close the round. Repeat this mesh pattern for 14 rows in total (or desired height).
  4. Round 17Chain 1. Make 1 half double crochet in every stitch around. Continue this for 1 row. Slip stitch into the first stitch to finish.

Important notes

Note 01

Use a stitch marker on the first stitch of every mesh round so you always know exactly where to slip stitch to close it.

Note 02

Weave in your starting and ending tails securely with a yarn needle, running them through several stitches on the wrong side to prevent unraveling in the open mesh.

Note 03

Block your finished headband lightly by steaming or dampening it and laying it flat — this helps the mesh stitches relax into an even, symmetrical lattice.

Note 04

If your acrylic yarn is a lighter or heavier weight than expected, gauge may shift the finished size slightly, so measure around your head as you work if a precise fit matters.

Note 05

Take care to work into the correct chain space (not around the chain itself) when making double crochet stitches into the chain-1 gaps for a cleaner, more even mesh.

Note 06

Store extra yarn from the same dye lot in case you want to make a matching scrunchie or bag strap later, since dye lots can vary slightly between skeins.

Note 07

Finished headband height: Approx. 15 cm.

Note 08

Adjust stitch count or number of rows for smaller/larger sizes.

More photos

FAQs

Asked on the glider

the ones that come up on the glider

What size head does this headband fit?

As written, the headband measures approximately 15 cm in height and is designed for a large size at around 50 cm circumference. You can easily size it up or down by adjusting your starting chain length.

Can I use a different yarn weight than what's listed?

Yes, though it will change your gauge and finished size. A thinner yarn will create a more delicate, lacy mesh, while a heavier yarn will make the headband thicker and cozier — just adjust your hook size to match.

Why is my mesh pattern coming out uneven?

This usually happens from inconsistent chain-1 spaces or accidentally skipping the wrong stitch. Slow down and count each DC and chain-1 pair carefully, especially for the first few rows until the rhythm feels natural.

How do I make sure the ring doesn't twist when I join it?

Lay your foundation chain flat on a table before joining so you can visually confirm there's no twist running along its length, then slip stitch the first and last stitches together.

Is this a good first project for someone new to crochet?

Absolutely — as long as you're comfortable with basic chain, half double crochet, and double crochet stitches, the repeating mesh pattern is a gentle, forgiving way to build confidence with a new stitch combination.