Intermediate 6-9 Hours Worsted yarn

Worked on the glider, counted out loud —

Crochet Floor Pouf Pattern (Free)

Make a cozy crochet floor pouf with this free pattern featuring a magic ring base, sturdy sides, and simple decreases for a plush finish.

Jump to the rounds

Before you sit down

Start by working a magic ring to form a tight, adjustable center for the base.

Build outward from the ring with evenly spaced increase rounds to flatten and widen the base.

Check your stitch count at the end of each base round to keep the shape perfectly circular.

Begin decreasing steadily around the top edge to start closing the pouf's opening.

Stuff the pouf firmly, packing filling into every edge and corner for a solid, even shape.

Continue the decrease rounds until only a small opening remains at the very top.

Fasten off and weave in your ends securely to finish the pouf.

What this one is

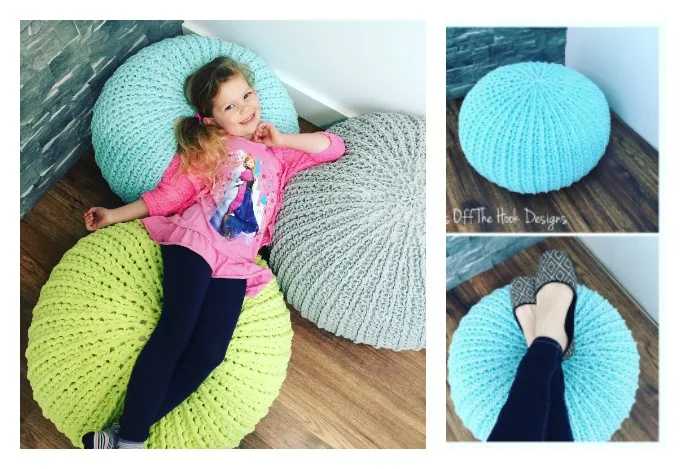
This crochet floor pouf pattern builds a sturdy, huggable seat or footrest entirely from worsted-weight yarn, starting with a simple magic ring and growing outward into a firm, rounded base. What makes it special is how forgiving the structure is — you're essentially building a giant amigurumi shape, so if you've ever stuffed a stuffed animal, you already understand the logic here. It's perfect for crocheters who want a functional, statement-making project that actually gets used every day instead of sitting on a shelf.

The finished pouf is a firm, rounded cushion with a flat base and straight sides, sized to whatever height and width you choose as you build. It has a substantial, tactile presence — dense enough to sit on, soft enough to lean against — and looks equally at home as extra seating, a coffee table footrest, or a plush floor accent. Because it's so customizable in color and size, it also makes a genuinely impressive handmade housewarming or wedding gift.

Common mistakes

  • Losing track of the magic ring'sPlace a stitch marker in the very first stitch of your magic ring round and move it up every round so you always know where a round begins and ends.
  • Increase rounds in the base coming out lumpy or uneven.Space your increases evenly by counting stitches between each one and using a marker every few stitches as a checkpoint before moving to the next round.
  • The sides flaring outward or curvingDouble-check your stitch count at the end of each side round — if it's growing, you're accidentally increasing; if it's shrinking, you're missing stitches or skipping into the wrong loop.
  • Rushing the decrease rounds at the topStuff the pouf firmly before your final few decrease rounds so you can still access the interior, then finish decreasing until only a small, easily closed opening remains.
  • Under-stuffing, leaving the pouf softPush stuffing into every corner and along the base edges first, checking the shape from multiple angles, and add more stuffing than feels necessary — it compresses with use.
  • Weaving in ends loosely after fastening off.Weave each tail through several stitches in different directions and pull snug, since a floor pouf gets handled and sat on far more than a typical amigurumi.

The rounds, in full

Written out, round by round

Intermediate6-9 HoursWorsted

Materials

Everything this one takes, in the order you will reach for it.

  • Worsted weight yarn
  • Crochet hook (size to suit your yarn)
  • Stuffing material (fiberfill or similar filling)

keep this to hand

Abbreviations

US crochet terms, as used in this pattern.

  1. chChain
  2. scSingle Crochet
  3. sl stSlip Stitch
  4. st(s)Stitch(es)
  5. incIncrease (work two stitches in the same stitch)
  6. decDecrease (crochet two stitches together)

Step 1: Start with a Magic Ring

A magic ring is a great foundation for a circular base.

Magic Ring : Create a magic ring and ch 1.

  1. Round 1Work 6 sc into the ring. Sl st to the first sc to close the round.

Step 2: Build the Base of the Pouf

Work in rounds to create the base, gradually increasing stitches for a larger circle.

  1. Round 2Inc in each st around (12 sts).(12)
  2. Round 3Sc in next st, inc in next st ; repeat around (18 sts).(18)
  3. Round 4Sc in next 2 sts, inc in next st ; repeat around (24 sts). Continue increasing in this pattern until the base reaches your desired width.

Step 3: Build Up the Sides

Once you’ve reached the desired base size, work without increasing to build up the height.

  1. Round 10-20Sc in each st around, maintaining the stitch count from your last increase row. Repeat until the sides reach your desired height.

Step 4: Create the Top

To finish, you'll decrease stitches to close off the top.

  1. Decrease RoundsSc in next 2 sts, dec in next st ; repeat around until only a small opening remains.Stuffing: Fill the pouf with your stuffing material, pushing it into all corners and ensuring an even shape.

Once fully stuffed, continue decreasing until the opening is closed. Fasten off and weave in any loose ends.

Important notes

Note 01

💡 Use a hook one size smaller than you'd normally choose for your worsted-weight yarn — a tighter gauge keeps stitches dense enough to hold stuffing without gaps showing through.

Note 02

💡 Keep a stitch marker in the first stitch of every round throughout the entire pattern, from the magic ring through the final decrease round, so you never lose your place.

Note 03

💡 Choose a firm, high-loft polyester stuffing rather than a soft one — the pouf needs to hold its shape under regular sitting weight, not just look full.

Note 04

💡 Stuff in stages as you work the final few side rounds rather than waiting until the very end, since it's much easier to pack stuffing into a partially open shape.

Note 05

💡 If you're changing colors for a striped or ombre look, always join new colors at the same point in the round so your color transitions line up neatly in a vertical seam.

Note 06

💡 Count your stitches at the end of every single round, not just occasionally — a small miscount in the base increases compounds quickly and throws off the whole shape.

FAQs

Asked on the glider

the ones that come up on the glider

How much yarn do I need for this floor pouf?

It depends on your final size, but plan for several large skeins of worsted-weight yarn since the base, sides, and top all use continuous rounds. Buy an extra skein of your main color to be safe, especially if you're sizing up.

What size hook should I use for this pattern?

A hook sized for worsted-weight yarn works well, typically in the range crocheters use for firm amigurumi-style projects. Going down half a size from the yarn label's suggestion helps keep stitches tight enough to contain the stuffing.

Can I make this pouf bigger or smaller than a standard size?

Yes — this pattern is designed to be size-flexible. Add more increase rounds to the base for a wider pouf, or work more side rounds for extra height, and shorten both for a mini version.

What's the best stuffing to use for a floor pouf?

A firm, high-loft polyester fiberfill holds up best under regular use and keeps the pouf from going flat. Avoid soft, lightweight stuffing, since it compresses too easily for something meant to be sat on.

Do I need to use stitch markers throughout the whole pattern?

Yes, definitely — since this pattern is worked in continuous rounds rather than joined rounds, a stitch marker at the start of each round is essential. Move it up every round from the magic ring all the way through the final decreases.