Intermediate 4-6 Hours Worsted yarn

Worked on the glider, counted out loud —

Crochet Baseball Star Square Motif: Orange & Navy Fan Pattern

Crochet a five-point star square motif in orange, navy, and white with a felt letter accent — a fun written pattern for baseball season fans.

Jump to the rounds

Before you sit down

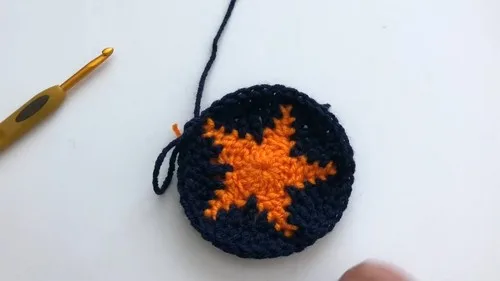
Start with orange yarn and build a small ring of double crochet stitches to form the square's dense center.

Shape that center into a five-point star by working back-loop stitches and skips around the ring.

Fasten off orange, then join navy yarn and build a pointed shell border that hugs each star tip closely.

Continue in navy for another round, adding stitches at each point to widen the motif's overall shape.

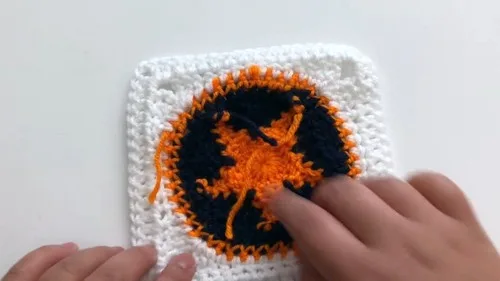
Fasten off navy, rejoin orange, and work single crochets with strategic increases to begin rounding the edges outward.

Mark the four corners evenly along the growing round so the shape transitions cleanly from star to square.

Work the remaining rounds to square off all four sides and corners into a flat, stable motif.

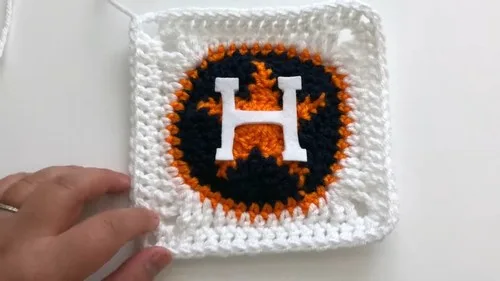
Weave in every yarn tail, then cut and attach a white felt letter to the center of the finished star.

What this one is

This crochet square motif transforms simple orange and navy yarn into a bold five-point star framed by a clean square border, finished with a felt letter appliqué at its center. It's the kind of small-format project that packs a big visual punch, ideal for fans who want to show their team colors on a coaster, patch, or wall hanging without committing to a full afternoon of stitching. If you love projects that double as both craft and conversation piece, this one earns its spot in your hook rotation.

The construction leans on a mix of techniques that keep things interesting round after round: working into back loops only to define crisp star points, building a pointed shell border with single, half double, double, and treble crochet all in one round, and finally squaring off the shape with corner increases. Expect roughly four to six hours from ring to finished square, making it very approachable for an intermediate crocheter who has some shell-stitch or star-motif experience already under their belt.

The finished piece lands as a compact, sturdy square — one navy-and-orange star radiating from the center, its five points caught inside a structured shell edge, with a crisp white felt letter glued or stitched right at the star's heart. It has real dimension and texture thanks to the layered stitch heights, and it holds its shape well enough to use as a coaster, ornament, or the start of a larger blanket. Stitch up a set and you've got an instant, thoughtful gift for anyone who bleeds orange and navy.
Variations

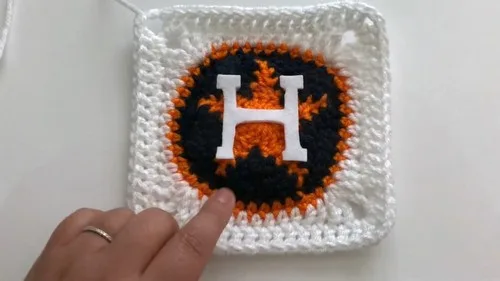
This motif is incredibly easy to customize once you understand the shaping. The most obvious swap is the letter — instead of an 'H,' cut out any initial, a number, or even a tiny bat-and-ball silhouette from the white felt to personalize it for a different name or team entirely. Color-wise, you're not locked into orange and navy: try red and navy for a different squad's palette, or black and gold, or even a pastel combo (blush and cream, or sage and white) if you want the star shape to read as more general-purpose decor rather than sports-specific. For yarn, any worsted-weight acrylic or cotton-blend works beautifully here — cotton gives the finished square a crisper, more structured feel that's great for coasters, while acrylic keeps things soft and huggable for a pillow accent. If you want to scale the project up, work several squares in a shared color scheme and join them into a lapghan, table runner, or throw blanket — since round 6 already squares off the corners at 10 stitches per side, these motifs are built to be joined edge to edge. Going smaller? Stop after round 5 and you'll have a rounded star-in-circle badge perfect for a keychain or bag charm, no felt letter required. You can also swap the felt appliqué for a small embroidered initial in satin stitch if you want something more durable than glued felt, especially for items that'll see a lot of handling like a bag or coaster set.

Common mistakes

  • Working into both loopsSlow down on round 2 and consciously locate the back loop of each stitch before inserting your hook — the front loop should stay untouched and visible as a ridge.
  • Losing track of which stitch to skipUse a stitch marker on the first stitch of each point as you work it, and recount before moving to the next repeat so all five points end up even.
  • Mixing up the treble crochet placementPause at each point tip and confirm your hook is going into that exact slip-stitch space before working the treble — it's the anchor stitch that makes the shell border pop.
  • Not fastening off and weaving inFasten off orange after round 2 and navy after round 4 as instructed, weaving in each tail immediately rather than letting several pile up together.
  • Miscounting the 10 stitches per sideCount out loud and place a stitch marker in the 11th stitch of each side before you begin round 6 — don't rely on eyeballing the shape.
  • Gluing the felt letter before the yarnWeave in every tail and lightly steam or pin the square into shape first, then glue or sew the felt letter once the base is completely finished and flat.

The rounds, in full

Written out, round by round

Intermediate4-6 HoursWorsted

Materials

Everything this one takes, in the order you will reach for it.

  • Orange, navy, and white yarn.
  • Crochet hook.
  • Scissors.
  • White felt.
  • Glue or sewing materials.

keep this to hand

Abbreviations

US crochet terms, as used in this pattern.

  1. chchain
  2. sl stslip stitch
  3. scsingle crochet
  4. hdchalf double crochet
  5. dcdouble crochet
  6. trtreble crochet
  7. incincrease (2 sts in one stitch)

Main Pattern

  1. Round 1With orange yarn, create a slipknot and chain 4. Slip stitch into the first stitch to form a ring. Chain 3 (counts as first double crochet) and work 14 double crochets into the center of the ring. Slip stitch to the top of the chain 3 to close the round. (15 dc)
  2. Round 2Chain 5, skip the first stitch, and slip stitch into the back loop of the second stitch. Work a single crochet, half double crochet, and double crochet in the following back loops. Skip two stitches and slip stitch into the third stitch from the previous round. Repeat the previous steps four more times to create five points.Fasten off the orange yarn after completing the star points (Round 2).
  3. Round 3Join navy yarn at the tip of any point and chain 1. Work a single crochet, half double crochet, and double crochet in the next three stitches. Work a treble crochet in the same space as the slip stitch from the previous round. Work a double crochet, half double crochet, and single crochet in the next three stitches. Repeat around, slip stitching to the first stitch.
  4. Round 4Place a stitch marker and skip the chain one. Work a single crochet, half double crochet, and three double crochets in the next stitches. Work a half double crochet, and two single crochets. Repeat around.Fasten off the navy yarn after completing Round 4.
  5. Round 5Join orange yarn and work a single crochet in the next stitch. Work 9 single crochets, then increase (2 single crochets in one stitch). Repeat around for a total of 44 stitches. Slip stitch to the first stitch. (44 sc)Mark the corners by counting 10 stitches for each side and marking the 11th stitch before starting Round 6.
  6. Round 6Join white yarn at any corner and chain 6 (counts as treble crochet and chain 2). Work two treble crochets in the same stitch. Work two double crochets, six half double crochets, and two double crochets. In the corner, work two treble crochets, chain 2, and two treble crochets. Repeat around. Slip stitch to the top of the chain 4 to complete the round.
  7. Round 7Chain 5 (counts as double crochet and chain 2). Work two double crochets in the chain-2 space. Work double crochets along the side. In each corner, work two double crochets, chain 2, and two double crochets. Repeat around and slip stitch to finish.

Assembly

Step 1

Secure all tails.

Step 2

Cut out the letter "H" from white felt.

Step 3

Glue or sew the "H" onto the center of the star.

Important notes

Note 01

Work round 2's back-loop-only instructions carefully — this single detail is what separates a crisp star shape from a rounded blob, so take your time here even if it feels slow.

Note 02

Keep your orange and navy yarn tails long enough (about 6 inches) when fastening off after rounds 2 and 4, since you'll need enough length to weave in securely without pulling the work tight.

Note 03

Block the finished square before attaching the felt letter — pinning it into a neat, flat square shape makes the appliqué step much easier and the final motif lie flatter.

Note 04

Cut your felt letter slightly smaller than the open space at the star's center so it sits centered with a small margin of yarn visible around its edges.

Note 05

If sewing the felt letter rather than gluing, use a whip stitch in white thread around the edge so stitches blend into the felt rather than standing out against the yarn.

Note 06

Count your stitches at the end of each round when a count is given (like the 44 single crochets in round 5) — catching an error early saves you from unraveling multiple rounds later.

More photos

FAQs

Asked on the glider

the ones that come up on the glider

What yarn weight works best for this star square motif?

A worsted-weight (medium, size 4) yarn in acrylic or cotton blend gives the cleanest stitch definition for the shell border and star points. Cotton yarn will produce a slightly stiffer, more structured square, which is great if you plan to use it as a coaster.

Can I make this pattern in different team colors?

Absolutely — simply substitute your preferred two main colors wherever the pattern calls for orange and navy, and swap the felt letter to match your team's initial. The shell-stitch construction and shaping stay exactly the same regardless of color choice.

Why does round 2 specify working into the back loop only?

Working in the back loop only is what creates the raised, defined ridge that gives the star its sharp five-point shape. If you work into both loops, the points will look softer and less distinct.

How do I keep my star points even and symmetrical?

Count carefully as you repeat the point-making sequence five times in round 2, and consider marking the first stitch of each repeat with a stitch marker. Consistent stitch counts in each repeat are the key to symmetrical points.

Is this pattern good for joining into a blanket?

Yes — since round 6 squares off the corners using consistent 10-stitch sides, these motifs are well suited for joining edge to edge into a lapghan or throw. Just keep your gauge and tension consistent across all the squares you make.