Intermediate 4-6 Hours Super Bulky yarn

Worked on the glider, counted out loud —

Free Crochet Baby Bottle Amigurumi Pattern for Baby Gifts

Make an adorable crochet baby bottle amigurumi with this free pattern—perfect for baby showers, nursery decor, or a sweet handmade newborn gift.

Jump to the rounds

Before you sit down

Begin the Top/Collar section with a magic ring and work through all 12 rounds, shaping the curved collar top.

Complete the Top/Collar section fully, then set it aside while you prepare the Bottle piece.

Work the Bottle section through its 5 rounds, building the rounded lower body of the amigurumi.

Stuff the Bottle section firmly with fiberfill, keeping the shape smooth and even.

Join the Bottle section to the Top/Collar, aligning the openings before stitching them together.

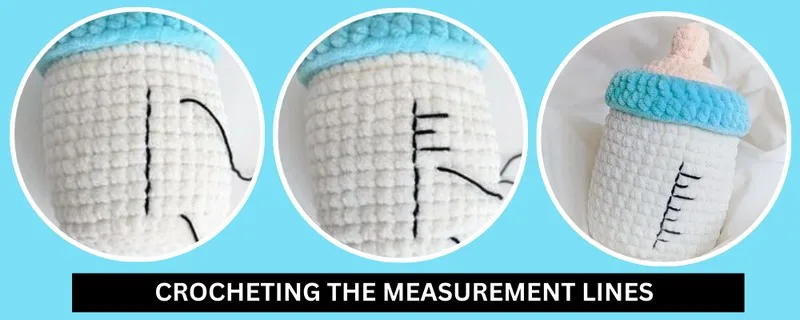
Thread black yarn onto a tapestry needle and backstitch a vertical line up the body between the marked rounds.

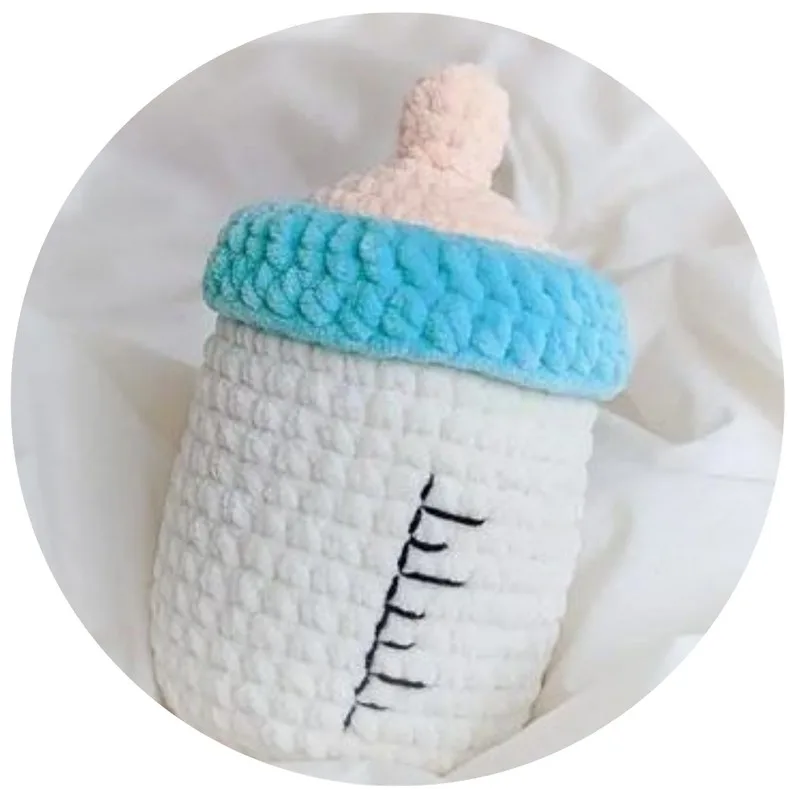
Finish by embroidering horizontal measurement marks along the vertical line, alternating 2-stitch and 1-stitch widths.

What this one is

This Crochet Baby Bottle Amigurumi is one of those patterns that makes everyone smile the moment they see it — a plush, huggable version of a classic baby bottle, complete with a rounded collar and a nipple top that looks almost real. It's a fantastic little project for anyone who loves baby-themed makes, whether you're stitching up a nursery decoration, a photo prop, or a one-of-a-kind shower gift. The soft super bulky yarn body paired with a crisp white 'nipple' section gives it just the right amount of realism without losing its amigurumi charm. You can also turn it into a rattle.

The pattern is built from two main parts — a 12-round Top/Collar section and a 5-round Bottle body — worked in the round with basic amigurumi shaping. What really sets this piece apart is the finishing touch: a hand-embroidered measurement line using black yarn and backstitch, alternating between 2-stitch and 1-stitch wide marks to mimic real bottle markings. Expect to spend about 4-6 hours total, and while the construction itself is approachable, the embroidery step calls for a little patience and a steady hand.

Once stuffed and stitched together, the finished bottle has a soft, squeezable body with a rounded silhouette that sits nicely on a shelf or in a crib. The cream, pink, or blue yarn choice lets you customize it for any baby, and the black-and-white detailing gives it a clean, giftable look straight out of the hoop. It's the kind of handmade piece that feels both playful and thoughtful — ideal for tucking into a diaper bag gift or displaying at a baby shower.

Variations

One of the best things about this pattern is how easy it is to make it your own. For a gender-specific gift, work the Bottle section in soft pink or baby blue super bulky yarn instead of cream — Bernat Blanket or Hometown USA both work beautifully at this weight and hook size. Want a neutral, keepsake-quality version? Try a soft sage green, buttery yellow, or lavender for a gender-neutral nursery vibe that photographs well too. If you're making a set for twins, work one bottle in pink and one in blue, or coordinate both in the same pastel with different embroidery thread colors (navy or brown instead of black) for a subtler, more heirloom-style look. For a mini keepsake version, consider working the same round counts in a worsted weight yarn with a smaller 4mm hook — the piece will shrink down nicely for a doll-sized accessory or ornament, though you'll want to stuff more lightly to keep the proportions balanced. On the flip side, if you want an oversized display piece for a nursery shelf, size up to a jumbo yarn weight with a 9mm or larger hook, which will make each round noticeably bigger without changing the stitch counts. You can also personalize the embroidery: instead of plain measurement lines, add the baby's initial or birth date in small backstitch letters below the markings. For a fun themed twist, work the collar in metallic or sparkle-blend yarn for a 'first birthday' bottle, or add a tiny crocheted bow or flower appliqué to the collar for a girly finish. However you style it, this pattern is a forgiving canvas for color and texture experiments.

There's something so satisfying about watching this little bottle take shape round by round — the Top/Collar builds up first with its gentle curves, and then the Bottle section joins in to complete that classic silhouette. I love that the pattern uses super bulky yarn for the body, which means the stitches work up fast and the plush texture feels irresistibly soft in your hands. But my favorite part is the embroidery finish: sewing that vertical backstitch line up the body between the rounds, then adding the alternating 2-stitch and 1-stitch measurement marks, transforms it from 'cute stuffed shape' into 'unmistakably a baby bottle.' It's a small technique, but it makes the whole project feel polished and intentional. This is a wonderful pattern if you want a quick, meaningful handmade gift without committing to a full amigurumi doll or animal. Plus, the color options are endless — swap the cream for pink or blue, or keep it neutral, and you've got a piece that fits any baby shower theme. It's simple enough to finish in a weekend but detailed enough to feel special.
Common mistakes

  • Pulling the backstitch embroideryKeep your tension relaxed as you stitch — the pattern specifically warns that pulling too tight will sink the black yarn into the fluffy super bulky texture and hide your careful detailing. Stitch loosely and check your work from a distance after each pass.
  • Losing track of where the vertical linePlace removable stitch markers at the round 27/26 boundary and the round 19/18 boundary before you begin embroidering, so you have clear visual anchors to sew between.
  • Overstuffing the Bottle section beforeStuff firmly but evenly, checking that the opening edge of the Bottle section still lies flat before you begin stitching it to the collar — add fiberfill gradually and test the fit as you go.
  • Using a hook size that doesn't matchStick with the recommended 6mm hook for the cream super bulky body yarn; if your stitches look loose, drop down half a size until the fabric feels dense enough to hide the fiberfill.
  • Skipping a color-change planWeave in ends as you go and carry or cut yarn cleanly at transition rounds so the color-change round stays neat and doesn't create bulky knots inside the finished piece.

The rounds, in full

Written out, round by round

Intermediate4-6 Hours6 mmSuper Bulky

Materials

Everything this one takes, in the order you will reach for it.

  • 6mm crochet hook
  • Super bulky (6) yarn Cream (Pink/Blue/Or Others)
  • White Yarn
  • Worsted (4) black yarn
  • Fiberfill
  • Tapestry needle
  • Scissors

keep this to hand

Abbreviations

US crochet terms, as used in this pattern.

  1. chchain
  2. ststitch
  3. stsstitches
  4. sl stslip stitch
  5. scsingle crochet
  6. hdchalf double crochet
  7. dcdouble crochet
  8. incincrease
  9. decdecrease
  10. mrmagic ring
  11. bloback loops only
  12. flofront loops only

Top/Collar

Start with cream color yarn

  1. Round 16 sc in MR (6)
  2. Round 2[sc, inc] x 3 (9)
  3. Round 3-4sc all around, for 2 rounds. (9)
  4. Round 5[sc, dec] x 3 (6)
  5. Round 6FLO inc x 6 (12)
  6. Round 7[inc, sc, inc] x 4 (20)
  7. Round 8[inc, 3 sc, inc] x 4 (28)
  8. Round 9[3 sc, inc] x 7 (35)Change to pink/blue/or any other main color for the collar
  9. Round 10FLO sc all around (35)
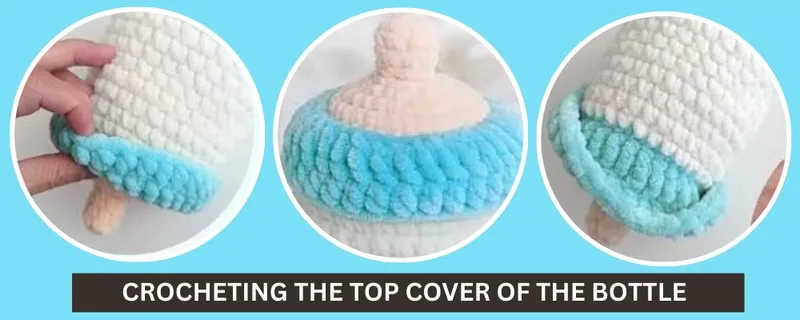
  10. Round 11Ch 2 (not counted as st), dc all around, end with a slst to the first stitch to level out the row, this does not count as a st. (35)
  11. Round 12Ch 1, hdc all around, end with slst to the first stitch to level out the row, fasten off and cut the yarn. Hide the yarn tail in the piece. (35)

Using white yarn to make the bottle

  1. Round 13Start with a slip knot on the hook, attach to the BLO <of R10 to sc all around. Make sure you are working on the outside of the piece, meaning your hook is going from the outside toward the inside.

You are working on the underside of the collar. Once you are done, the collar should wrap on the outside of the bottle.

Bottle

  1. Round 14-27sc all round, for 14 rounds. (35)

You can make more or fewer rounds, depending on how tall you want the bottle to be. The next 4 rounds will be the same to close the piece.

  1. Round 28BLO [3 sc, dec] x 7 (28) Stuff as your go.
  2. Round 29[2 sc, dec] x 7 (21)
  3. Round 30[sc, dec] x 7 (14)
  4. Round 31Dec x 7 (7) Stuff the piece well before closing. Fasten off and cut the yarn. To close the remaining gap, use a tapestry needle to take the yarn tail through the front loops of the last 7 sts and then pull tight to closeMeasurement Lines Using black yarn, starting between R27 and R26, sew a vertical line up the body of the bottle using a backstitch to between R19 and R18. Do not pull the yarn too tight, or else it might disappear among the fluffy yarn! Sew increment lines horizontally along the vertical line, alternating between 2 st wide and 1 st wide in length.

Important notes

Note 01

💡 Use a 6mm hook for the super bulky cream body yarn to keep stitches tight enough that fiberfill won't peek through.

Note 02

💡 Place stitch markers at the start of each round throughout both the Top/Collar and Bottle sections — with 12 and 5 rounds respectively, it's easy to lose your place.

Note 03

💡 Stuff the piece firmly but in small amounts at a time, especially near the collar, so the rounded shape stays smooth rather than lumpy.

Note 04

💡 When embroidering the measurement line, work with worsted weight black yarn (not the bulky body yarn) so the marks stay crisp and don't overwhelm the design.

Note 05

💡 Test your backstitch tension on a scrap swatch first if you're new to embroidering on amigurumi — this helps you find the sweet spot before committing to the visible front of the bottle.

Note 06

💡 Weave in all ends securely with a tapestry needle, especially around the white nipple section, since this small area gets handled most when the piece is used as a gift or toy.

More photos

FAQs

Asked on the glider

the ones that come up on the glider

What yarn weight works best for this baby bottle amigurumi?

The pattern calls for super bulky (6) yarn for the cream body and worsted (4) black yarn for the embroidery, plus white yarn for the nipple section. Sticking to these weights with a 6mm hook keeps the proportions and stitch density correct.

Can I make this pattern without doing the backstitch embroidery?

Yes, you can absolutely skip the measurement line embroidery if you prefer a simpler look — the bottle will still read clearly as a baby bottle thanks to its shape and collar. However, the embroidery is what gives it that authentic 'measurement marking' detail, so it's worth trying if you have the patience.

How much fiberfill do I need for this project?

The exact amount isn't specified, but plan for a generous handful given the super bulky yarn and rounded shape of both the Top/Collar and Bottle sections. Stuff firmly in small amounts to avoid lumps and keep the silhouette smooth.

Is this pattern good for beginners?

Yes — the designer notes this pattern's ease of creation makes it perfect for beginners looking to crochet a meaningful, handmade gift. The backstitch measurement line is the trickiest part, but it's a forgiving technique that improves with practice.

Can I change the color of the bottle body?

Definitely — the source materials list mentions cream, pink, or blue as color options, so you can easily match the bottle to a specific baby's gender or nursery theme. Any super bulky yarn in your color of choice will work with the same 6mm hook.