Intermediate 4-6 Hours Worsted yarn

Worked on the glider, counted out loud —

Crochet Baby Bib and Pacifier Clip Set Pattern

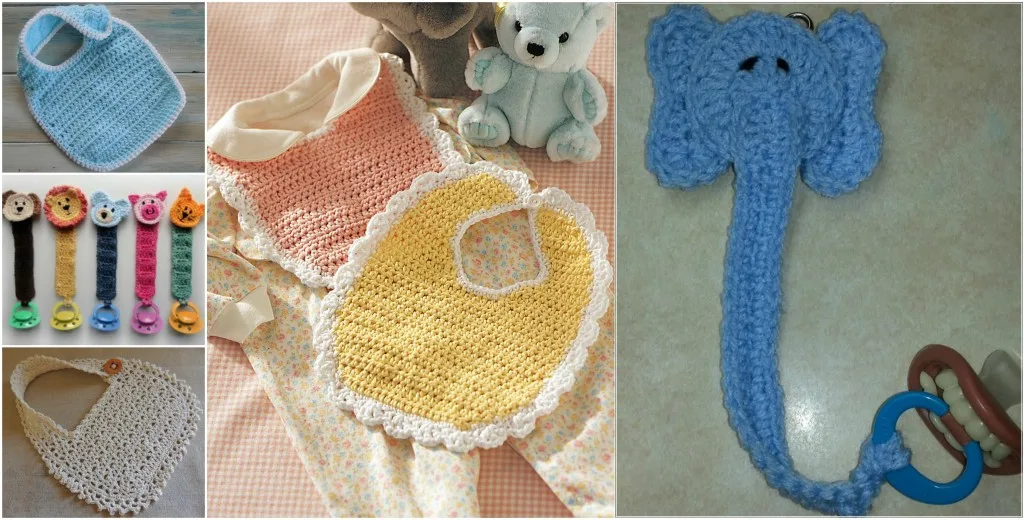
Make an adorable crochet baby bib and pacifier clip set with this easy pattern featuring a shaped neckline, sturdy edging, and quick fastener finish.

Jump to the rounds

Before you sit down

Start by crocheting the foundation chain that sets the width for the baby bib's main body.

Work the main body over two rounds to build the flat base fabric of the bib.

Shape the neckline gradually across three rounds so it curves gently for a baby's neck.

Finish the bib edges and add the fastener over two rounds for a clean, secure closure.

Weave in all loose ends on the bib before moving on to the pacifier clip.

Crochet the small pacifier clip piece separately using the same cotton yarn for a matching set.

Attach the plastic or wooden clip hardware securely to the finished crochet piece with sturdy thread.

Give both pieces a final check for loose ends and secure stitching before gifting or using.

What this one is

This crochet baby bib and pacifier clip duo is the kind of pattern that makes you want to grab every color of cotton yarn in your stash. The bib features a shaped neckline and a finished edge with fastener, while the matching pacifier clip keeps that beloved binky from ever hitting the floor. It's a lovely project for anyone with a baby on the way, a new niece or nephew to spoil, or a friend's baby shower coming up on the calendar.

Technique-wise, you'll work the main body flat, then shape the neckline over a few rounds before finishing with a clean edging and fastener. It's a great intermediate project — nothing too tricky, but enough shaping to keep your brain engaged and your stitch count honest. Because both pieces are so small, expect to finish the whole set in a single cozy afternoon or evening, even if you're chatting on the phone or half-watching a show while you stitch.

The finished bib sits soft and snug against a little neck, sized just right for tiny shoulders, while the pacifier clip adds a playful, practical touch that doubles as an accessory. Made in washable cotton, the whole set feels sturdy but gentle against baby skin. Stitch it up in a set of three coordinating colors and you've got yourself one seriously adorable, thoughtful baby shower gift that looks far more impressive than the time it actually took to make.

Variations

The easiest way to make this set your own is through color. Try a classic gender-neutral palette like 24/7 Cotton in Mustard, Sage, and Cream, or go bold with Sugar 'n Cream Sunshine and Sailor Blue stripes worked in as you complete each round of the main body. For a monogrammed feel, work the bib in a solid neutral like oatmeal or dove gray, then use a contrasting color just for the edging and fastener round so the finished trim really pops against the body. If you want to resize the bib for an older baby or toddler, add extra foundation chain stitches in multiples of your working repeat before starting the main body, and add one extra round to both the main body and neckline shaping sections to compensate for the larger circumference — just be sure to check your gauge swatch first so the neckline still curves smoothly. For a smaller preemie-size bib, simply remove a few chains from the foundation and drop one round from the main body. Seasonal and themed versions are so much fun here too: work the bib in soft pastel pink or blue for a traditional shower gift, or go with a woodland vibe using a mossy green and rust color combo. You could also skip a solid pacifier clip and instead alternate two colors every round for a candy-stripe effect. For yarn substitutes, any smooth worsted-weight cotton blend will behave well here — just avoid fuzzy or highly textured yarns, since they can obscure the clean lines of the neckline shaping and edging detail that make this pattern so charming.

I adore this pattern because it proves small projects can pack a big cuteness punch. Shaping the neckline over those three rounds is genuinely satisfying — you can watch the bib take real form right in your hands, curving exactly where a tiny neck needs it to. Then adding the edging and fastener in the final two rounds feels like putting the bow on a present; suddenly this flat little piece of cotton becomes something a baby will actually wear. The pacifier clip is the perfect companion project too, quick enough to whip up while your coffee's still hot, but useful enough that parents will genuinely reach for it every single day. I love that this whole set uses sturdy worsted cotton and a simple G/6 hook, so there's no fussing with slippery fibers or tiny hooks. It's the kind of make that feels productive and joyful at once — practical, giftable, and just plain sweet. Honestly, once you finish your first bib, don't be surprised if you find yourself reaching for a new color to start another one immediately.
Common mistakes

  • Starting the foundation chainKeep tension even by holding the chain close to the hook as you work, and consider going down half a hook size just for the foundation chain if your chains tend to run loose.
  • Miscounting stitches while shapingPlace a stitch marker at the start of each neckline round and count your stitches before moving to the next round so both sides shape evenly and symmetrically.
  • Working the edging round too tightlyWork the edging stitches with a slightly looser tension around the curved neckline area specifically, adding an extra stitch or two if the fabric starts to cup inward.
  • Skipping a gauge check before startingWork a small swatch with your chosen G/6 hook and cotton yarn first, and compare your stitch and row measurements to the pattern's expected finished size before diving into the full main body.
  • Sewing or attaching the fastener beforeWeave in all ends immediately after finishing each pattern part — main body, neckline, and edging — before moving on, so nothing gets buried or forgotten.
  • Attaching the pacifier clip's clipUse a strong sewing thread or a small length of the same cotton yarn to whip-stitch the clip securely in place, going around at least twice for durability.

The rounds, in full

Written out, round by round

Intermediate4-6 Hours4 mmWorsted

Materials

Everything this one takes, in the order you will reach for it.

Yarn

  • Soft, washable cotton yarn in your preferred colors.

Crochet Hook

  • Size G/6 (4 mm) for a tight, sturdy fabric.

Scissors

  • For cutting the yarn.

Tapestry Needle

  • For weaving in ends.

Pacifier Clip

  • A clip to attach to the pacifier holder.

Button

  • For fastening the bib.

keep this to hand

Abbreviations

US crochet terms, as used in this pattern.

  1. scsingle crochet
  2. sc2togsingle crochet 2 stitches together (decrease)
  3. chchain

1. Create the Foundation Chain

Start by making the foundation chain for the baby bib.

Foundation Chain:

  1. Foundation ChainChain (ch) 30 ( or the number needed for your desired width).

2. Work the Main Body

Crochet the main body of the bib using basic stitches.

  1. Round 1Single crochet (sc) in the second chain from the hook and in each chain across. Turn.
  2. Round 2-20Chain 1 , sc in each stitch across. Turn.

3. Shape the Neckline

Create the neckline by decreasing stitches.

  1. Round 21Chain 1 , sc in the first 10 stitches, leave remaining stitches unworked. Turn.
  2. Round 22Chain 1 , sc2tog (single crochet two together), sc across to the last 2 stitches, sc2tog. Turn.
  3. Round 23-26Repeat Row 22 until 4 stitches remain.
  4. Round 27-30Chain 1 , sc in each stitch across. Turn. Finish off and weave in ends .

4. Add Edging and Fastener

Finish the bib with a neat edging and add a button for fastening.

Edging:

  1. Round 1Single crochet evenly around the edges of the bib, working 3 sc in each corner. Join with slip stitch to the first sc.
  2. Round 2Chain 1 , sc in each stitch around . Join with slip stitch to the first sc.Sew a button onto one end of the neckline. Create a button loop on the opposite end by chaining 5 and attaching with a slip stitch.

Fastener:

Pacifier Clip: 1. Create the Foundation Chain

Begin the pacifier clip with a foundation chain.

Foundation Chain:

  1. Foundation ChainChain (ch) 50 ( or the length needed to reach from the baby 's clothing to their mouth).

Pacifier Clip: 2. Work the Strap

Crochet the strap using a simple stitch pattern for durability.

  1. Round 1Single crochet (sc) in the second chain from the hook and in each chain across. Turn.
  2. Round 2-3Chain 1 , sc in each stitch across. Turn. Finish off and weave in ends .

Pacifier Clip: 3. Attach the Clip and Pacifier Holder

Secure the clip to one end and create a loop for the pacifier on the other.

Clip End:

Fold one end of the strap around the pacifier clip and sew securely.

Pacifier Loop:

Fold the opposite end of the strap to create a small loop and sew in place, ensuring it can hold the pacifier firmly.

Important notes

Note 01

💡 Use a Size G/6 (4 mm) hook exactly as specified — this size gives the cotton yarn enough structure to hold its shape without becoming stiff or scratchy against baby's skin.

Note 02

💡 Choose a soft, washable cotton yarn since bibs get spit-up, drool, and frequent trips through the wash; cotton also holds crisp stitch definition through the neckline shaping.

Note 03

💡 Place a stitch marker at the beginning of each round throughout the main body and neckline shaping sections so you never lose track of where a new round starts.

Note 04

💡 When adding the edging and fastener in the final section, work slowly around any curves so the trim lies flat rather than rippling or puckering.

Note 05

💡 Always attach pacifier clip hardware securely with sturdy thread or yarn, checking it periodically since this piece will see the most handling and pulling during daily use.

Note 06

💡 Weave in ends as you complete each pattern part rather than waiting until the very end — it's much easier to manage loose tails before the fastener is attached.

FAQs

Asked on the glider

the ones that come up on the glider

What size hook and yarn work best for this bib and pacifier clip set?

A Size G/6 (4 mm) hook paired with a soft, washable worsted-weight cotton yarn gives the best results. This combination creates a tight, sturdy fabric that holds up well to regular washing and daily baby use.

How long does it take to make the whole set?

Since both pieces are quite small, most crocheters can finish the bib and pacifier clip together in about 4-6 hours. It's a great weekend project or a couple of relaxed evening sessions.

Is this pattern good for beginners?

It's best suited for confident beginners or intermediate crocheters, since the neckline shaping across three rounds requires some comfort with stitch counting and shaping. If you've made a hat or amigurumi before, you'll manage this just fine.

Can I wash the finished bib and pacifier clip?

Yes, as long as you use a washable cotton yarn as recommended, both pieces can go through a gentle wash cycle. Just be sure the clip hardware is securely attached with strong thread before laundering.

What kind of clip should I use for the pacifier holder?

A standard plastic or wooden pacifier clip with a flat attachment tab works best, sewn securely onto the finished piece with sturdy thread. Avoid metal clips with sharp edges since this will be near a baby's face.