Petal
Into the same stitch, work (hdc, dc, tr, dc, hdc). This forms a single curved petal lobe.
Pattern Notes Before You Begin
1. The mesh center panel is worked flat in rows. The border is then worked in joined rounds around the entire perimeter.
2. Corner stitches increase by 3 dc in each corner to keep the piece flat.
3. Roses and leaves are made entirely separately and pinned into position before sewing.
4. Do not pull the turning chain too tightly. The chain-3 turning chain counts as the first dc throughout the mesh section.
5. All yarn ends should be woven in securely on the wrong side before blocking. Leave the tails on roses and leaves for sewing.
6. Stated finished dimensions are after wet blocking.
Crochet Pattern Instructions: Mesh Center Panel Foundation Chain Using MC and your G-6 hook, chain 111.
- Round 1(RS) Dc into the 6th chain from the hook (this counts as dc, ch-2, dc for the first mesh). Ch 2, skip 2 ch, dc into next ch. Repeat from to across to the end. Turn. (36 mesh squares)Your foundation chain of 111 produces: 4 skipped chains for beginning plus 1 dc in 6th chain equals first mesh, then (ch 2, skip 2, dc) 35 times equals 35 more meshes. Total equals 36 mesh squares. Check that you end with a dc into the last chain.
- Round 2Ch 5 (counts as dc plus ch 2), turn to WS. Dc into next dc. Ch 2, dc into next dc. Repeat from to across, ending with dc into top of turning chain. Turn. (36 mesh squares)Rows 3 through 43 Repeat Row 2. Turn after each row. (36 mesh squares per row) Work a total of 43 rows of mesh including Row 1. After Row 43, do not fasten off. Proceed to border.Checkpoint: After completing Row 43, the mesh panel should measure approximately 9 inches wide by 35 inches long when blocked flat with light pinning. If your piece is shorter or longer, adjust the number of rows before proceeding.
Border Instructions
The border is worked in rounds around the perimeter of the completed mesh panel. Do not turn at the end of rounds. Join each round with a slip stitch to the first stitch.
Foundation
Ch 12.
- Round 1(RS) Sc into 2nd ch from hook, hdc into next ch, dc into next 3 ch, hdc into next ch, sc into next ch, hdc into next ch, dc into next ch, (dc, ch 2, dc) into the last ch (this is the leaf tip).Now working back along the opposite side of the foundation chain: dc into next ch, hdc into next ch, sc into next ch, hdc into next ch, dc into next 3 ch, hdc into next ch, sc into last ch. Join with sl st to first sc. Do not turn.Fasten off, leaving a 10-inch (25.5 cm) tail for sewing. The finished leaf should measure approximately 2.25 inches long and 0.75 inch wide.
Leaf tip: If you want a slightly wider leaf, begin with ch 14 and add one additional dc on each side of the central section. Swatch one leaf to check size against your roses before making all 30.
Assembly and Finishing Blocking the Base
Before attaching any roses or leaves, wet block the completed runner base. Soak in cool water for 15 minutes, gently squeeze out excess water without wringing, lay flat on a blocking mat, pin to 14 by 40 inches, and allow to dry completely. This ensures the mesh opens correctly and the border lies flat.
Rose Placement Layout
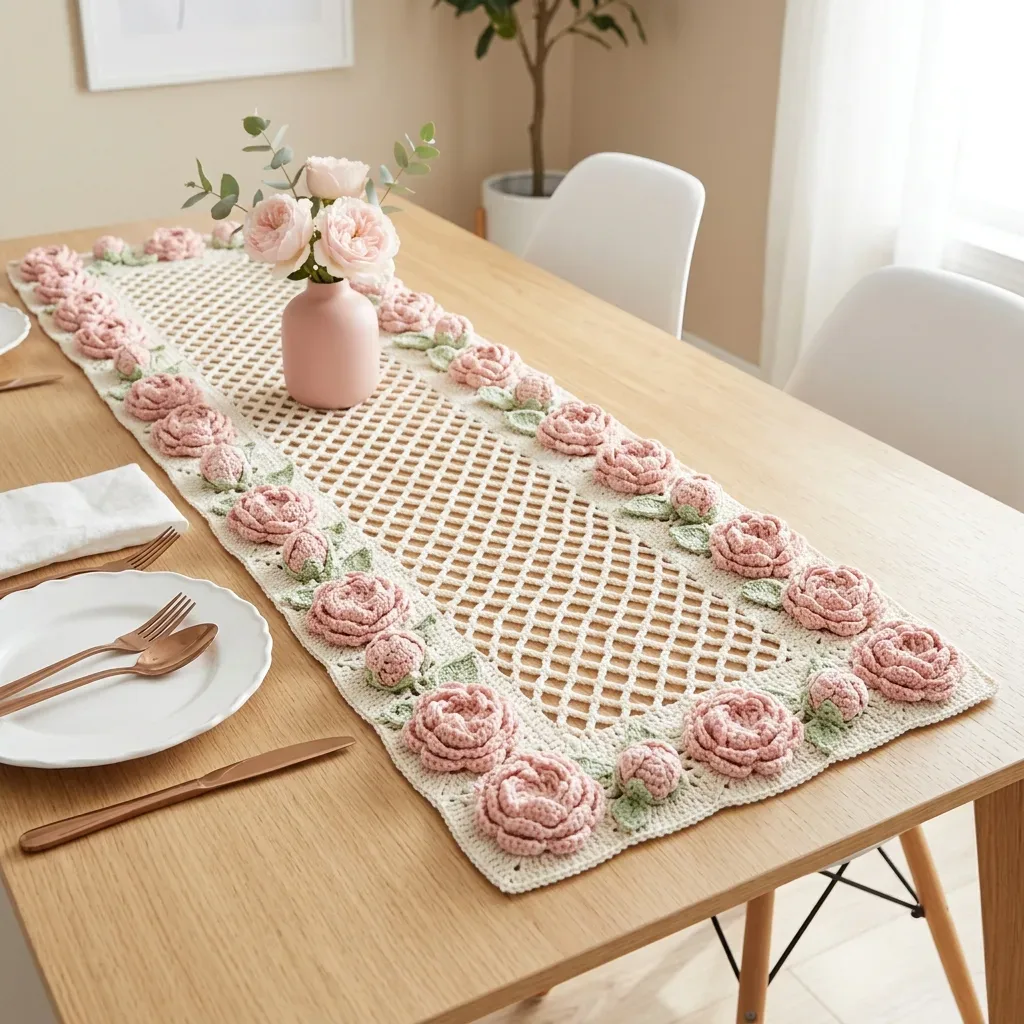
The roses are arranged in a continuous border around the perimeter, sitting on top of the crocheted border.
Along each long side (40-inch sides): Place 8 roses per side, evenly spaced approximately 4.5 inches apart from center to center.
Along each short end (14-inch ends): Place 4 roses per end, evenly spaced approximately 3.25 inches apart from center to center.
Corner treatment: At each of the 4 corners, place 1 rose so it sits squarely at the corner, bridging the long-side and short-end rows.
Total roses: 8 plus 8 plus 4 plus 4 equals 24 along the edges, plus 2 additional roses can be placed at the center of each short end for a fuller look. Adjust quantity as your design preference dictates.
Leaf Placement
Place one leaf beside each rose, positioned so the leaf tip points slightly outward from the center of the runner. At corner roses, angle the leaf diagonally outward. The 4 accent corner leaves are placed at 45-degree angles for extra fullness.
Sewing On Roses and Leaves
Pin all roses and leaves in place before sewing any of them down. Step back and look at the overall layout. When satisfied, thread the 12-inch tail of each rose onto a yarn needle and sew the base of the rose securely to the border fabric using several small stitches in a circular pattern around the base.
Do the same for each leaf, sewing down the bottom 0.5 inch of the leaf stem to the border while leaving the rest of the leaf free for a natural dimensional quality.
Final Blocking
After all roses and leaves are attached, lightly mist the finished piece with water and pat the roses and leaves into their final positions. Do not fully submerge the piece after assembly since this may distort the roses. Allow to air dry flat.
Size Customization Tips
To make a shorter runner: Reduce the number of rows in the mesh panel in increments of 3 rows. Each group of 3 rows removed shortens the piece by approximately 2.5 inches. Adjust the number of roses along the long sides accordingly.
To make a longer runner: Add rows in increments of 3. Add 2 roses per additional 9 inches of length.
To make a wider runner: Increase the foundation chain by multiples of 3 chains. Each group of 3 chains adds approximately 0.75 inch of width. Add extra roses along the short ends as needed.
To make a matching placemat: Work a mesh panel of 12 mesh squares wide by 16 mesh squares tall, add 3 rounds of border, and decorate with 6 roses and 6 leaves.
Care Instructions
Hand wash in cool water with a gentle detergent formulated for delicates or cotton. Lay flat to dry, reshaping the border roses gently while damp. Do not place in a clothes dryer since heat and agitation will distort the three-dimensional roses and may cause cotton to shrink. Do not dry clean. Store flat or loosely rolled to prevent permanent creasing of the dimensional flowers. Iron on the reverse side only on a low cotton setting if the base fabric needs pressing, taking care to avoid flattening the roses.
You Did It!
This blush pink peony floral table runner crochet pattern is definitely a labor of love. But when you drape it across your dining table and see those dimensional roses catching the light, you will understand why every stitch was worth it. This is the kind of piece that becomes a family heirloom, something guests notice and ask about, something that makes ordinary dinners feel special.
Thank you so much for choosing this pattern for your next project. I would absolutely love to see your finished runner! Tag me on Instagram or share a photo in my Facebook group. Seeing your beautiful work is honestly the best part of sharing these patterns.
If this pattern caught your eye, go ahead and save it to your Pinterest boards so you can find it when you are ready to start. And if you make this runner, please drop a comment below. I would love to hear how it turned out and see which colors you chose for your roses!